
Blog
Your complete guide to matching door trims at home

Jun
TL;DR:
- Matching door trims with appropriate profiles, sizes, and finishes enhances a room’s overall appearance and perceived quality. Proper measurement, consistent profiles, and durable materials like solid brass are essential for professional-looking results that increase property value. Accurate installation and careful selection of finishes ensure a cohesive, long-lasting interior design.
A guide to matching door trims is the difference between a room that looks professionally finished and one that feels slightly off, no matter how good the furniture or paint colour. Door casing, the industry term for the moulding that frames a door opening, does far more than cover the gap between the frame and the wall. It sets the architectural tone of a room, ties together your skirting boards, doors, and walls, and signals the quality of the whole interior. Get it right and every room feels considered. Get it wrong and something always looks out of place.
How to use this guide to matching door trims effectively
Before you buy a single length of casing, you need to understand what you already have. Door casing should complement your home’s architectural style and relate in width and profile to your skirting boards. That relationship is the foundation of every good trim decision.
Measure your existing trims first
Start with a measuring tape and a smartphone camera. Measure the width of your current door casing at its widest point, then measure the height of your skirting boards. Write both figures down. A general rule is that skirting boards sit roughly 25mm shorter than the door casing to maintain a clear visual hierarchy. If your skirting is 95mm tall, your door casing should be around 120mm wide.
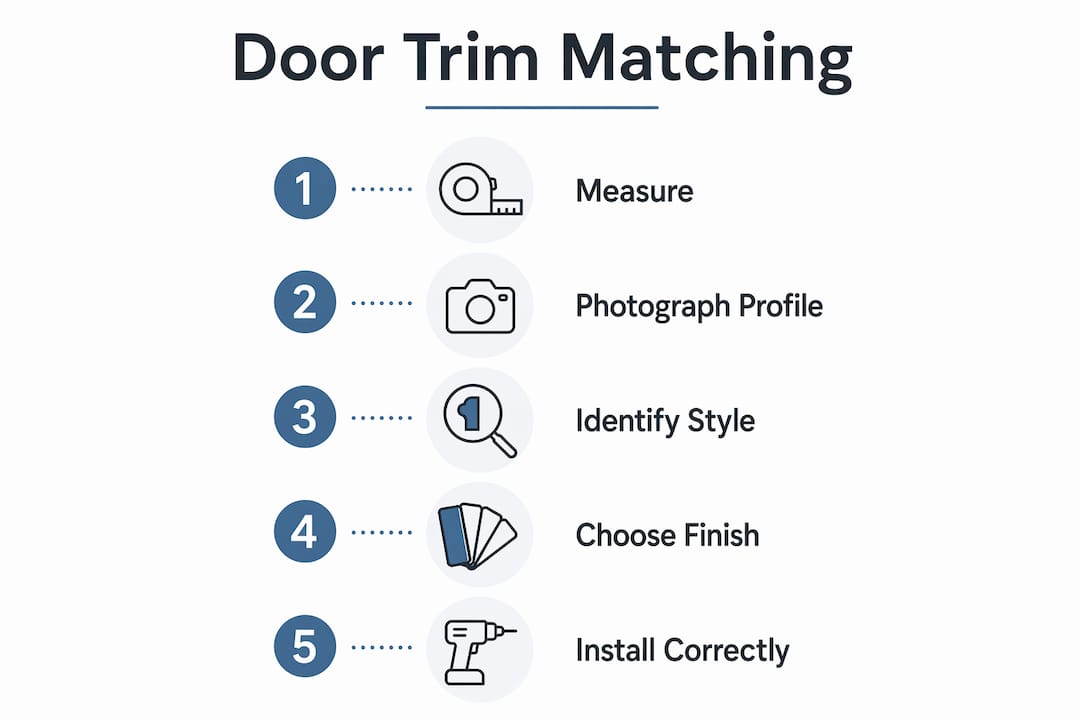
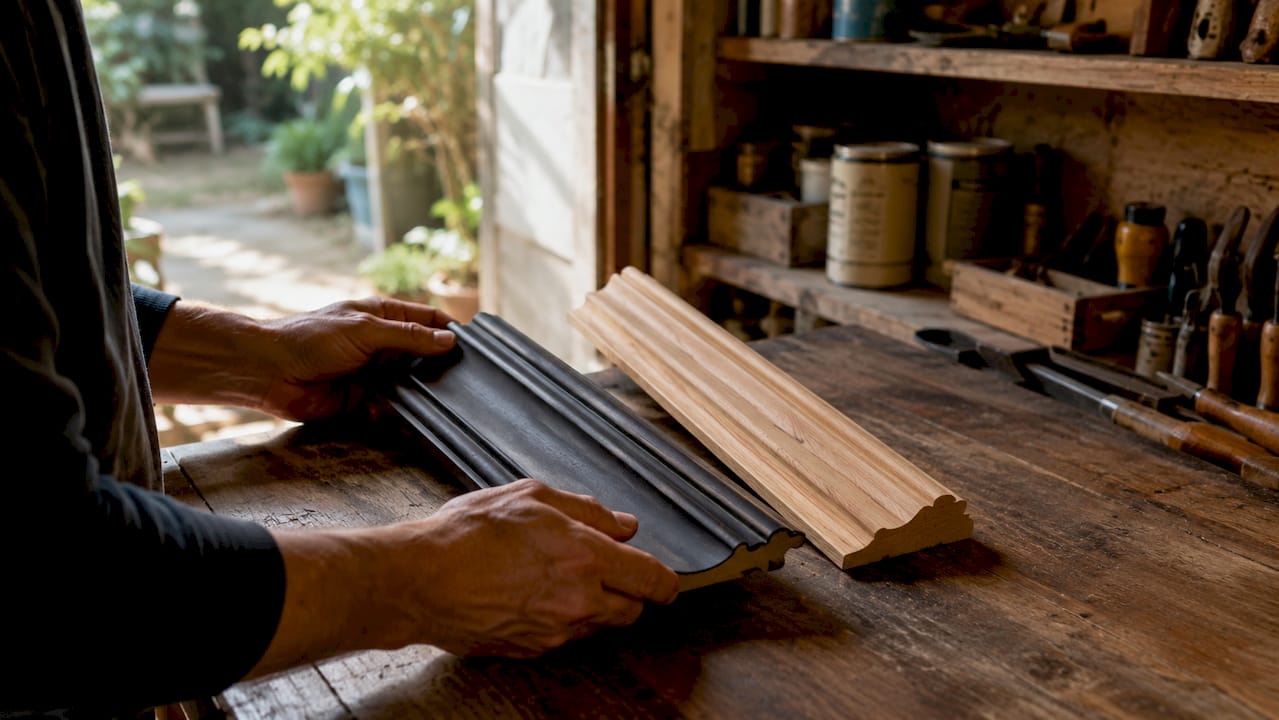
Next, photograph the profile of your existing trim from the side. A profile gauge, available from most DIY retailers, presses against the moulding and captures its exact shape. This is the tool that solves the single biggest matching problem: finding a new trim that fits an existing style.
Identify your architectural style
The profile you choose must suit the building. Victorian and Edwardian homes suit ogee or ovolo profiles with layered detail. Modern new builds call for flat, square-edged casing with minimal decoration. Georgian properties often use bolection or chamfered profiles with bold proportions.
- Victorian and Edwardian: ogee, ovolo, or staff bead profiles, typically 100–120mm wide
- Georgian: bolection or chamfered profiles, often 120–150mm wide
- Modern and contemporary: flat or pencil-round profiles, 60–90mm wide
- Cottage or farmhouse: simple torus or ovolo profiles, 80–100mm wide
Pro Tip: Take a physical sample of your existing trim to any supplier rather than relying on a photo alone. Profiles that look identical in photographs can differ by several millimetres in depth, which creates a visible step when two pieces meet.
How do you choose the right door trim style and finish?
Choosing the right profile is only half the decision. The finish determines whether your door trim reads as a deliberate design choice or an afterthought.
Consistent trim profiles throughout the interior create a unified design language. Mixing profiles between rooms, or between the door casing and skirting board in the same room, produces a disjointed look that no amount of paint can fix.
Matching versus contrasting finishes
Most British homes use white or off-white paint on all trims, which is a safe and effective approach. The trim reads as a neutral frame and the door colour becomes the feature. A contrasting approach, where the trim is painted the same colour as the wall and the door is a bold colour, works well in contemporary interiors but requires precise colour selection.
| Approach | Best for | Finish to use |
|---|---|---|
| White trim, coloured door | Traditional, Victorian, Edwardian | Satin or semi-gloss paint |
| Trim matches wall colour | Contemporary, minimalist | Satin paint in wall colour |
| Trim matches door colour | Farmhouse, cottage | Satin or eggshell |
| Metallic or brass trim finish | All styles, luxury finish | Powder-coated solid brass |
Why solid brass trims outperform cheaper materials
Wooden trims split along the grain when humidity changes. Plastic trims dent, discolour, and look cheap within a few years. Rubber trims lose their shape. Solid brass trims with powder-coated finishes resist all of these problems. Luxury solid brass trims with powder-coated finishes provide superior durability, resisting splitting, bending, and denting that are common in cheaper alternatives. That durability is not just structural. A powder-coated brass finish holds its colour and sheen for years without repainting.
Qualitycarpettrims supplies solid brass door bars hand-finished in 10 luxury powder-coated colours. Each finish is designed to coordinate with popular interior palettes, from warm antique brass to cool satin chrome tones.
Pro Tip: Order a free sample before committing to a finish. Powder-coated colours photograph differently on screen than they appear in person under natural light.
What are the best installation steps for a professional finish?
Precise installation is what separates a trim that looks fitted by a professional from one that looks like a weekend project. The most common mistake is skipping the reveal marking step.
A consistent reveal of about 3mm around the casing improves the finished appearance and prevents a crooked look even when cuts are accurate. The reveal is the small gap between the edge of the door frame and the inner edge of the casing. Mark it with a pencil before you cut anything.
- Mark the reveal line. Use a combination square set to 3mm and run a pencil line around all three sides of the door frame. This is your guide for positioning the casing.
- Measure and mark the head casing first. The horizontal piece at the top sets the mitre angles for both side pieces. Measure the distance between the two reveal lines at the top and add the width of two casing pieces for your cut length.
- Cut your mitres at 45 degrees. Use a mitre saw for accuracy. Cut the head casing first, then hold it in position and mark the side casings directly from it rather than from a tape measure.
- Tack before nailing permanently. Use shorter panel pins to tack the casing in place and check the reveal is consistent before driving longer nails into the studs. This lets you adjust without splitting the trim.
- Fill and finish. Use a fine filler for any small gaps at the mitre joints. Minimal caulking is the mark of accurate carpentry. Heavy caulking signals poor fitting, not neat finishing.
- Paint with the right sheen. Semi-gloss or satin finish is the professional standard for door trims. It is more durable and easier to clean than flat paint, and it holds up to the knocks a door frame receives daily.
Pro Tip: Always prime bare wood or filler before applying your topcoat. Skipping primer causes the paint to absorb unevenly, which shows up as patchy sheen under raking light.
What are the most common door trim problems and how do you fix them?
Even careful work throws up problems. Knowing what to expect means you can solve issues quickly rather than starting over.
- Discontinued profiles. If your existing trim profile is no longer manufactured, bring a physical sample or clear photos with measurements to your supplier. Most specialist suppliers can identify the closest current match or arrange custom milling. In some cases, replacing all trims in a connected space is more practical than hunting for a single matching length.
- Uneven reveals. If the reveal wanders, the mitre joints will not close properly even with accurate cuts. Remove the casing, re-mark the reveal line, and refit. There is no shortcut here.
- Gaps at mitre joints. Small gaps at 45-degree joints are normal as timber moves with humidity. Fill with a flexible decorator’s filler and repaint. Large gaps indicate the mitre angle was wrong or the reveal was inconsistent.
- Paint tone mismatch. Higher sheen levels highlight undertone shifts between different paint batches. Always use paint from the same batch for all trims in a room, and keep a note of the exact colour reference for future touch-ups.
- Trim that looks too thin or too wide. This is almost always a proportions problem. Casing width and height should be proportional to the skirting boards. If the trim looks wrong, measure both and check the ratio before buying replacements.
Does matching door trim actually affect property value?
Door trims frame interior doors and contribute significantly to room balance. Consistent trim style and finish across a property signals quality and attention to detail to buyers, surveyors, and estate agents alike.
The effect is cumulative. One well-trimmed door in an otherwise inconsistent interior does little. But when every door in a property shares the same profile, finish, and reveal width, the whole house reads as considered and well-maintained. That perception influences both sale price and the speed at which a property sells.
“Coordinating door hardware, finish, and trims upgrades overall home appeal in a way that individual upgrades rarely achieve on their own.”
Solid brass trims with powder-coated finishes contribute to this perception in a way that wooden or plastic alternatives cannot. The finish does not fade, chip, or require repainting every few years. The structural integrity of brass means the trim holds its shape at the corners and along the length, which is where cheaper materials fail first.
For anyone choosing trims for a renovation, the material choice is a long-term decision. A trim fitted once and never replaced adds genuine value. A trim that needs replacing every five years adds cost and disruption.
Key takeaways
Matching door trims correctly requires consistent profiles, proportional sizing, and a finish that holds its quality over time.
| Point | Details |
|---|---|
| Measure before you buy | Record casing width and skirting height to get proportions right from the start. |
| Match profiles throughout | Consistent profiles across all rooms create a unified interior rather than a disjointed one. |
| Mark reveals before cutting | A 3mm reveal line marked in pencil prevents crooked casing and misaligned mitres. |
| Choose solid brass for longevity | Brass trims with powder-coated finishes resist splitting, bending, and denting that affect cheaper materials. |
| Use satin or semi-gloss paint | Higher sheen finishes on trims are more durable and easier to clean than flat wall paint. |
Why i think most people get door trims wrong from the start
Most DIYers focus on the door itself and treat the trim as an afterthought. That is the wrong order of thinking. The trim is the frame, and frames define how we perceive what is inside them. A beautiful door in a poorly fitted or mismatched casing looks worse than a plain door in a well-fitted one.
The mistake I see most often is buying trim by width alone without checking the profile. Two casings can be identical in width and look completely different on the wall because one has a deep ogee and the other is flat. Always check the profile against what you already have.
The second mistake is over-caulking. A lot of caulk usually indicates poor installation precision. I have seen jobs where the mitre joints were filled with a thick bead of caulk painted over to hide the gap. It looks fine in photographs and terrible in person. Fit the trim accurately and use caulk only for the hairline gaps that remain after good carpentry.
My strongest advice for anyone renovating is to invest in solid brass trims with a powder-coated finish rather than reaching for the cheapest option. Wooden trims split. Plastic trims dent and yellow. Brass trims look as good in ten years as they do on the day they are fitted. That is not a luxury consideration. It is a practical one.
— Matt
Upgrade your home with solid brass door trims
If this article has shown you anything, it is that the material and finish of your door trim matters as much as the profile and the fitting.

Qualitycarpettrims supplies solid brass door threshold bars and finishing trims hand-finished in 10 luxury powder-coated colours. Every trim is British-made, solid brass throughout, and built to resist the bending, denting, and splitting that affects cheaper alternatives. Whether you are renovating a Victorian terrace or finishing a modern new build, the range covers the profiles and finishes to suit your interior. Browse the full collection and order free samples to see the finishes in your own home before you commit.
FAQ
What is door casing and how does it differ from skirting?
Door casing is the moulding that frames a door opening on the wall face, covering the gap between the door frame and the plaster. Skirting boards run horizontally along the base of walls and are a separate element, though the two should share a compatible profile and proportion.
How wide should door trim be relative to skirting boards?
Door casing is typically around 25mm wider than the skirting board height to maintain a clear visual hierarchy. If your skirting is 95mm, aim for casing around 120mm wide.
What is the correct reveal for door casing?
A reveal of approximately 3mm between the door frame edge and the inner edge of the casing is the professional standard. Consistent reveal lines must be marked before cutting to prevent misaligned mitres.
What paint finish should i use on door trims?
Satin or semi-gloss is the correct choice for door trims. Satin or semi-gloss finishes balance durability with visual appeal and are far easier to clean than flat paint used on walls.
How do i match a discontinued door trim profile?
Bring a physical sample or clear photographs with measurements to a specialist supplier. Most can identify the closest current equivalent or arrange custom milling. If the profile is used throughout a property, replacing all trims at once is often more practical than sourcing a single matching length.
Recommended
- The role of trims in home decor: a guide for UK homes
- Floor trim fitting guide for a professional finish
- Floor trim types explained for UK homes: A full guide
- Choosing trims for renovations: the complete guide