
Blog
Why trims matter: choosing the right finish for your renovation

May
TL;DR:
- Many homeowners overlook the importance of trims, which are essential for safety, protection, and a professional finish. Choosing the correct trim type—such as T-moulds, reducers, or thresholds—and properly installing them ensures durability, safety, and aesthetic appeal for years. Planning trims alongside flooring and avoiding common installation mistakes is vital to achieving a seamless, high-quality renovation result.
Most homeowners spend weeks selecting their flooring but give almost no thought to the trims that hold the whole installation together. That’s a costly oversight. The wrong trim, or worse, no trim at all, can turn a beautiful new floor into a trip hazard, void your product warranty, and leave raw edges that chip, fray, and deteriorate within months. Trims aren’t just the finishing touch on a renovation project. They are a functional, structural, and safety-critical component that determines whether your floors look and perform as intended for years to come.
Table of Contents
- What are trims and why are they so important in renovation?
- Different types of trims: choosing the right solution
- Installation mistakes to avoid: movement, safety and measurement
- DIY tips for a flawless trim installation
- Our take: what most homeowners miss when choosing trims
- Find your perfect trim: premium, practical, and delivered to your door
- Frequently asked questions
Key Takeaways
| Point | Details |
|---|---|
| Trims prevent trip hazards | The right trim matches the floor height difference and reduces the risk of trips. |
| Correct installation matters | Always fix trims to the subfloor or wall, not through floating flooring itself. |
| Measure and plan your purchases | Accurate planning saves money by avoiding trim wastage and last-minute shortages. |
| Choose trims for both function and style | Properly selected trims complete the look and performance of any renovation. |
What are trims and why are they so important in renovation?
At their most basic, floor trims are shaped profiles used to bridge the gap between two flooring surfaces, protect exposed edges, and create neat, safe transitions from room to room or between different floor types. You’ll find them at doorways, along skirting boards, at the edge of stairs, and wherever two different surfaces meet. Understanding flooring trim definitions properly is the first step toward a genuinely professional finish.
Their functional roles go much further than aesthetics:
- Hiding raw edges: When laminate or vinyl meets a wall or threshold, there’s always a gap. Trims cover this cleanly, preventing dust ingress and protecting the cut edge of the board.
- Accommodating expansion: Floating floors move with changes in temperature and humidity. Trims allow that movement without causing buckling or separation.
- Enhancing safety: Height differences between two floors are one of the leading causes of trip accidents in the home. A properly fitted reducer or ramp eliminates that sharp step.
- Meeting building regulations: In rental properties and certain commercial spaces, poorly transitioned floors can breach health and safety requirements.
- Preserving your investment: Without a trim protecting the cut edge of a board, that edge chips, frays, and wears far faster than the rest of the floor.
As the National Flooring Authority makes clear, trims are not just for looks—proper selection avoids trip hazards and finish failures. That’s a principle worth taking seriously before you budget for your next renovation.
The difference between a trim fitted correctly and one installed as an afterthought is visible from across the room. It affects resale value, safety inspections, and how long your floor continues to look like new.
Understanding why floor trims matter for both the practical and visual performance of your home is genuinely important, especially if you’re investing in quality flooring and want that investment to last.
Different types of trims: choosing the right solution
Not all trims are interchangeable. Using the wrong profile for the job is one of the most common mistakes in DIY flooring projects. Each trim type solves a specific problem, and selecting incorrectly will either look wrong, cause damage, or create the very hazard you were trying to avoid.
Here are the main types and what they’re designed for:
- T-moulds: Used where two floors of equal height meet, typically in a doorway. They sit centrally between both surfaces and allow movement in either direction. As the National Flooring Authority confirms, T-moulds are best for joining two floors of equal height; reducers or ramps are needed for changes in level.
- Reducers and ramps: Used where there’s a height difference between two floors, for example, where a thicker carpet meets a thinner vinyl. Without a reducer, you have a step that catches toes and heels alike.
- Scotia and beading: Quarter-round or D-shaped profiles that sit at the base of skirting boards to conceal the expansion gap around the perimeter of a floating floor. They flex slightly with the floor and prevent the gap from becoming visible.
- Thresholds: Heavier-duty profiles designed for carpet to laminate thresholds, providing a durable and often decorative transition at doorways.
- Edge trims: Used at the exposed edge of a floor where it meets a step, hearth, or other surface that has no skirting to hide behind.
| Trim type | Best use case | Key consideration |
|---|---|---|
| T-mould | Equal height doorway joins | Must allow movement in both directions |
| Reducer/ramp | Height differences between floors | Match to the height gap precisely |
| Scotia/beading | Expansion gap at skirting | Bond to wall only, never to the floor |
| Threshold bar | Carpet to hard floor transitions | Choose a durable, hand-finished metal |
| Edge trim | Exposed floor edges and steps | Must be flush and securely fixed |
Pro Tip: Before purchasing any trim, measure the height of both floors involved. If there’s any difference at all, even just a few millimetres, you need a reducer rather than a T-mould. Getting this wrong means buying again and delaying your project.
The decision doesn’t have to be complicated, but it does need to be deliberate. Think about function first: what gap does this trim need to bridge, what height difference does it need to span, and how much movement does the floor underneath require? Once you’ve answered those questions, aesthetic choices become much simpler. You can explore multi-floor transitions in detail to understand how different combinations of trim profiles work together across a whole property.
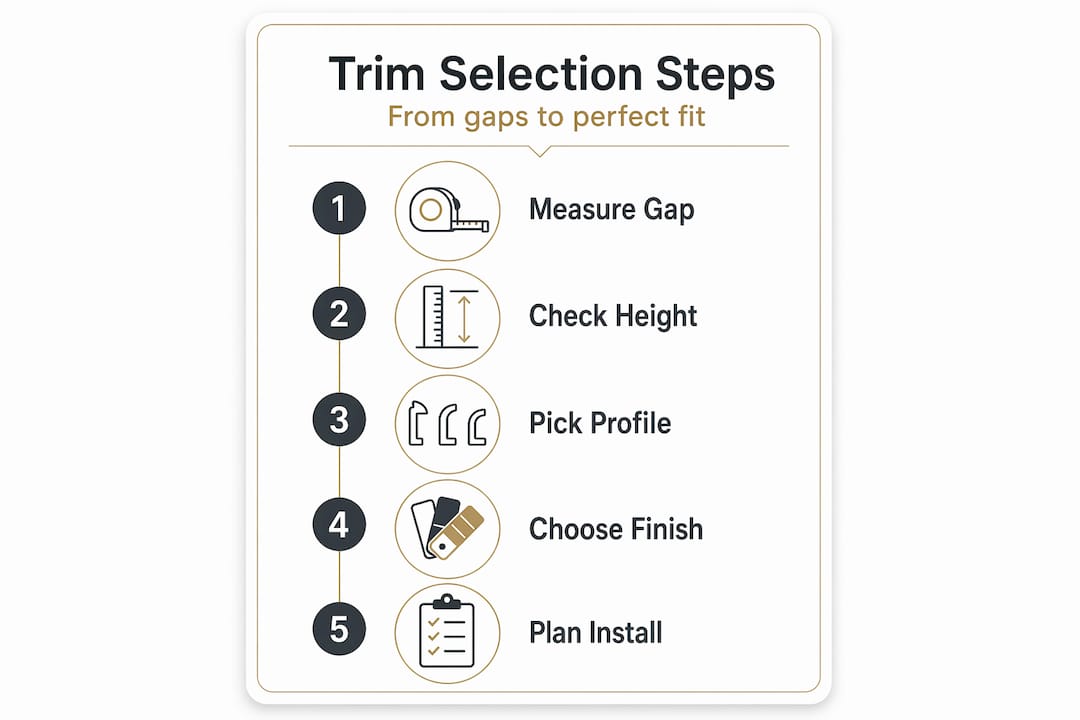
For practical guidance on fitting once you’ve selected your profiles, the flooring edge trim installation guidance is genuinely useful reading before you pick up a saw.
Installation mistakes to avoid: movement, safety and measurement
Even the right trim won’t help unless it’s installed properly. Here are the mistakes to avoid, and they’re more common than you might expect.
- Fixing through a floating floor: This is the single most damaging mistake you can make. Screwing or nailing a trim directly through the boards of a floating floor pins that floor in place and prevents the expansion and contraction it needs. Over time, this causes buckling, cracking, and warped boards. As the National Flooring Authority stresses, trims on floating floors must be secured to the subfloor, not screwed through the planks, to prevent buckling. Always fix to the wall, skirting, or subfloor depending on the trim type.
- Choosing the wrong reducer height: A reducer that doesn’t match the actual height difference leaves a residual step or, worse, a wobbly trim that shifts underfoot. Both are trip hazards. Refer to reduce trip hazards with flooring transitions for detailed guidance on measuring for reducers correctly.
- Not dry-fitting before bonding: If you glue a trim before checking the fit, you’ll find every misalignment immediately after it’s permanent. Always dry-fit first, mark your positions, then apply adhesive.
- Cutting mitres incorrectly: Corner joins are where DIY trim jobs most often look amateurish. As One Step Beyond Flooring explains, cutting trims to accurate mitres and using the right adhesive are crucial for a professional finish and performance. A 45-degree mitre saw makes short work of this, and the difference in the finished result is stark.
- Ignoring expansion gaps at perimeters: Many people fit beautiful floor boards and then push the skirting tight against the edge, eliminating the expansion gap entirely. Scotia and beading exist to hide that gap while still allowing the floor to breathe. Removing the gap removes the protection.
- Buying too little: Trims come in set lengths. If you don’t plan your layout, including corners and mitred joins, you’ll either run short or end up with ugly mid-run joins in visible places.
Understanding trim terminology explained before you go shopping helps enormously here. Knowing what a rebated reducer is versus a standard ramp, for instance, saves you from ordering the wrong product entirely.
Pro Tip: Write out every doorway, every perimeter length, and every exposed edge in your room before ordering. Add 10% for waste and corner cuts. This simple step saves most homeowners from a second order and a second delivery wait.

DIY tips for a flawless trim installation
Armed with the theory, here’s how you can put trim fitting into practice and get results that look genuinely professional.
- Measure every gap before you buy anything. Use a steel tape and note the height of both floors at every transition point. Write it down. Do not rely on memory.
- Plan your corners. Inside corners need mitred joins or a pre-made corner piece. Outside corners need careful marking to avoid gaps. Sketch the room layout first.
- Choose your fixing method based on the floor type. Floating floors need bonded trims fixed to the wall or subfloor. Solid or glued-down floors can accept more direct fixing. Bonding preserves movement and is usually the safest choice.
- Dry-fit everything before applying adhesive. Lay all pieces in position, check joints and alignment, and only then commit to bonding.
- Cut cleanly with the right tool. A mitre saw or a good quality hand saw with a mitre box will give clean 45-degree cuts. Rough cuts create visible gaps even after the trim is fixed.
- Allow adhesive to fully cure before allowing foot traffic. Most flooring adhesives need at least 24 hours. Rushing this causes trim movement and bonding failure.
| Task | Tool needed | Common mistake |
|---|---|---|
| Measuring height differences | Steel tape measure | Estimating by eye |
| Cutting mitres | Mitre saw or hand mitre box | Using a regular handsaw freehand |
| Bonding to subfloor | Flooring adhesive | Using general-purpose grab adhesive |
| Dry-fitting | No tool, just patience | Skipping to final fit immediately |
| Checking alignment | Spirit level | Relying on the floor surface being level |
As B&Q’s product guidance notes, many perimeter trims come in set lengths such as 2.4m, and allowing for waste at corners saves money and hassle. Buy your full lengths, plan your cuts on paper before picking up a saw, and you’ll find the material goes much further than expected.
For a full walkthrough of the fitting process, the step-by-step edge trim install guide takes you through each stage clearly. And when it comes to doorways, browsing stylish door thresholds will show you the range of profiles and finishes available for a truly polished end result.
Our take: what most homeowners miss when choosing trims
Here’s what years of supplying trims to homeowners and contractors across the UK has taught us: the biggest mistake isn’t choosing the wrong trim type. It’s treating trims as an afterthought rather than part of the renovation plan from day one.
People spend serious money on flooring. They research the best engineered boards, they compare carpet grades, they agonise over colour. Then they get to the end of the job and grab whatever trim is cheapest and most convenient, because by that point the budget is stretched and the enthusiasm is flagging. The result is a premium floor finished with a product that looks cheap, shifts underfoot after a few months, or fails to accommodate the movement the floor actually needs.
We’ve seen it countless times. Beautiful laminate, lovely carpet, and a trim that undermines why trims add real value to the whole job. A poorly chosen trim is the detail that a visitor notices, even if they can’t articulate exactly why the finish looks slightly off. And it’s the detail that a surveyor notices when you come to sell.
Our advice is straightforward: plan your trims at the same time as you plan your flooring. Decide on the profiles you need, the finishes that will complement your décor, and the lengths you’ll require before you even order your boards. This approach makes budgeting more accurate, makes the installation smoother, and means you end the job feeling satisfied rather than compromising at the final hurdle. Solid metal trims, hand finished to match your interior, genuinely elevate the result. They’re not a luxury. They’re the difference between a renovation that looks finished and one that looks almost finished.
Find your perfect trim: premium, practical, and delivered to your door
If this article has made you think differently about how trims fit into your renovation, you’re already ahead of most DIYers. The next step is finding the right products for your specific project.

At Quality Carpet Trims, we supply solid metal door bars and threshold profiles, hand finished in 10 beautiful finishes designed to complement any interior. Whether you’re bridging a carpet-to-laminate join, tidying up a matwell, or finishing a doorway with something that genuinely stands out, our range has the right solution. Explore our matwell flooring trim range for specialist profiles, or take a look at our full selection of brass threshold bars for a warm, classic finish that never dates. Not sure where to start? Our explore trim types page will help you narrow down the right profile for every situation in your home.
Frequently asked questions
Is it necessary to use trims when installing new flooring?
Yes, trims are essential to conceal expansion gaps, ensure safety at transitions, and create a professional finish. As the National Flooring Authority confirms, trims cover raw edges, provide movement accommodation, and reduce trip hazards.
What happens if I fix a trim directly on top of a floating floor?
Fixing trims directly into floating flooring restricts its natural movement, which causes buckling, cracking, and can void the floor manufacturer’s warranty. Movement accommodation is critical and trims must be fixed to the subfloor or wall and skirting instead.
How do I know which trim to use for height differences?
Use a reducer or ramp profile whenever there is any height difference between two floor surfaces. According to the National Flooring Authority, reducers and ramps are specifically selected for height differences to avoid sharp edges and trip hazards.
What’s the most common measurement mistake with trims?
Underestimating the total length required, especially forgetting to account for corners and waste, leads to buying too little and incurring additional delivery costs. Measure accurately and allow for corners and waste to avoid the frustration of buying multiple part-lengths.
Recommended
- How to choose the right flooring trim: flawless finish
- How trims transform decor for safer, stylish spaces
- Why flooring trims are essential for stylish interiors
- Why durable flooring trims matter: style and protection