
Blog
What is hardfloor edge? A homeowner’s guide

Jun
TL;DR:
- A hardfloor edge is the profile cut along the sides and ends of flooring planks or tiles, influencing appearance, installation, and cleaning. Square edges create seamless surfaces suited for modern styles, while eased and beveled edges add character and better tolerate subfloor unevenness. Choosing the appropriate profile and durable trims, such as powder-coated solid brass, ensures a long-lasting, visually appealing floor.
A hardfloor edge is the specific profile or shape cut along the sides and ends of flooring planks or tiles, and it directly determines how your floor looks, how forgiving it is during installation, and how easy it is to keep clean. The industry uses terms like square edge, micro-bevel, and beveled edge to describe these profiles, each producing a distinctly different visual result. Choosing the wrong edge for your subfloor condition or room style is one of the most common and costly mistakes homeowners make. Finishing those edges with a solid brass trim from Qualitycarpettrims locks in the result and protects the perimeter for years.
What is a hardfloor edge and why does it matter?
A hardfloor edge is the shaped treatment applied to the top corners and sides of each plank or tile before it leaves the factory. That shape controls whether the joint between two planks looks like a continuous sheet of material or shows a defined groove. The edge profile affects aesthetic style from seamless and modern through to casual and rustic, which means it sets the entire character of a room before a single piece of furniture is placed.
Edge treatment also signals craftsmanship. A floor with the wrong edge for its setting looks unfinished or amateurish, even when the boards themselves are premium quality. Understanding the hardfloor edge definition before you buy saves you from that outcome.
What are the main types of hardfloor edges?
The three profiles you will encounter on most hardfloor products are square, eased (also called micro-bevel or mini-bevel), and beveled. Each has a distinct look and a different practical character.

Square edge planks have no rounding or chamfering at the top corners. When laid, they form a seamless, smooth continuous surface that reads as one unbroken sheet. This suits minimalist and transitional interiors where precision is the point.
Eased edge (micro-bevel or mini-bevel) planks have their top corners shaved or sanded to a subtle rounding of roughly 1/32 to 1/8 inch. The result is a faint shadow line at each joint that softens the look without making the grooves obvious. Note that micro-bevel, mini-bevel, and kissed edge are overlapping terms for essentially the same treatment. The precise depth of the bevel changes how visible the seam is and how much debris it collects.
Beveled edge planks carry a more pronounced chamfer, producing a deeper V-groove between planks. This adds defined character and suits farmhouse, cottage, or rustic interiors where a handcrafted feel is the goal.
| Edge type | Visual character | Best room style | Groove depth |
|---|---|---|---|
| Square | Seamless, flush | Modern, minimalist | None |
| Eased / micro-bevel | Subtle shadow line | Contemporary, transitional | 1/32 to 1/8 inch |
| Beveled | Defined V-groove | Rustic, farmhouse | Pronounced |
Two additional profiles worth knowing are rolled edge (a gentle curve rather than a flat chamfer) and hand-scraped edge (a textured, distressed look). Both are less common but follow the same principle: the edge shape sets the visual tone of the entire floor.
How do different hardfloor edges affect installation and floor performance?
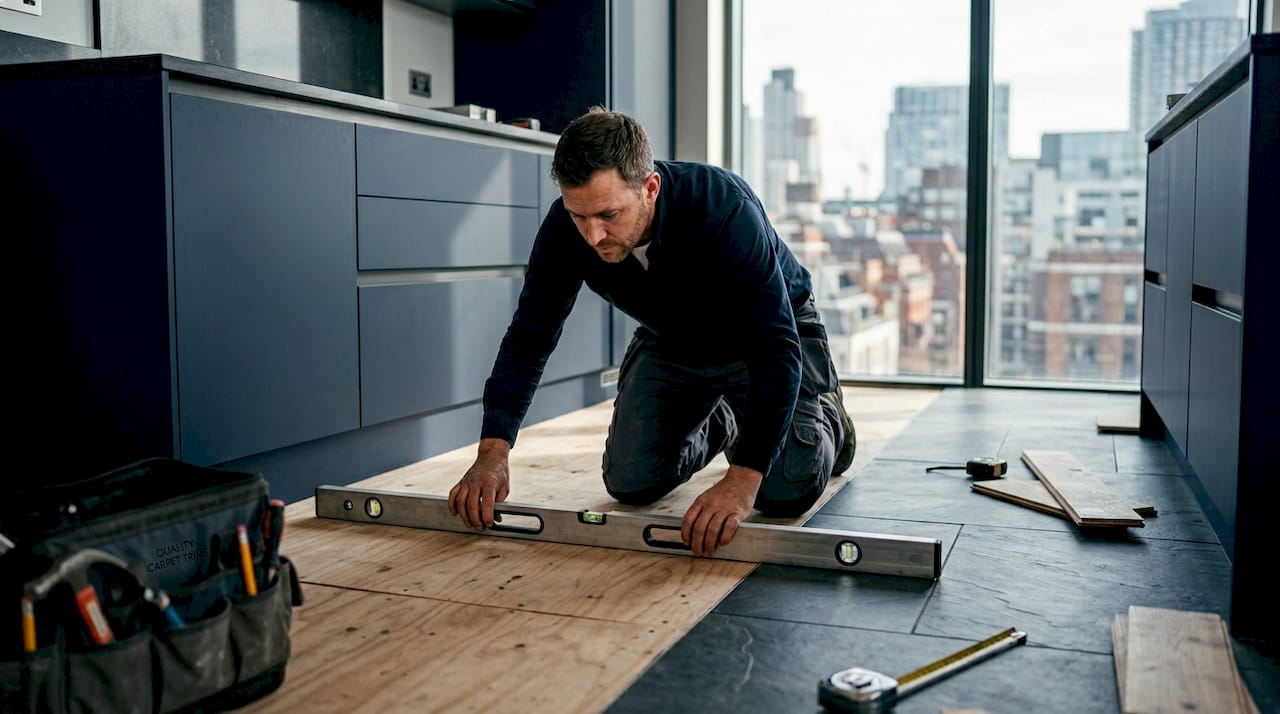
Edge choice is, in practice, a direct indicator of how flat your subfloor needs to be. Square edges require near-perfect subfloor preparation and precise installation because any height difference between adjacent planks is immediately visible as a lip. For most DIY projects, that level of subfloor flatness is difficult to achieve without professional grinding or self-levelling compound.
Micro-bevel edges offer visual forgiveness for slight height differences and subfloor imperfections by adding subtle shadow lines that disguise minor variations. Eased edges reduce the demand for micrometre-perfect installation, making them the practical choice for most DIY projects. Beveled edges are the most forgiving of all, as the deeper groove absorbs more variation without it becoming noticeable.
Here are the key installation considerations for each edge type:
- Square edge. Subfloor must be flat to within 3mm over 1.8 metres. Expansion gaps must be consistent and precise. Any lippage between planks will be visible and will feel underfoot.
- Eased or micro-bevel edge. Minor subfloor unevenness is tolerated. Expansion gaps are less critical visually. Suitable for confident DIY installers working on prepared but not perfect subfloors.
- Beveled edge. Most tolerant of subfloor variation. The deeper groove absorbs height differences. Suitable for older properties where subfloor levelling is impractical.
Finishing the perimeter with a quality trim is the final step in protecting your edge work. Proper trim installation improves edge protection and flooring longevity by covering the expansion gap and preventing the plank ends from lifting or chipping over time.
Pro Tip: If you are unsure about your subfloor flatness, lay a long spirit level or straight edge across the surface before buying your flooring. A reading of more than 3mm variation over 1.8 metres means you need to level before choosing a square edge profile.
What maintenance and aesthetic trade-offs come with each edge type?
Square edges are the easiest to maintain. Because there are no grooves between planks, a flat mop or vacuum passes over the surface without catching debris. The floor reads as one continuous plane, which also makes it look larger and more formal.
Eased and micro-bevel edges collect fine dust in their grooves. Micro-bevel edges may accumulate fine dust requiring more regular cleaning than square-edge floors. Even subtle grooves can trap dust and require consistent vacuuming and sweeping. This is the direct trade-off for their forgiving installation properties.
Beveled edges have deeper grooves that are more prone to collecting dirt, pet hair, and grit. In high-traffic areas or homes with pets, this becomes a meaningful maintenance commitment. The aesthetic payoff is a floor with genuine character and depth, but you need to be honest with yourself about whether you will keep up with the cleaning.
- Square edge: wipe clean, no grooves to catch debris, suits formal or modern spaces.
- Eased edge: vacuum regularly, pay attention to groove lines, suits most living spaces.
- Beveled edge: clean grooves with a soft brush attachment, suits character-led interiors.
Pro Tip: For eased or beveled edge floors, use a vacuum with a soft brush head rather than a hard floor attachment. Hard attachments can scratch the chamfered corners of planks over time, dulling the finish along every joint line.
How to choose the right hardfloor edge and trims for your project
The decision starts with your subfloor, not your style preferences. Assess subfloor flatness before you look at product catalogues. If your floor is flat and you have installation experience, square edge gives you the cleanest result. If your subfloor has minor variation or this is your first installation, an eased or micro-bevel edge is the sensible choice.
Room style is the second filter. Square edges suit contemporary, Scandi, or minimalist interiors. Eased edges work in almost any setting. Beveled edges belong in period properties, farmhouse kitchens, or rooms where a relaxed, lived-in character is the goal.
The edge profile balances functionality with aesthetic effect, allowing floors to look natural and well-crafted even over imperfect surfaces. That balance is worth thinking about carefully before committing to a product.
| Factor | Square edge | Eased / micro-bevel | Beveled |
|---|---|---|---|
| Subfloor requirement | Very flat | Moderate | Forgiving |
| DIY suitability | Experienced only | Good for most | Excellent |
| Cleaning effort | Low | Moderate | Higher |
| Room style | Modern, formal | Versatile | Rustic, period |
Once you have chosen your edge profile, select your perimeter trims to match. Cheap trims made from wood, plastic, rubber, or aluminium will split, bend, and dent within a few years, leaving your floor edges exposed and unsightly. Solid brass trims with a powder-coated finish, such as those from Qualitycarpettrims, resist all of those failure modes and maintain a high-end appearance for years. Ten luxury finishes are available, from satin brass through to matt black, so the trim complements rather than competes with your chosen floor style. You can explore the full range of flooring trim types to find the finish that suits your project.
Best practices for installing and finishing hardfloor edges
Good installation technique protects your edge choice and extends the life of the floor. Follow these steps for a professional result:
- Measure the perimeter accurately. Measure each run twice and cut trims to length with a fine-tooth saw. Inaccurate cuts leave gaps that collect debris and look unfinished.
- Allow for the expansion gap. Most hardfloor products require a 10 to 12mm expansion gap at walls and fixed objects. Your trim must be wide enough to cover this gap fully.
- Fix the trim to the subfloor, not the plank. Fixing to the plank restricts movement and can cause buckling. Solid brass trims from Qualitycarpettrims are designed to sit over the expansion gap and fix to the subfloor independently.
- Check alignment before fixing permanently. Lay the trim in position and check it is straight and flush before drilling or screwing. Adjustments are easy before fixing, difficult after.
- Clean the trim after installation. Remove any adhesive residue or dust with a soft cloth. Powder-coated brass trims need no sealing or treatment after fitting.
Solid brass trims with powder coating provide durability that prevents splitting, bending, or denting seen in cheaper trims. That durability matters most at doorways and room perimeters, where foot traffic is concentrated and cheaper materials fail first.
Pro Tip: After installation, wipe solid brass trims monthly with a damp cloth and dry immediately. This keeps the powder-coated finish looking sharp and prevents any build-up in the trim channel that could lift the edge over time.
Key takeaways
The hardfloor edge profile you choose determines your floor’s visual character, installation difficulty, and long-term maintenance commitment, so match the profile to your subfloor condition and room style before buying.
| Point | Details |
|---|---|
| Edge profile defines the floor | Square, eased, and beveled edges each produce a distinct visual and practical result. |
| Subfloor flatness drives the decision | Square edges demand near-perfect subfloor prep; eased and beveled edges tolerate variation. |
| Maintenance differs by groove depth | Square edges clean easily; micro-bevel and beveled edges require regular groove cleaning. |
| Cheap trims fail at the edges | Wood, plastic, and aluminium trims split and dent; solid brass trims hold their form for years. |
| Match trim finish to edge style | Ten powder-coated brass finishes from Qualitycarpettrims complement any edge profile or room style. |
Why I always tell homeowners to decide on the edge before the board
I have seen more flooring projects go wrong at the edge than anywhere else. Homeowners spend weeks choosing the right board colour and finish, then pick a square edge profile for a Victorian terrace with a bouncy, uneven subfloor. The result is a floor that looks worse than a budget option would have, because every height difference between planks is on full display.
My honest recommendation: treat the edge profile as a structural decision, not a cosmetic one. If your subfloor is not flat, an eased or micro-bevel edge is not a compromise. It is the correct choice. The shadow line it creates actually adds warmth and depth to a room that a perfectly flat square edge would make feel cold and clinical.
The other thing homeowners consistently underestimate is the trim. I have watched people spend significant money on premium boards and then finish the perimeter with a thin aluminium strip that dents the first time a door catches it. That trim is the last thing visitors see when they walk into a room. It deserves the same quality consideration as the floor itself. Solid brass trims do not bend, split, or lose their finish. They look as good in ten years as they do on the day of installation. That is not a luxury upgrade. For a floor you want to last, it is the only sensible choice.
— Matt
Finish your floor properly with Qualitycarpettrims
You have chosen your edge profile and laid your floor. The perimeter trim is what separates a professional result from a DIY one.

Qualitycarpettrims supplies solid brass luxury flooring trims hand-finished in ten beautiful powder-coated colours, from warm satin brass to contemporary matt black. Unlike wood, plastic, or aluminium trims that split, dent, and discolour within a few years, solid brass holds its shape and finish through decades of daily use. Every trim is British-made and designed to cover expansion gaps cleanly while protecting plank ends from chipping. Browse the full range, order free samples, and get expert advice on fitting at qualitycarpettrims.co.uk.
FAQ
What is a hardfloor edge in simple terms?
A hardfloor edge is the shaped profile cut along the top corners and sides of a flooring plank or tile. It controls whether the joint between planks looks flush and seamless or shows a defined groove.
Which hardfloor edge type is best for DIY installation?
An eased or micro-bevel edge is best for DIY projects because it tolerates minor subfloor unevenness and expansion gaps better than a square edge, reducing the risk of visible lippage between planks.
Do hardfloor edge grooves collect dirt?
Yes. Micro-bevel and beveled edges accumulate fine dust in their grooves and require more frequent vacuuming than square-edge floors, which have no groove to trap debris.
What materials should I avoid for hardfloor edge trims?
Avoid wood, plastic, rubber, and aluminium trims. These materials split, bend, and dent under normal use. Solid brass trims with a powder-coated finish are the durable alternative that maintains its appearance long term.
How do I choose between square and micro-bevel edge flooring?
Choose square edge only if your subfloor is very flat and you have installation experience. Choose micro-bevel or eased edge if your subfloor has minor variation or if this is your first flooring project, as the profile hides minor height differences between planks.
Recommended
- Complete guide to hardfloor edge strips: seamless floors
- What is edge finishing? A homeowner’s guide
- Hardfloor thresholds explained: Perfect flooring transitions
- Explaining hardfloor transitions: a homeowner’s guide