
Uncategorized
The role of trims in kitchen fitouts: a complete guide

Jun
TL;DR:
- Kitchen trims are essential finishing profiles that seal gaps, protect edges, and improve the room’s aesthetic. Choosing durable materials like solid brass with powder-coated finishes ensures long-lasting practicality and style. Proper planning and precise installation of trims enhance both the functionality and visual cohesion of a kitchen.
Trims in kitchen fitouts are defined as the finishing profiles and mouldings that seal gaps, protect edges, and create smooth transitions between cabinetry, walls, ceilings, and flooring surfaces. The role of trims in kitchen fitouts extends well beyond decoration. They are structural finishing elements that determine whether a kitchen looks professionally completed or visibly unfinished. Kitchen trims serve to seal gaps, protect edges from daily wear, and unify the room’s aesthetic so cabinets appear built-in rather than simply placed. In demanding kitchen environments, the material and finish you choose matters as much as the profile itself.
What types of trims are used in kitchen cabinetry and flooring?
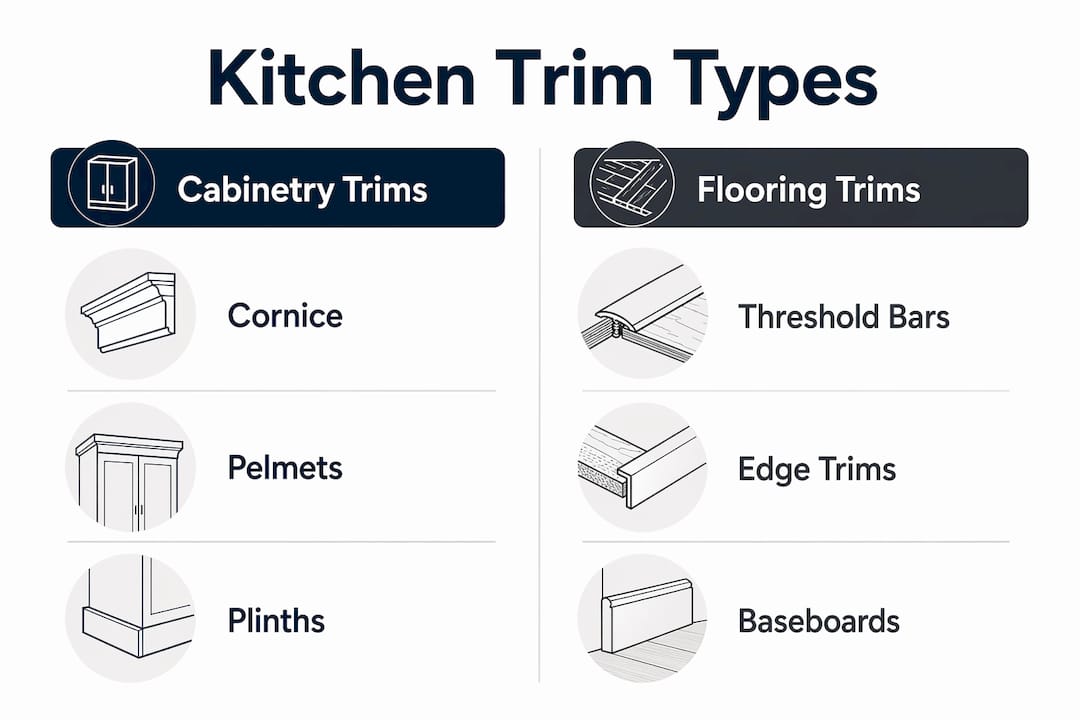
Kitchen trims fall into two broad categories: cabinetry trims and flooring trims. Each serves a distinct function, and understanding both is the foundation of a well-finished kitchen.
Cabinetry trims are the three workhorses of kitchen cabinet design:
- Cornices sit at the top of wall cabinets, bridging the gap between cabinet tops and the ceiling. They give the kitchen a built-in, architectural feel.
- Pelmets run beneath wall cabinets, concealing under-cabinet lighting and creating a clean visual base for the upper units.
- Plinths (also called kick boards) cover the base of floor cabinets, hiding the structural legs and creating a finished floor-level appearance.
Flooring trims handle the transitions between different floor surfaces:
- Threshold bars span doorways where two flooring types meet, such as kitchen tiles transitioning to hallway carpet.
- Edge trims protect exposed flooring edges at room perimeters or step edges.
- Base trims run along the bottom of cabinets where they meet the floor, bridging floor gaps of 12–25mm.
| Trim type | Location | Primary purpose |
|---|---|---|
| Cornice | Top of wall cabinets | Seals ceiling gap, adds architectural detail |
| Pelmet | Underside of wall cabinets | Conceals lighting, creates clean base line |
| Plinth | Base of floor cabinets | Hides structural legs, finishes floor level |
| Threshold bar | Doorways and floor junctions | Manages flooring transitions safely |
| Edge trim | Exposed flooring edges | Protects and finishes raw floor edges |
| Base trim | Cabinet-to-floor junction | Covers expansion gaps, prevents debris ingress |
Pro Tip: Measure your ceiling height before selecting cornice profiles. A deep, ornate cornice in a kitchen with low ceilings will make the space feel oppressive. A shallower profile achieves the same architectural finish without dominating the room.
Cheaper trims made from wood, plastic, or rubber are common in budget fitouts, but they warp, split, and stain within a few years in kitchen conditions. Solid brass trims with powder-coated finishes hold their form and colour through years of heat, moisture, and daily contact.
How do trims enhance kitchen aesthetics and unify design elements?
Trim is a crucial part of kitchen architectural language and should be planned alongside cabinet layout, not selected as an afterthought. This distinction separates kitchens that look designed from kitchens that look assembled.
Trims act as visual connectors. A cornice draws the eye upward and links the cabinet top to the ceiling plane. A plinth grounds the cabinetry to the floor. Without these elements, cabinets float awkwardly in the room, with visible gaps that undermine the whole design.
Matching trim profiles to your kitchen’s style is non-negotiable. Minimalist trim in traditional kitchens with raised-panel doors diminishes the luxury feel. The reverse is equally damaging: heavy ornate cornices on flat-fronted modern cabinets look incongruous. The trim profile should echo the door style, the handle design, and the overall mood of the space.
Common aesthetic mistakes to avoid:
- Choosing trim that is too small in scale for the cabinet height, making it look like an afterthought
- Selecting a finish that clashes with hardware, such as warm brass trims against chrome handles
- Using mismatched profiles across different trim types within the same kitchen
- Ignoring the transition between kitchen flooring and adjacent rooms, leaving a raw, unfinished edge
Trims enhance decor most effectively when they are treated as part of the design brief from day one. Bring trim samples to your cabinet supplier before ordering. Hold them against door samples in the actual kitchen lighting. What looks cohesive in a showroom can read very differently under your kitchen’s specific conditions.
What practical and safety benefits do trims provide in kitchens?
Kitchens are the hardest-working rooms in any home. Trims in this environment must perform practically, not just look good. Moisture-sensitive materials warp and stain within years in kitchen conditions. This is why material choice is a safety and longevity decision, not just an aesthetic one.
The practical benefits of correctly fitted kitchen trims are significant:
- Moisture protection. Trims seal the junction between cabinets and walls or floors, preventing water ingress from spills, steam, and cleaning. Raw edges left exposed absorb moisture and deteriorate rapidly.
- Debris and pest prevention. Gaps beneath and around cabinets collect food debris and provide entry points for insects. A well-fitted plinth and base trim eliminates these gaps entirely.
- Edge protection. Cabinet edges and flooring edges take constant knocks from feet, appliances, and cleaning equipment. Trims absorb this impact and prevent chipping or splitting of the underlying material.
- Trip hazard elimination. Where kitchen flooring meets a different surface in a doorway, an unmanaged height difference creates a genuine trip risk. A properly fitted threshold bar creates a smooth, safe ramp between the two levels.
- Structural stability. Professional base trim installation reduces visible expansion gaps by 80% over ten years and prevents cabinet movement issues in approximately 30% of poorly installed projects.
Pro Tip: In kitchens, always choose trims with a non-porous, sealed finish. Semi-gloss and satin finishes repel grease, moisture, and cleaning chemicals far better than raw or flat surfaces. Powder-coated solid brass trims offer exactly this kind of sealed, durable surface.
How to choose the right trims for your kitchen fitout
Selecting the right kitchen trim options comes down to three factors: material hardness, finish durability, and installation precision. Getting all three right means your trims will still look sharp in fifteen years.
Material hardness matters more than most people realise
Softer materials dent, split, and compress under the daily impact of a working kitchen. Janka hardness ratings guide material selection: pine registers at 380 lbf and dents easily, while harder engineered alternatives perform significantly better in high-traffic areas. Solid brass sits in a different category entirely. It does not dent, warp, or split under normal kitchen conditions, and it does not absorb moisture.
Wooden trims, rubber trims, and plastic trims are common in budget fitouts. They all share the same weakness: they degrade in kitchen conditions. Wood warps with moisture. Plastic yellows and becomes brittle. Rubber compresses and loses its profile. None of these are worth considering for a kitchen you want to last.
Finish selection and long-term maintenance
| Material | Moisture resistance | Dent resistance | Maintenance requirement |
|---|---|---|---|
| Solid brass (powder coated) | Excellent | Excellent | Wipe clean, no repainting |
| Wood (painted) | Poor to moderate | Poor | Repainting every 2–4 years |
| Plastic or PVC | Moderate | Poor | Yellows, cannot be refinished |
| Rubber | Poor | Moderate | Compresses, loses shape |
Powder-coated solid brass trims are the clear choice for kitchens. The coating creates a sealed, non-porous surface that repels grease and cleaning chemicals, and the brass substrate will not bend or dent if knocked. Qualitycarpettrims offers these in ten hand-finished luxury finishes, so you can match your trim to your hardware and cabinetry precisely.
Installation precision
Scribing base trim to the exact contours of your floor prevents unsightly gaps and cabinet creep, a problem found in approximately 30% of amateur installations. Take time to trace the floor profile onto the trim before cutting. A step-by-step installation guide will walk you through this process if you are fitting trims yourself.
What are the most common kitchen trim problems and how do you avoid them?
Even well-chosen trims can fail if installed or maintained incorrectly. These are the problems that come up most often in kitchen renovations, and how to prevent them.
- Poor scribing. Gaps between the trim and an uneven floor or wall are the most visible sign of an amateur fit. Always scribe to the surface rather than assuming it is flat.
- Incorrect joins at corners. Mitre joints that open up over time are caused by movement in the substrate. Use a quality adhesive alongside fixings, and allow for slight seasonal movement.
- Stylistic mismatch. Choosing a trim profile that does not match the cabinet door style creates stylistic dissonance that reduces the perceived value of the whole kitchen. Always compare profiles against door samples before ordering.
- Wrong scale. A trim that is too narrow for a tall cabinet run looks mean and unfinished. A trim that is too deep in a low-ceilinged kitchen dominates the space. Scale your trim to the cabinet height and room proportions.
- Moisture damage from unsuitable materials. Wooden or plastic trims in kitchens will show moisture damage within a few years. If you are replacing damaged trims, upgrade to solid brass with a powder-coated finish rather than repeating the same mistake.
For persistent or complex fitting problems, solving flooring trim issues professionally is often faster and cheaper than repeated DIY attempts.
Key takeaways
The most effective kitchen trims combine solid brass construction, powder-coated finishes, and precise installation to deliver lasting aesthetic cohesion and practical protection.
| Point | Details |
|---|---|
| Plan trims from the start | Treat trims as part of the design brief, not a finishing afterthought, to avoid scale and style mismatches. |
| Match profile to cabinet style | Mismatched trim profiles reduce perceived kitchen value and create visual dissonance across the whole room. |
| Choose solid brass over soft materials | Solid brass resists denting, warping, and moisture where wood, plastic, and rubber all fail within years. |
| Prioritise sealed finishes | Powder-coated surfaces repel grease and moisture, making kitchen trims far easier to maintain long-term. |
| Scribe accurately for a professional fit | Precise scribing to floor and wall contours eliminates gaps and prevents cabinet creep in the long term. |
Why I always tell renovators to sort their trims first
Most people treat trims as the last item on the kitchen renovation list. I think that is exactly backwards. The trims you choose set the tone for how finished the whole kitchen feels, and if you leave them until the budget is nearly gone, you end up with whatever is cheapest rather than whatever is right.
I have seen beautiful, expensive kitchens undermined by plastic plinths that yellowed within two years, and wooden cornices that swelled and cracked above the hob. The cabinets were excellent. The trims let the whole project down.
The shift I always recommend is to treat trims as part of the cabinetry specification, not a separate line item. When you are choosing door profiles and hardware finishes, bring trim samples into that conversation. A solid brass threshold bar in a warm bronze finish, matched to the cabinet handles, does something to a kitchen that no amount of expensive tile can replicate. It signals that the whole room was considered as a single design, not assembled from separate decisions.
Durability matters here too. A kitchen renovation is a significant investment. The trims should last as long as the cabinets, not need replacing every few years. Solid brass with a powder-coated finish is the only material I would recommend in a kitchen environment. Everything else is a compromise you will notice eventually.
— Matt
Upgrade your kitchen fitout with premium solid brass trims
If you are planning a kitchen renovation or refreshing an existing fitout, the trims you choose will define the finished result more than most people expect.

Qualitycarpettrims supplies solid brass door bars and threshold strips, hand-finished in ten luxury finishes to complement any kitchen style. These trims will not split, bend, or dent like cheaper alternatives, and the powder-coated surface wipes clean without repainting. Whether you need a threshold bar for flooring transitions at your kitchen doorway or edge trims for stylish flooring, Qualitycarpettrims has the finish and profile to complete your kitchen professionally. Browse the full range at qualitycarpettrims.co.uk/shop.
FAQ
What is the main role of trims in a kitchen fitout?
Trims seal gaps between cabinetry and architectural surfaces, protect edges from wear, and create smooth transitions between flooring types. They also unify the kitchen’s aesthetic so cabinets appear built-in rather than freestanding.
Which trim types are most important in a kitchen?
Cornices, pelmets, and plinths are the core cabinetry trims, while threshold bars and edge trims manage flooring transitions. Each serves a distinct structural and aesthetic function in a complete kitchen fitout.
Why do cheaper trims fail in kitchens?
Wood, plastic, and rubber trims all degrade in kitchen conditions. Wood warps with moisture, plastic yellows and becomes brittle, and rubber compresses over time. Solid brass with a powder-coated finish resists all of these failure modes.
When should I plan kitchen trims in a renovation?
Trim selection should be planned alongside the cabinet layout, not after installation. Choosing trims early ensures correct scale, profile matching, and finish coordination with hardware and flooring.
How do flooring trims improve kitchen safety?
A properly fitted threshold bar creates a smooth transition between different floor heights at doorways, eliminating trip hazards. Base trims also seal gaps that would otherwise collect debris and allow moisture ingress beneath cabinets.
Recommended
- The role of trims in bathroom fitting explained
- The role of trims in home decor: a guide for UK homes
- Choosing trims for renovations: the complete guide
- The role of trims in commercial spaces: a design guide