
Blog
Step by step edge trim fitting: your complete DIY guide

Jun
TL;DR:
- Proper preparation, full adhesive coverage, and accurate cutting are essential for successful edge trim installation. Using solid brass trims and allowing adequate curing time ensure a durable and professional finish that resists damage over time. Patience during curing and precise mitre cuts significantly improve the overall appearance and longevity of the trim.
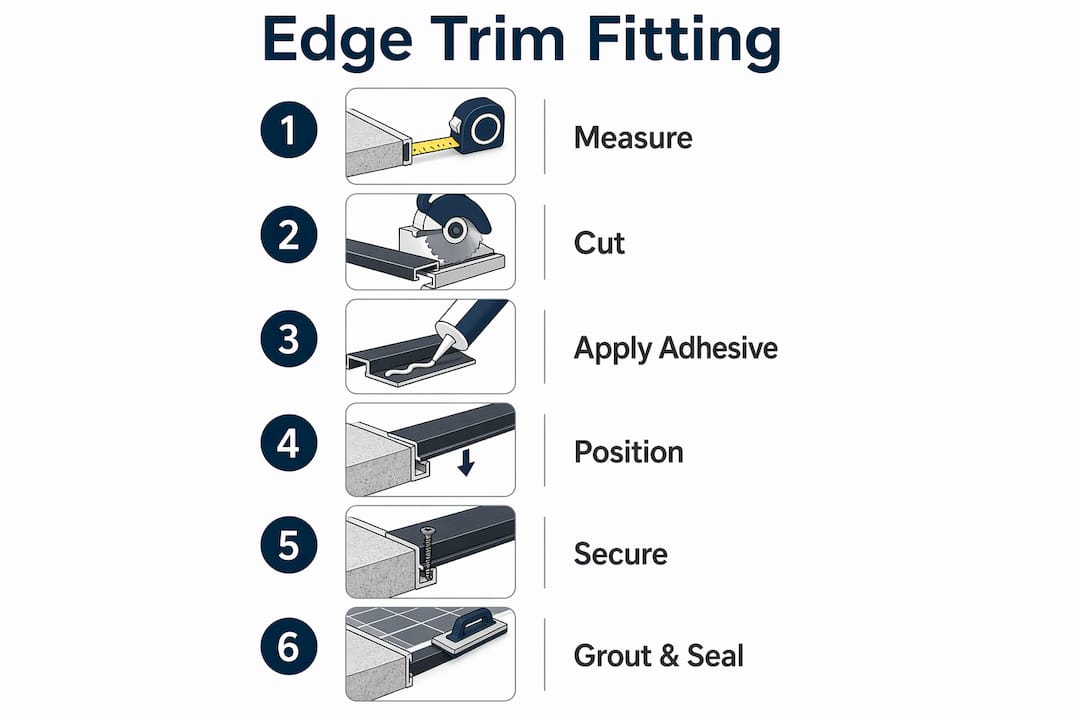
Step by step edge trim fitting is the process of installing solid brass, powder-coated trims to create clean, durable edges where flooring or tiling meets a wall, step, or transition point. Done correctly, it produces a finish that looks professional, protects exposed edges from damage, and adds a polished detail to any room. This guide covers every stage of the edge trim installation workflow, from choosing the right tools to grouting the final joint. Follow each step carefully and you will achieve results that hold up for years.
What tools and materials do you need for edge trim installation?
The right tools make every stage faster and more accurate. Gathering everything before you start prevents the frustrating mid-job trips to the hardware shop that throw off your timing and curing schedule.
Essential tools:
- Wet saw or fine-tooth hacksaw (for clean, chip-free cuts)
- Notched trowel, typically 6mm or 8mm, for spreading adhesive evenly
- Tile spacers in your chosen grout gap size
- Measuring tape and pencil
- Spirit level
- Utility knife
- Smoothing tool or grout float
- Caulking gun
Materials checklist:
- Solid brass, powder-coated edge trims in your chosen finish
- Suitable tile adhesive or polyurethane adhesive depending on trim type
- Grout in a matching colour
- Flexible caulk for movement joints
The trim itself is the most important material decision you will make. Solid brass trims outperform plastic, aluminium, or cheaper alternatives by resisting bending, splitting, and denting over time. Qualitycarpettrims supplies solid brass, powder-coated trims in 10 luxury finishes, so you can match any interior scheme without compromising on durability.
| Tool or Material | Purpose |
|---|---|
| Notched trowel (6–8mm) | Spreads adhesive to the correct depth and coverage |
| Wet saw | Produces clean 45° mitre cuts without chipping |
| Tile spacers | Maintains consistent grout gaps throughout |
| Flexible caulk | Seals movement joints to prevent cracking |
| Solid brass powder-coated trim | Provides a durable, elegant edge that will not degrade |
How do you prepare the area before fitting edge trims?
Surface preparation is the step most DIYers rush, and it is the one that causes the most failures. A clean, level surface free from old adhesive, dust, and debris is a non-negotiable starting point for a secure bond.
Work through this preparation sequence before touching your adhesive:
- Remove all old adhesive residue, grout, and loose material from the substrate
- Check the surface is level using your spirit level; pack out any low spots with adhesive before you begin
- Mark the full length of each trim run with a pencil line, including outer corners and transition points
- Account for tile thickness when positioning your marks, particularly near baths, shower trays, or door frames
- Dry-fit every trim piece before applying any adhesive, checking that corner mitres sit tight and lengths are accurate
Measuring twice before cutting once is not a cliché here. A trim cut 2mm too short leaves a visible gap that no amount of grout will hide neatly. Mark your cut lines clearly on the trim with a pencil and double-check against your tile layout before picking up the saw.
Pro Tip: Dry-fit the entire run of trims, including all corner pieces, before mixing any adhesive. This reveals fit problems when they are still easy to fix, not after the adhesive has gone off.
Step by step edge trim installation: from adhesive to setting
This is the core of the edge trim fitting tutorial. Work through each stage in order and do not skip ahead, particularly when it comes to curing times.
-
Spread the adhesive. Apply tile adhesive to the substrate using your notched trowel, working in sections no longer than you can tile in 20 minutes. Full coverage across the contact surface is critical. Insufficient adhesive coverage is one of the most common causes of trim loosening after installation.
-
Back-butter the trim. For bullnose and edge trims, apply a thin layer of adhesive directly to the back of the trim as well. This technique, known as back-buttering, fills any micro-gaps between the trim and substrate and dramatically improves bond strength.
-
Press the trim into position. Align the trim with your pencil guideline and press it firmly into the adhesive bed. Check it is flush with the tile face using your spirit level. Any deviation now will be visible in the finished job.
-
Check alignment repeatedly. Alignment must be verified before the adhesive sets. If the trim sinks below the tile face, remove it immediately, add more adhesive to the back, and reposition. Leaving a sunken trim in place creates a lip that catches feet and looks unprofessional.
-
Place tile spacers. Insert spacers between the trim flange and the adjacent tiles to maintain a consistent grout gap. Tile spacers ensure uniform grout lines and keep the trim correctly positioned while the adhesive cures. This detail separates a tidy finish from an amateur one.
-
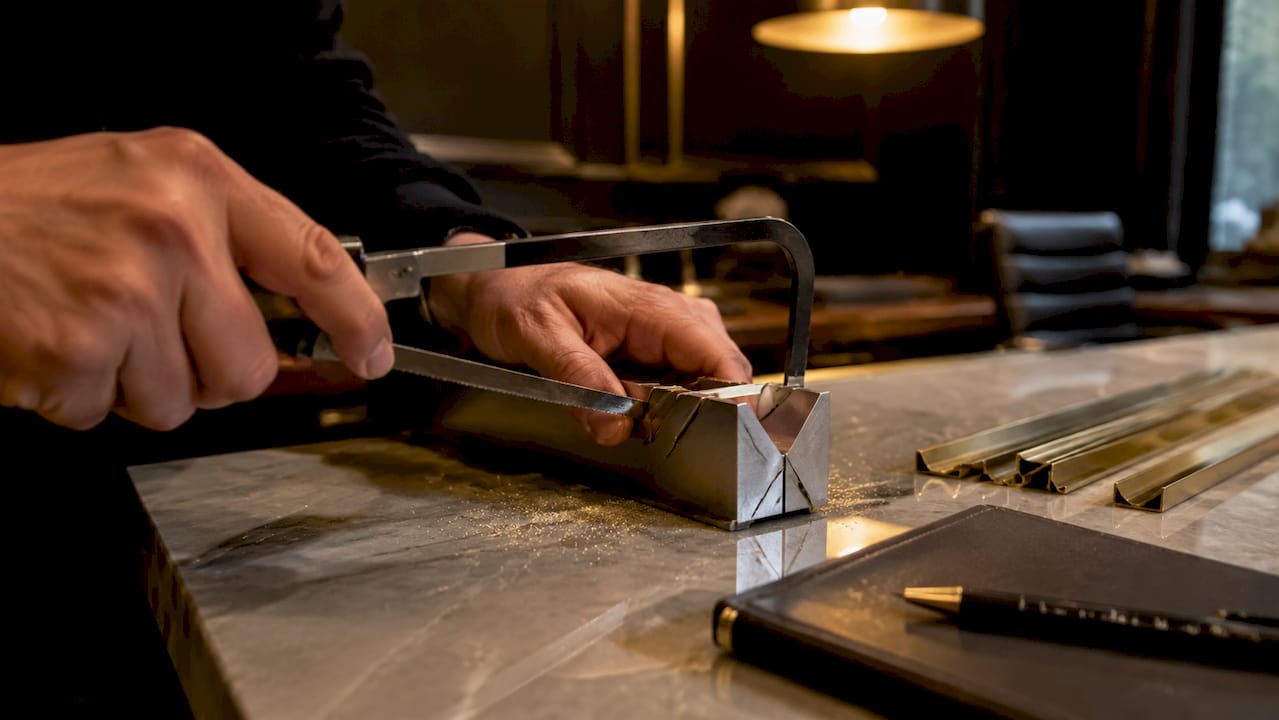
Cut and mitre corners. Where two trim runs meet at an outer corner, cut each piece at 45° using a wet saw. Mitre cuts at 45° angles are non-negotiable for a professional, chip-free joint. A hacksaw can work for straight cuts, but a wet saw gives far cleaner results on brass.
-
Fit the adjacent tiles. Cut tiles to sit tightly against the trim edge. Hold the trim steady as you press each tile home. Avoid nudging the trim out of alignment as you work along the row.
-
Allow full curing time. The complete installation workflow requires a curing period of 24–72 hours before grouting. That range reflects differences in adhesive type, room temperature, and humidity. Do not walk on the tiles or disturb the trims during this period.
Pro Tip: Tape the trim in place with low-tack masking tape while the adhesive cures. It holds the trim flush without leaving residue and removes cleanly once the adhesive has set.
How do you grout, seal, and maintain edge trims?
Finishing the joints correctly is what separates a lasting installation from one that starts cracking or lifting within a year. Grout and caulk application along with proper curing are critical for long-term durability.
Follow this finishing sequence:
- Remove tile spacers gently once the adhesive has fully cured, taking care not to lever against the trim or tiles
- Apply grout to rigid joints using a grout float, pressing it firmly into the gap and wiping excess away with a damp sponge
- Use flexible caulk rather than grout at any movement joint, including where the trim meets a bath, shower tray, or wall
- Choose a grout and caulk colour that matches or complements your trim finish for a cohesive result
- Smooth the caulk bead with a wet finger or a caulk tool for a clean, professional line
- Allow grout to cure for a minimum of 24 hours before light use and 72 hours before any water exposure in wet areas
For ongoing maintenance, wipe solid brass powder-coated trims with a damp cloth and a mild, non-abrasive cleaner. The powder-coated finish on Qualitycarpettrims products resists moisture and daily wear, so you will not need specialist products. Avoid abrasive pads, which can scratch the finish over time.
Pro Tip: Apply a thin bead of flexible caulk along the top edge of the trim where it meets the tile face, even if the joint looks tight. This prevents water from tracking behind the trim in wet areas.
What are the most common edge trim fitting mistakes?
Most problems in a complete edge trim fitting project come down to four recurring errors. Knowing them in advance means you can avoid them rather than fix them.
-
Insufficient adhesive coverage. Spreading adhesive too thinly or missing sections of the contact area leaves voids behind the trim. Those voids allow movement, which eventually cracks the grout and loosens the trim. Always check that the adhesive transfers fully to the trim back when you press it down.
-
Disturbing trims before curing. Premature disturbance before curing is a leading cause of misalignment and adhesive failure. Plan your installation sequence so that cured sections are not in a traffic path. In wet or humid rooms, allow the full 72 hours.
-
Inaccurate measuring and cutting. Gaps at corners and uneven grout lines almost always trace back to a measuring error made before the saw was picked up. Measure the actual installed tile run, not the planned dimension on paper.
-
Skipping the dry-fit. Fitting trims without a dry run means corner mitre problems only appear once adhesive is on the substrate. A dry-fit takes ten minutes and saves hours of remedial work.
-
Chipping during cutting. Cutting brass trims with an unsuitable blade causes chipping at the cut edge. Use a wet saw with a fine blade, score the cut line first, and support the trim fully on both sides of the cut.
If a trim does sink or shift after placement, act immediately. Remove it, clean the adhesive from both surfaces, apply fresh adhesive, and reposition before it sets. Once adhesive cures around a misaligned trim, correction requires significantly more effort.
Key takeaways
Successful edge trim fitting depends on thorough preparation, full adhesive coverage, accurate cutting, and respecting curing times at every stage.
| Point | Details |
|---|---|
| Preparation is non-negotiable | Clean, level, debris-free surfaces are required before any adhesive is applied. |
| Full adhesive coverage prevents failure | Back-butter trims and check full transfer to avoid voids that cause loosening. |
| Dry-fit before committing | Test every trim piece and corner mitre before adhesive goes down. |
| Respect curing times | Wait 24–72 hours before grouting and avoid disturbing trims in wet or humid conditions. |
| Choose solid brass over cheaper materials | Solid brass powder-coated trims resist bending, splitting, and denting that affect inferior materials. |
Why i always say patience is the real skill here
After years of watching DIY tiling projects succeed and fail, the pattern is clear. The jobs that go wrong almost never fail because of poor technique with a trowel. They fail because someone rushed the preparation or pulled the spacers out four hours after laying the tiles.
The curing window of 24–72 hours feels like dead time when you are mid-project and keen to see the finished result. It is not. That window is when the adhesive develops the bond strength that will hold your trim in place for a decade. Disturb it and you are gambling with the entire job.
I also feel strongly about trim quality. Plastic and aluminium trims look fine in the shop. On a floor or tiled edge, they flex, discolour, and eventually fail. Solid brass with a powder-coated finish is a different product entirely. It holds its shape, holds its colour, and holds its position. When you are putting real effort into a tiling project, the trim is not the place to save money.
The other thing I would say is this: mitre cuts matter more than most guides admit. A poorly cut corner joint draws the eye immediately. A clean 45° cut on a wet saw, with both pieces fitting tight, looks genuinely professional. That one detail changes how the whole room reads. Take the time to get it right.
— Matt
Get your trims from Qualitycarpettrims

Qualitycarpettrims supplies solid brass, powder-coated edge trims hand-finished in 10 luxury colours, made in the UK and built to last. Every trim is designed to resist the bending, splitting, and denting that affect cheaper materials, so your installation stays looking sharp for years. Whether you are finishing a tiled bathroom edge, a flooring transition, or a step nosing, the full trim range covers every scenario. Browse the collection online, order free samples to check your finish match, and get fast UK delivery straight to your door. For a flooring trim types guide to help you select the right profile, Qualitycarpettrims has you covered at every stage of your project.
FAQ
How long should i wait before grouting edge trims?
Wait 24–72 hours after fitting before grouting, depending on your adhesive type, room temperature, and humidity. Grouting too early risks loosening or misaligning the trim before the bond has fully developed.
What is the best way to cut edge trims at corners?
Use a wet saw to cut mitre joints at 45° angles for clean, chip-free corner joints. A fine-tooth hacksaw works for straight cuts but is less reliable for precise mitres on solid brass trims.
Do i need to back-butter edge trims?
Yes. Applying a thin layer of adhesive directly to the back of the trim, known as back-buttering, fills micro-gaps and significantly improves bond strength. It is a standard step in professional bullnose trim installation.
Where should i use flexible caulk instead of grout?
Use flexible caulk at any movement joint, including where trims meet baths, shower trays, or walls. Rigid grout in these locations cracks as the building moves, while caulk accommodates that movement without failing.
Why do edge trims come loose after installation?
The most common cause is insufficient adhesive coverage leaving voids behind the trim, or disturbing the trim before the adhesive has fully cured. Full contact adhesion and respecting the curing window of 24–72 hours prevent this problem in the vast majority of cases.
Recommended
- Step by step flooring trim installation guide
- Floor trim fitting guide for a professional finish
- Installing Flooring Edge Trims for Seamless Floor Transitions
- What is edge finishing? A homeowner’s guide