
Blog
How to connect laminate and tile floors: a practical guide

Jul
TL;DR:
- Connecting laminate and tile floors requires a proper transition strip installed on the subfloor to accommodate movement and prevent damage.
- Choosing the correct profile, such as T-moulding or reducer, depends on the height difference between the floors, and solid brass trims offer the best durability.
- Proper preparation, including flatness checks and maintaining an expansion gap, ensures a safe, long-lasting, and visually appealing transition.
Connecting laminate and tile floors is defined as the process of joining two different flooring types at their meeting point using a transition strip, also called a threshold or floor profile. The industry standard term for this junction is a “laminate tile transition.” Getting it right matters more than most homeowners realise. A poorly fitted join creates trip hazards, allows moisture ingress, and restricts the natural movement of a floating laminate floor. Done correctly, the result is a clean, professional finish that lasts for years. This guide covers preparation, trim selection, and step-by-step installation so you can approach the job with confidence.
What tools and materials do you need to connect laminate and tile floors?

The right tools make the difference between a frustrating afternoon and a clean result. Before you start connecting laminate and tile flooring, gather everything listed below.
Tools:
- Tape measure and pencil
- Jigsaw or mitre saw for cutting trims to length
- Cordless drill and masonry or wood bits
- Spacers (10mm) to maintain expansion gaps
- Tapping block and rubber mallet for joining planks near the transition
- Utility knife for trimming underlayment
Materials:
- Transition strip and metal track (sold together or separately)
- Underlayment with integrated vapour barrier
- Appropriate fixings for your subfloor type (wood screws or concrete anchors)
Pro Tip: Choose an underlayment specifically designed for hard substrates. A compression-resistant underlayment with a vapour barrier prevents locking mechanism failures in laminate laid over tile.
The trim itself is the most visible component, so quality matters. Avoid trims made from plastic, rubber, or aluminium. These materials bend, dent, and discolour within a few years. Solid brass trims, hand-finished and powder-coated, hold their shape and their finish far longer. Qualitycarpettrims supplies solid brass trims in 10 luxury finishes, from brushed satin to antique gold, so you can match the trim to your interior rather than settling for whatever the local DIY shed stocks.
| Item | Purpose | Quality consideration |
|---|---|---|
| Transition strip | Covers the join between floors | Solid brass outlasts plastic and aluminium |
| Metal track | Anchors strip to subfloor | Steel or brass track; avoid plastic clips |
| Underlayment | Cushions laminate, blocks moisture | Must be compression-resistant over tile |
| Spacers | Maintains expansion gap | 10mm standard for most floating floors |
| Tapping block | Protects plank edges during fitting | Rubber-faced to avoid surface damage |
How to prepare laminate and tile floors before installation
Preparation is the step most homeowners underestimate. Floating floors tolerate minor imperfections but fail quickly if major tile irregularities exist beneath them.
- Check surface flatness. The flatness tolerance is 3/16 inch over a 10-foot span. Use a long straightedge to identify high spots or dips across the tile surface. Any deviation beyond this tolerance will telegraph through the laminate and cause locking joint stress.
- Secure loose tiles. Press each tile firmly. Any movement means the adhesive bond has failed. Re-bond loose tiles with thinset mortar and allow full cure before proceeding.
- Fill grout lines. Deep grout lines can print through thinner underlayments over time. Use a floor-levelling compound to skim over the tile surface if grout lines exceed 3mm in depth.
- Clean the surface thoroughly. Remove all wax, grease, and adhesive residue. Laminate underlayment will not bond or lie flat on a contaminated surface.
- Measure the height difference. Measure the combined thickness of your laminate board and underlayment, then compare it to the tile height. Accurate height measurement prevents a raised lip at the transition that becomes a trip hazard.
- Mark the expansion gap position. Mark a line on the tile surface showing where the laminate will stop. The gap between the last laminate plank and the tile edge must be a minimum of 10mm.
Pro Tip: If the tile sits noticeably higher than the laminate will, consider a reducer profile rather than a T-moulding. Choosing the wrong profile at this stage is far harder to correct after the floor is laid.
How do you choose the right transition trim for laminate to tile?
The transition strip is a functional necessity, not merely a decorative cover. It allows the laminate to expand and contract with temperature and humidity changes without buckling or lifting at the edge.
T-moulding vs. reducer: which profile fits your floors?
T-moulding suits floors where the height difference between laminate and tile is within 1/8 inch. The T-shaped profile sits in a central track and covers the expansion gap on both sides. A reducer strip is the correct choice when tile sits significantly higher than laminate. It provides a gentle slope from the higher surface down to the lower one, protecting the laminate edge and eliminating a raised lip.
Key selection criteria:
- Measure both floor heights before ordering any trim
- Confirm the expansion gap is a minimum of 1/4 inch, ideally 3/8 inch, under the trim
- Match the trim finish to your room’s existing hardware and floor tones. Brushed metal finishes suit modern kitchens; warmer tones suit living areas and hallways
- Never choose a trim width that is too narrow to cover the full expansion gap
| Trim type | Height difference | Best application |
|---|---|---|
| T-moulding | Within 1/8 inch | Open-plan rooms, doorways with equal floors |
| Reducer | 1/4 inch or more | Kitchen to hallway, bathroom to landing |
| Metal edge trim | Any | Exposed laminate edge at tile boundary |
Qualitycarpettrims’ laminate floor edging range covers all three profile types in solid brass, with a track-and-snap fitting system that keeps the trim secure without restricting floor movement.
Step-by-step guide to installing transition strips between laminate and tile
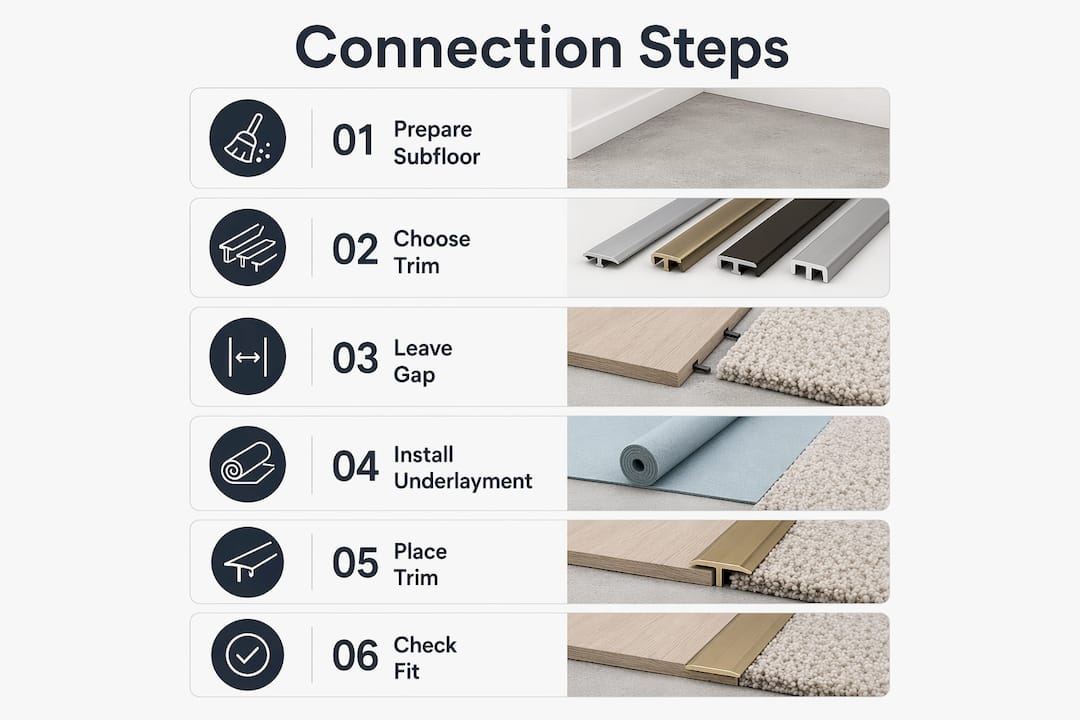
This is where preparation pays off. Follow each step in order and the result will be solid, safe, and visually clean.
- Mark the track position. Hold the track centrally over the expansion gap and mark the fixing hole positions on the subfloor with a pencil.
- Drill fixing holes. Use a masonry bit for concrete subfloors or a wood bit for timber. Drill to the depth specified by the track fixings you are using.
- Secure the track. Screw the metal track into the subfloor only. Never fix the track through the laminate planks themselves. Doing so restricts the floor’s ability to float and can void the laminate manufacturer’s warranty.
- Lay the laminate up to the gap. Use 10mm spacers between the last plank and the tile edge. Use a tapping block and rubber mallet to close the joints between planks near the transition without damaging the board edges.
- Cut the trim to length. Measure the doorway or opening width precisely. Cut the brass trim with a fine-toothed saw or an angle grinder with a metal cutting disc. Deburr the cut ends with a file.
- Snap the trim onto the track. Press the trim firmly into the track channel. Most track systems use a snap-in or press-fit mechanism. Do not hammer directly onto the trim surface. Use a rubber mallet and a scrap piece of timber to protect the finish.
- Remove spacers and check movement. Pull the spacers from the expansion gap. Confirm the laminate can slide slightly under the trim lip without resistance.
Pro Tip: Maintaining the expansion gap under the trim is the single most important step in the entire installation. Skipping it is the most common cause of transition failure, and it cannot be corrected without removing the floor.
Common installation errors to avoid:
- Fixing the track to the laminate plank rather than the subfloor
- Cutting the trim too short and leaving the expansion gap exposed
- Using a trim that is too narrow for the gap width
- Forgetting to remove spacers before snapping the trim into place
- Choosing a plastic or rubber trim that will compress and fail under foot traffic
Troubleshooting common issues with laminate-tile transitions
Even a well-planned installation can develop problems over time. Knowing what to look for helps you act before minor issues become costly repairs.
Subfloor irregularities are the root cause of most transition failures. Locking joint stress, visible wear near the trim, and lifting laminate edges all trace back to inadequate preparation rather than the trim itself. Fix the subfloor first, and most problems disappear.
Signs to watch for and what they mean:
- Clicking or movement in the trim. The track fixing has loosened. Re-drill and re-fix the track into the subfloor.
- Laminate lifting at the edge. The expansion gap has been blocked, either by the trim sitting too low or by debris filling the gap. Remove the trim, clear the gap, and refit.
- Visible wear or denting on the trim surface. This is a sign of a low-quality trim material. Solid brass trims do not dent or deform under normal foot traffic.
- Height mismatch becoming more pronounced. Seasonal movement in the laminate is normal. Check the gap annually and confirm the trim still covers it fully.
Cleaning and maintaining brass trims:
Wipe brass trims with a damp cloth and a mild detergent. Avoid abrasive pads or acidic cleaners, which strip the powder-coat finish. Qualitycarpettrims’ hand-finished brass trims are designed to retain their appearance for the life of the floor without re-finishing.
Key takeaways
Connecting laminate and tile floors correctly requires the right trim profile, a maintained expansion gap of at least 1/4 inch, and a track fixed to the subfloor rather than the laminate planks.
| Point | Details |
|---|---|
| Prepare the subfloor first | Check flatness to 3/16 inch per 10 feet and secure all loose tiles before laying laminate. |
| Match the trim to the height difference | Use T-moulding for equal heights and a reducer when tile sits significantly higher than laminate. |
| Never fix through the laminate | Screw the track into the subfloor only to preserve the floating floor’s ability to move. |
| Keep the expansion gap clear | A minimum 1/4 inch gap under the trim prevents buckling and lifting at the laminate edge. |
| Choose solid brass over cheaper materials | Plastic, rubber, and aluminium trims bend and fail; solid brass holds its shape and finish long-term. |
Why I think most DIYers get the transition wrong before they even start
The most common mistake I see is treating the transition strip as the last thing to think about. Homeowners spend weeks choosing their laminate, agonise over grout colour, and then grab whatever trim is on the shelf at the last minute. That approach almost always ends in a visible, wobbly join that looks wrong from the moment it goes down.
The trim is a structural component of a floating floor system. It has to allow movement. The moment you fix it to the plank rather than the subfloor, or forget the expansion gap, you have created a problem that will show itself within one heating season. I have seen beautifully laid floors buckle at the doorway simply because someone used a plastic trim that compressed and blocked the gap.
My honest recommendation is to choose your trim before you order your laminate. Measure the height difference between your tile and your intended laminate-plus-underlayment stack, and select the correct profile at that point. Then you can plan the installation around the trim, not the other way around. Solid brass trims from Qualitycarpettrims are worth the investment precisely because they do not compress, bend, or discolour. You fit them once and they stay right. For a detailed look at professional flooring transition methods, the Qualitycarpettrims blog covers the full range of profiles and when to use each one.
The aesthetic side matters too. A trim in the right finish ties the two floors together rather than drawing attention to the join. That is the goal: a transition you notice because it looks good, not because it looks wrong.
— Matt
Qualitycarpettrims: solid brass trims for lasting floor transitions

Qualitycarpettrims supplies solid brass transition trims hand-finished in 10 luxury colours, from brushed satin to antique bronze, to suit any interior. Every trim is made in the UK and fitted using a track-and-snap system that keeps the strip secure while allowing your laminate to float freely beneath it. Unlike plastic, rubber, or aluminium trims that bend, dent, and split under daily use, solid brass holds its form and its finish for the life of your floor. Browse the full range, including the popular Matwell Flooring Trim, and order with free samples and fast UK delivery. If you need guidance on which profile suits your specific height difference, the Qualitycarpettrims team is available to advise before you buy.
FAQ
What is the best trim for connecting laminate and tile floors?
A T-moulding suits floors of equal height, while a reducer strip is correct when tile sits higher than laminate. Both should be solid brass for durability.
How big should the expansion gap be under a transition strip?
The expansion gap should be a minimum of 1/4 inch, ideally 3/8 inch, to allow the laminate to expand and contract with seasonal temperature changes.
Can I screw a transition strip directly into my laminate planks?
No. Fixing a strip through the laminate restricts floor movement, causes joint stress, and voids most laminate manufacturer warranties. Fix the track into the subfloor only.
How do I stop the tile pattern showing through my laminate?
Fill deep grout lines with a floor-levelling compound and use a compression-resistant underlayment. A flatness tolerance of 3/16 inch per 10 feet is the standard to meet before laying laminate over tile.
How often should I check my laminate-tile transition?
Check the expansion gap and trim fixings once a year, ideally at the end of the heating season when the floor has contracted to its smallest dimension.
Recommended
- Flawless Laminate Finishes: Edging, Beading, And Transition Strips Made Simple – Quality Carpet Trims
- Carpet Meets Laminate Or Tile: The Best Trims For A Safe, Neat Join – Quality Carpet Trims
- Laminate to Carpet Join: Ensuring Seamless Transitions
- Seamless carpet to hardfloor connections: expert guide