
Blog
Achieve seamless floor transitions: step-by-step UK workflow

May
TL;DR:
- Proper workflow and planning are essential for professional-looking, safe, and durable floor transitions.
- Selecting the correct trim type and quality materials impacts both appearance and longevity.
- Accurate measuring, fitting, and addressing subfloor unevenness ensure a seamless, safe finish.
Unsightly floor transitions are one of the most common finishing mistakes in UK homes and commercial spaces. A ragged edge where carpet meets tile, or a wobbly metal strip lifting in a doorway, does far more damage than most people realise. It breaks the visual flow of a room, creates a genuine trip hazard, and signals to anyone who notices that the job was rushed. The good news is that with the right workflow, the right trim, and a little patience, you can achieve results that look entirely professional — whether you’re a seasoned contractor or a first-time DIYer tackling your own renovation.
Table of Contents
- Understanding floor transitions and why workflow matters
- Essential tools and materials: what you’ll need before starting
- Step-by-step floor transition installation workflow
- Troubleshooting and perfecting your result
- What most guides miss about floor transition workflows
- Upgrade your finish with high-quality trims
- Frequently asked questions
Key Takeaways
| Point | Details |
|---|---|
| Plan your workflow | A clear workflow and the right materials mean fewer mistakes and a more professional finish. |
| Prepare properly | Gathering the correct tools and selecting suitable trims is critical for efficiency and results. |
| Follow each step | Careful measuring, cutting, and fixing are key to a secure, seamless transition. |
| Tackle issues head-on | Troubleshooting and adjustment perfect the final look and feel. |
Understanding floor transitions and why workflow matters
A floor transition is the point where two different flooring surfaces meet. This might be where carpet ends and a tiled hallway begins, where laminate meets hardwood in an open-plan kitchen-diner, or simply where one room’s flooring finishes at a doorway. These junctions are unavoidable, but how they’re handled makes all the difference.
The importance of floor transitions goes well beyond looks. Floor transitions are critical for both safety and style — they improve longevity and add real value to the finished floor. A poorly fitted transition strip lifts at the edges over time, catches on socks and shoes, and can cause falls. An untreated edge frays or chips, shortening the life of the flooring on both sides.
When workflow is ignored, problems stack up quickly. Gaps appear. Trims sit proud of the floor surface and become trip hazards. Fixings are visible. The finish looks rushed. All of these issues are avoidable with a properly planned approach that starts before a single tool is picked up.
Open-plan layouts are particularly unforgiving. When a space flows from one flooring type to another without visual interruption, even small inconsistencies in the transition are immediately obvious. The same applies to heavily trafficked doorways, where wear is concentrated and the trim needs to be both secure and level. Using 3D floor plan visualisations at the design stage can help you anticipate where transitions will fall and plan accordingly.
Here’s a quick comparison of the main trim types and where they’re typically used:
| Trim type | Best used for | Key benefit |
|---|---|---|
| T-bar / joining strip | Hardfloor to hardfloor, same level | Clean, flush join |
| Carpet edge trim | Carpet to hardfloor | Holds carpet edge securely |
| Reducer strip | Floors at slightly different heights | Smooth ramp between levels |
| Threshold bar | Doorways, internal or external | Durable, defined border |
| Matwell trim | Inset mats, lobby areas | Professional, recessed finish |
Key situations where transitions are especially critical:
- Doorways between rooms with different flooring types
- Open-plan areas where flooring changes mid-space
- Conservatories and extensions where internal meets external floor materials
- Kitchens and bathrooms where hardfloor meets carpet in adjacent rooms
- Entrance lobbies with inset matwell areas
Essential tools and materials: what you’ll need before starting
Now you know why workflow and planning matter, the next step is making sure you have everything to hand before starting the installation. Arriving at a job half-prepared is the fastest route to a poor finish and wasted trips to the merchant.
Selecting the right transition strips and tools for uneven floors ensures both appearance and durability from the outset. The table below covers the key tools and materials for most residential and light commercial transition jobs:

| Tool / Material | Purpose | Notes |
|---|---|---|
| Steel tape measure | Accurate length measurement | Essential for every job |
| Fine-tooth hacksaw or mitre saw | Cutting metal trims cleanly | Fine-tooth blade gives cleaner edges |
| File or deburring tool | Smoothing cut ends | Prevents sharp edges after cutting |
| Pencil or chalk line | Marking cut lines and positions | More reliable than felt-tip on metal |
| Drill and bits | Fixing into concrete or timber subfloor | Match bit type to subfloor material |
| Screws or nails | Securing trim to subfloor | Check fixing type required for your trim |
| Adhesive (grab adhesive) | Alternative fixing on solid subfloors | Useful where drilling is not ideal |
| Spirit level | Checking flush fit | Critical for uneven floors |
| Knee pads | Comfort during installation | Underrated but genuinely useful |
| Transition trims (solid metal) | The primary finishing product | Order correct profile for your scenario |
The type of transition you’re creating affects which trim profile is appropriate. Carpet-to-carpet transitions need a different profile to carpet-to-hardfloor joins, and hardfloor-to-hardfloor requires something else again. For transition strips for uneven floors, adjustable reducer profiles are available that accommodate height differences without creating a sharp lip.
At the planning stage, check the following before ordering anything:
- Subfloor level: Is the subfloor level on both sides of the transition? Use a spirit level to check across the join.
- Gap width: How wide is the gap between the two floor edges? This determines the trim width required.
- Height difference: Is there a step between the two surfaces? This dictates whether a flat or reducer profile is needed.
- Fixing options: What is the subfloor made of — timber joists, concrete screed, or a composite board?
Pro Tip: Always order 10 to 15 per cent more trim than your measured length. Mistakes during cutting happen, and having a small surplus means you won’t be waiting on a reorder before you can finish the job.
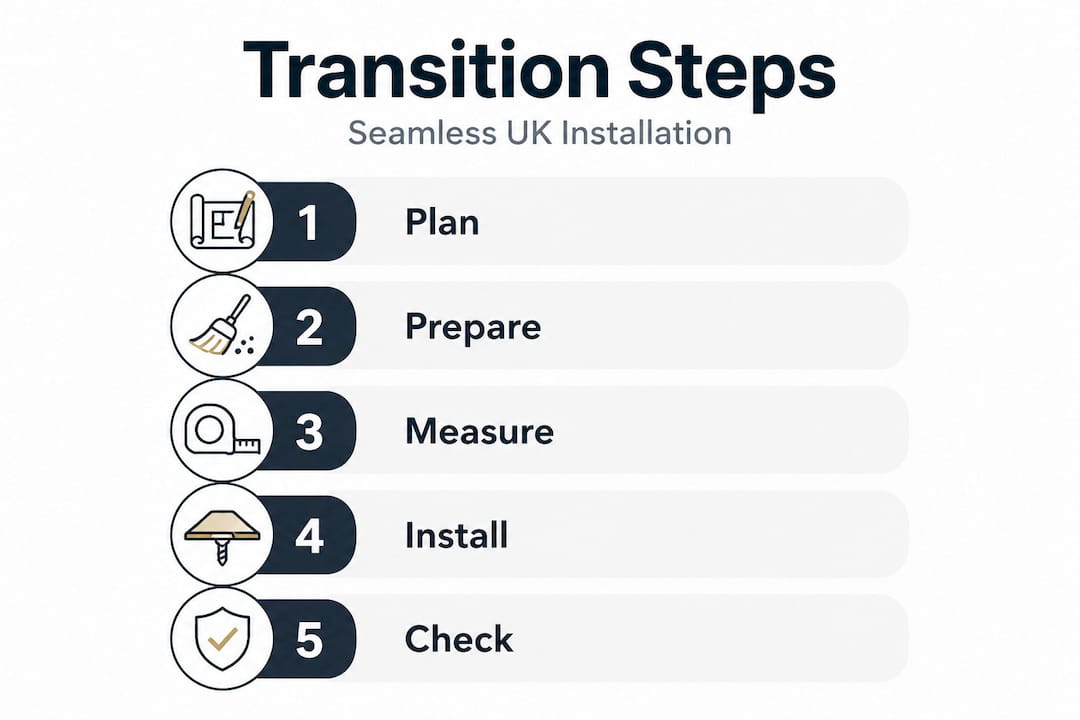
Step-by-step floor transition installation workflow
With tools and materials ready, and a clear understanding of what’s involved, you’re set for the practical workflow itself. A professional result comes from careful planning, accurate measuring, and following each step methodically. Rushing any stage introduces errors that compound later.
Here is the core workflow broken into clear steps:
- Measure the opening or transition gap accurately. Measure the full length of the transition at least twice. Note any irregularities in the gap width along its length.
- Select the correct trim profile. Different transition profiles are suitable depending on the flooring types and levels being joined. Match the trim to your specific scenario.
- Cut the trim to length. Use a fine-tooth hacksaw or mitre saw. Cut slightly long first, then trim to exact length. File all cut ends smooth immediately.
- Dry fit the trim. Place the trim in position without fixing it. Check it sits flush on both sides, covers the gap neatly, and requires no force to sit flat.
- Mark fixing positions. With the trim in place, mark through the pre-drilled holes (or mark positions if drilling through the trim itself).
- Remove the trim and drill fixing holes. Drill into the subfloor at the marked positions. Use the correct drill bit for timber or masonry.
- Apply adhesive if required. On solid subfloors where drilling is not ideal, apply a continuous bead of grab adhesive to the underside of the trim.
- Fix the trim securely. Screw or nail through into the subfloor. On solid metal trims, ensure each fixing is seated flush so nothing protrudes above the trim surface.
- Check the fit one final time. Run your hand along the trim. Nothing should catch or rock. The surface should feel smooth and level.
- Tuck carpet edges or seat hardfloor edges as required. Depending on the trim type, tuck carpet under the nosing lip or ensure hardfloor edges are seated in the trim channel correctly.
Pro Tip: Always test the full dry fit before committing to final fixing. A trim that looks right at first glance can reveal alignment problems once you check along its full length.
Safety note: Always double-check for underfloor pipes or wires before nailing or screwing down trims. Use a pipe and cable detector on any subfloor where services may be concealed.
The table below illustrates how the sequence adapts for different transition types. Use this as your reference at each job:
| Transition type | Key step to prioritise | Common pitfall |
|---|---|---|
| Carpet to carpet | Accurate gap measurement | Trim too wide, buckling carpet |
| Carpet to hardfloor | Correct profile for height difference | Sharp lip creating trip hazard |
| Hardfloor to hardfloor | Level check across both surfaces | Visible gap under trim |
| Uneven subfloor | Re-levelling or adjustable profile | Trim rocking after fixing |
For a more thorough breakdown of each scenario, the seamless transition guide covers individual scenarios in detail and is worth consulting before you start.
Troubleshooting and perfecting your result
After the main installation, there are a few important checks and tweaks to ensure the transition is both attractive and durable. Even when the installation goes smoothly, small issues can surface on close inspection.
The most common problems and their fixes include:
- Wrong trim type selected: If the trim is clearly not suited to the height difference or material combination, the only proper fix is to remove it and start with the correct profile. Forcing an ill-suited trim into position always shows.
- Trim rocking or lifting at one end: Usually caused by an uneven subfloor. Remove the trim, check the subfloor with a spirit level, and use smoothing compound to correct minor high or low spots before refixing.
- Visible fasteners: If screws or nails are standing proud, the trim is either not fully seated or the fixings are too long. Replace with shorter fixings and countersink properly.
- Gap visible beneath the trim: The trim may be slightly too narrow for the gap, or the subfloor has a high point mid-span. Sand down any high spots, or consider a wider profile.
- Trim feels sharp underfoot at the edge: This usually means the cut end was not filed smooth, or the trim has shifted so its cut end is now exposed. Refile, reposition, and refix.
Uneven transitions can often be resolved with the correct profile or by re-levelling the subfloor before fitting. It’s worth spending time at this stage rather than ignoring small issues — they tend to worsen with foot traffic.
For planning floor transitions visually before committing to a layout, digital tools can reveal potential problem zones early and save significant remedial work.
Quick checks before calling the job finished:
- Walk over the transition several times at a normal pace. No rocking, lifting, or noise.
- Run your fingertips across the full length of the trim surface. No sharp edges or raised fixings.
- Check visually from a low angle. The trim should appear level with both floor surfaces.
- Open and close the door over the trim if it’s a doorway transition. There should be no catching.
“A polished transition feels smooth underfoot and visually unites your space.”
What most guides miss about floor transition workflows
Most step-by-step guides present the process as if every installation is identical: measure, cut, fix, done. The reality on site is rarely so clean.
The subfloor is almost never perfectly level. Older UK properties in particular have floors that have settled unevenly over decades, and no amount of careful measuring at the planning stage fully prepares you for what you discover when the existing flooring comes up. Adaptability matters far more than memorising a checklist.
In our experience, the installers who consistently achieve the best results are those who treat the workflow as a decision-making framework rather than a fixed recipe. When a subfloor surprise appears — a high spot, a buried cable, an unexpected step — they adjust. They re-level before fitting. They switch to a reducer profile mid-job because the conditions call for it. They don’t force a solution that almost fits.
There’s also an important truth about materials. The quality of the trim itself shapes the outcome at least as much as the quality of the installation. Inferior trims bend, corrode, and loosen far sooner than solid metal alternatives. We see this repeatedly. A contractor can follow every step correctly and still end up with a poor result in six months because the product wasn’t up to the job. Solid metal trims, hand-finished to a precise standard, hold their shape, their fixing, and their appearance for years.
The other thing most guides understate is the safety dimension. An amateur might prioritise getting the visual finish right and view the safety aspect as secondary. A professional understands that the two are inseparable. A trim that looks perfect but rocks slightly under foot traffic is a hazard. The detailed workflow advice we provide reflects this balance, because a finish that’s only visually pleasing is not truly finished.
Approach every transition job as a fresh problem to be solved with the right tools, the right product, and the right level of attention to what the site is actually telling you.
Upgrade your finish with high-quality trims
Once you understand the workflow, the next step is sourcing trims that guarantee a professional finish every time.

At Quality Carpet Trims, we supply solid metal door bars and flooring trims that are hand-finished in ten beautiful finishes to complement any interior scheme. Whether you’re working on a straightforward doorway transition or a bespoke lobby area, our matwell flooring trims deliver a clean, recessed finish that looks genuinely premium. If you’re not yet sure which profile suits your specific situation, our guide to choosing the right trim takes the guesswork out of the decision. For room-to-room joins, browse the full range of carpet to carpet trims to find exactly what your project needs. Free samples are available, so you can check the finish against your flooring before committing.
Frequently asked questions
What is the best trim for joining carpet to tile flooring?
Choose a carpet-to-hardfloor trim specifically designed for these transitions, as it ensures a level and safe join between the two very different materials. These profiles hold the carpet edge securely while accommodating the harder surface on the adjacent side.
How can I fix an uneven floor before installing a transition trim?
Level minor height differences with an appropriate self-levelling or smoothing compound, or use an adjustable profile from the transition strips for uneven floors range. Addressing the subfloor before fitting always produces a more stable and attractive result.
Do I need professional tools for a quality transition install?
Basic hand tools and careful measurement are usually sufficient for DIYers, but a mitre saw and a quality deburring tool will improve the cleanliness of your cuts and speed up the process significantly.
Are floor transitions necessary for open-plan spaces?
Yes — in open-plan layouts, carefully chosen transitions add both visual unity and safety. Floor transitions are important for safety and style, and they define zones within a space without interrupting its flow.
Recommended
- Achieve seamless floor transitions: step-by-step UK guide
- Perfect bathroom floor transitions: step-by-step UK guide
- Professional floor transition steps for polished results
- What is a flooring transition: guide for UK homeowners 2026
- Fliesenleger fachbetrieb workflow: so gelingt die verlegung