
Blog
What is edge trim for vinyl? Professional flooring guide

Mar
Many homeowners discover too late that neglecting vinyl floor edges leads to water damage, lifting planks, and expensive repairs. Without proper edge trim, even premium vinyl flooring deteriorates quickly at exposed edges where moisture seeps beneath, causing subfloor rot. This guide explains what edge trim is, why it’s essential for protecting your investment, and how to select and install the right profiles for lasting, professional results.
Table of Contents
- What Is Edge Trim For Vinyl Flooring?
- Types Of Edge Trims And When To Use Them
- Choosing Materials And Styles For Your Vinyl Edge Trim
- How To Install Vinyl Edge Trims Correctly
- Explore Premium Vinyl Edge Trims At Quality Carpet Trims
- What Is Edge Trim For Vinyl? Common Questions Answered
Key takeaways
| Point | Details |
|---|---|
| Edge trim protects vulnerable vinyl edges | Prevents moisture ingress and physical damage that cause lifting and subfloor issues. |
| Different trims serve specific functions | T-moulding for same-height transitions, reducer strips for height changes, nosings for stairs. |
| Material choice affects durability and safety | UPVC for indoor moisture resistance, anodised aluminium for outdoor strength, rubber for slip resistance. |
| Proper installation ensures longevity | Accurate measurements, secure fastening, and expansion allowance prevent buckling and trip hazards. |
| Professional finishing extends floor lifespan | Quality trims prevent costly damage whilst delivering aesthetically cohesive results. |
What is edge trim for vinyl flooring?
Edge trim is a finishing profile fixed along exposed vinyl flooring edges to create clean transitions and protect vulnerable perimeters. These profiles perform three critical functions: they shield raw edges from moisture and physical damage, accommodate the natural expansion and contraction vinyl undergoes with temperature fluctuations, and deliver a polished appearance that conceals installation gaps.
Without edge trim, vinyl planks face serious risks. Exposed edges chip easily under foot traffic, allowing water to penetrate beneath the flooring. This moisture ingress causes planks to lift, adhesive to fail, and subfloors to rot, ultimately requiring complete replacement. Research shows that edge trim provides professional finishes whilst protecting from damage.
Vinyl flooring naturally expands up to 10mm across a 10-metre span when temperatures rise. Edge trims accommodate this movement by covering the necessary expansion gap around room perimeters. Standard expansion gaps range from 6mm to 12mm depending on room size and climate conditions.
Common edge trim materials include:
- UPVC profiles offering excellent moisture resistance and minimal maintenance requirements
- Anodised aluminium for superior durability in high-traffic commercial settings
- Flexible PVC for curved edges and irregular perimeters
- Metal composites combining strength with aesthetic versatility
Quality vinyl edge trim transforms amateur installations into professional results. The right profile conceals imperfections whilst protecting your flooring investment for decades. Understanding trim functions helps you select appropriate profiles for each application area in your project.
Pro Tip: Measure your expansion gap before ordering trim profiles. Trims must fully cover the gap whilst allowing the flooring room to move, typically requiring profiles 15-20mm wide for standard residential installations.
Types of edge trims and when to use them
Different edge scenarios demand specific trim profiles. Selecting the wrong type compromises both aesthetics and functionality. Understanding each profile’s purpose ensures you specify correctly for every transition point.
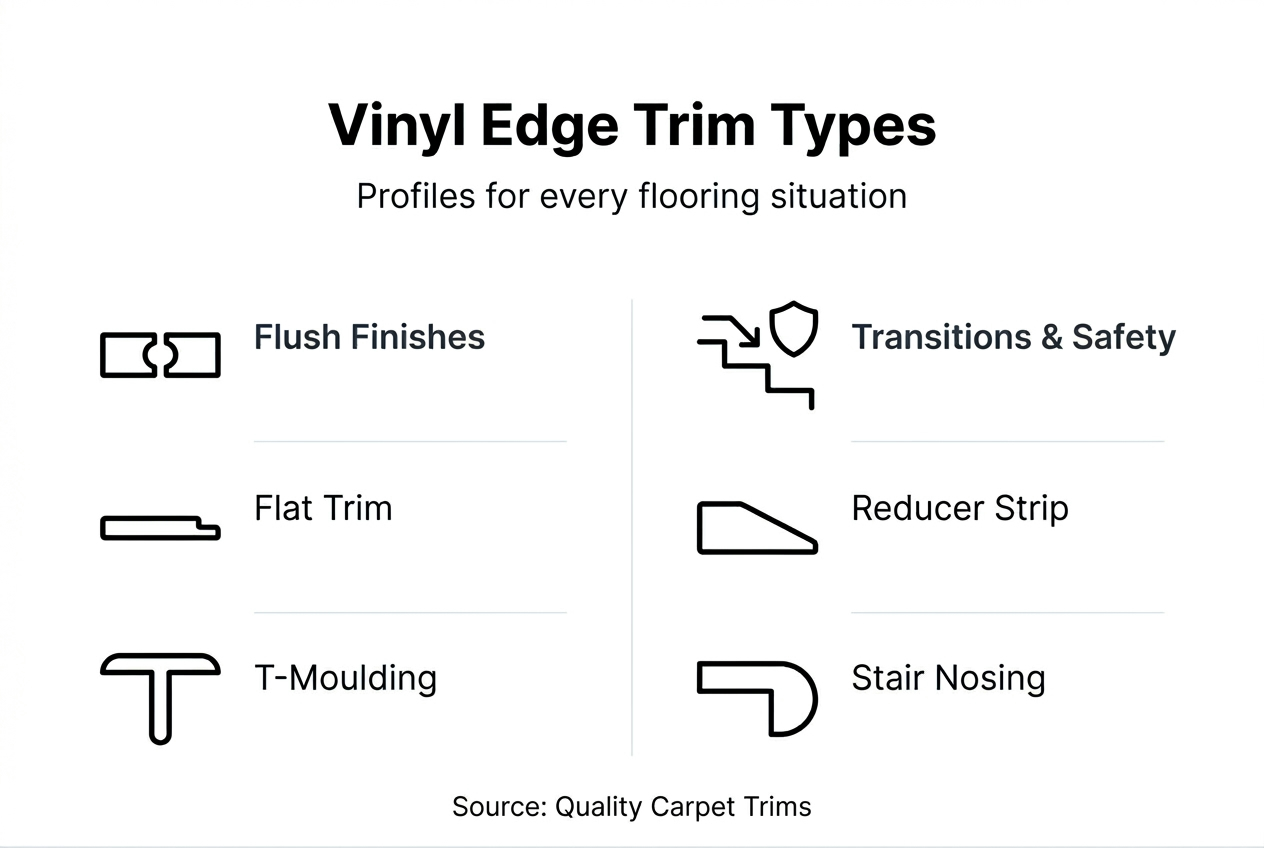
Quadrant trims feature rounded profiles that sit against walls, creating subtle transitions between vertical and horizontal surfaces. These work brilliantly where skirting boards aren’t present or where you want minimal visual interruption. The curved design prevents sharp edges whilst concealing the expansion gap elegantly.
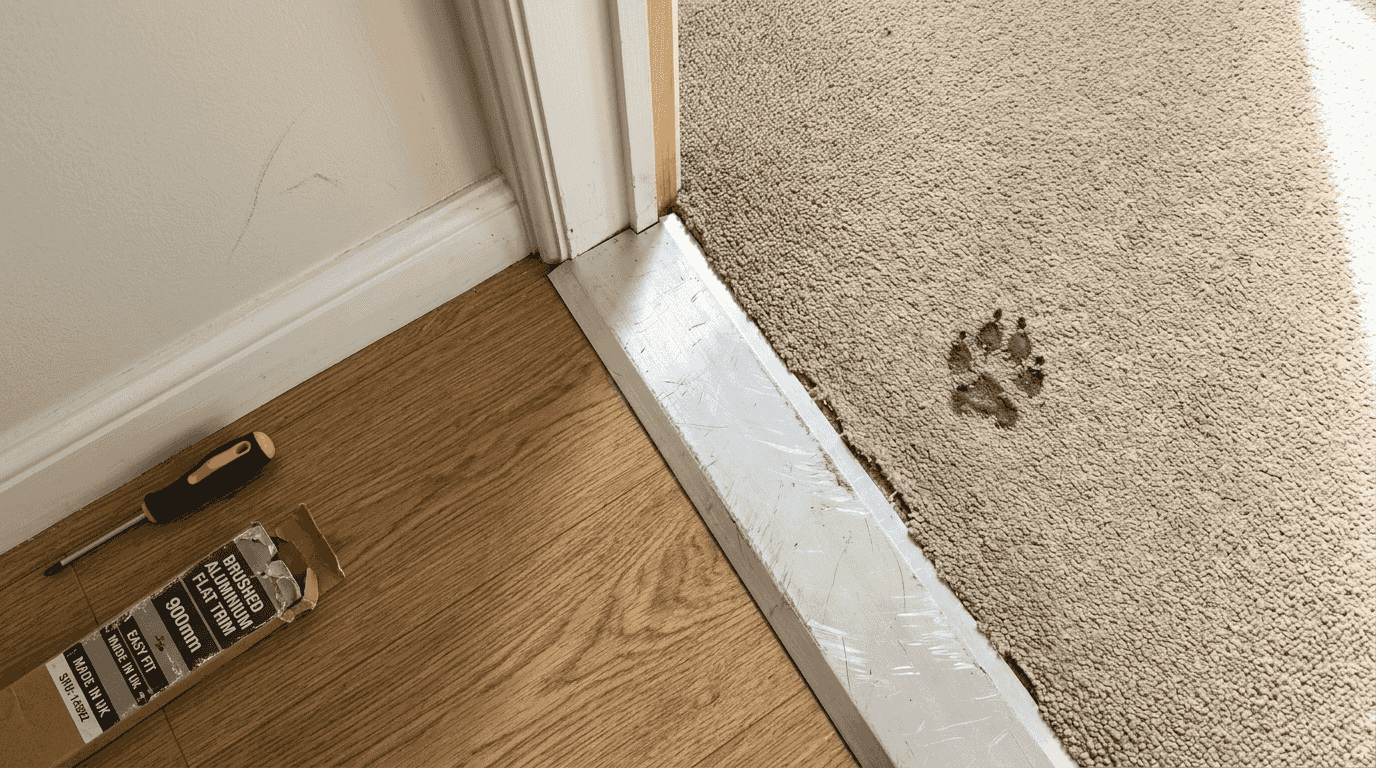
Flat trims deliver flush finishes where vinyl meets doorways or other flooring types at the same height. These low-profile strips sit almost invisibly across thresholds, protecting edges without creating trip hazards. Commercial installations favour flat trims for their unobtrusive appearance and wheelchair accessibility.
T-moulding enables smooth transitions between same-height floors, commonly where vinyl meets another vinyl area or laminate. The raised centre section covers both expansion gaps whilst the wings secure beneath each floor. Open-plan layouts connecting multiple rooms rely heavily on T-moulding for seamless flow.
Reducer strips solve the challenge of height differences between flooring types. When vinyl sits higher than adjacent carpet or tile, these angled profiles create gentle slopes that prevent tripping whilst protecting both floor edges. The gradual transition maintains accessibility standards in commercial settings.
Stair nosings protect step edges from the intense wear stairs endure daily. Beyond edge protection, quality nosings incorporate slip-resistant surfaces that dramatically improve safety. Textured aluminium or rubber inserts provide grip even when wet, crucial for family homes and commercial premises.
Application guide by trim type:
| Trim Type | Best Application | Key Benefit |
|---|---|---|
| Quadrant | Wall perimeters without skirting | Conceals gaps subtly |
| Flat trim | Doorways and same-height transitions | Minimal profile, no trip hazard |
| T-moulding | Room dividers between equal heights | Professional appearance |
| Reducer strip | Height changes between floor types | Safe, gradual slope |
| Stair nosing | All step edges | Safety and edge protection |
Common types include quadrant, flat, and angle trims, each serving unique finishing purposes. Angle trims specifically handle corners where floors meet at 90 degrees, often at room entrances or L-shaped layouts. These prevent the vulnerable corner edges from damage whilst maintaining clean lines.
Pro Tip: For open-plan spaces, use consistent trim styles throughout to create visual continuity. Mixing profiles unnecessarily draws attention to transitions you want to minimise.
Choosing vinyl floor edge trim types correctly prevents installation mistakes that compromise durability. Consider traffic patterns, adjacent materials, and height differences before ordering to ensure you specify appropriate profiles.
Choosing materials and styles for your vinyl edge trim
Material selection dramatically impacts trim performance and longevity. The wrong material fails prematurely, whilst appropriate choices deliver decades of reliable service. Your decision should balance durability requirements, aesthetic preferences, location conditions, and safety considerations.
UPVC offers durability with moisture resistance and minimal upkeep, available in multiple colours. These profiles suit most indoor residential applications where moderate traffic occurs. UPVC resists moisture excellently, making it ideal for kitchens, bathrooms, and utility areas where water exposure happens regularly. Colour-matched options ensure trims blend seamlessly with your vinyl flooring.
Anodised aluminium provides superior strength for commercial installations and outdoor applications. These profiles withstand heavy foot traffic without denting or flexing. Aluminium stair nosing performs best outdoors due to weather resistance. The anodising process creates a protective oxide layer that prevents corrosion even in coastal environments.
Rubber and PVC trims deliver enhanced slip resistance crucial for stair safety. These materials offer comfortable underfoot feel whilst preventing dangerous slips on steps. Indoor stairs benefit enormously from rubber nosings with aggressive tread patterns that maintain grip even when wet from tracked-in rain.
Material comparison for different settings:
- Residential indoor: UPVC for affordability and adequate durability in normal traffic conditions
- Commercial indoor: Anodised aluminium for heavy traffic resistance and extended lifespan
- Outdoor areas: Anodised aluminium exclusively for weather and UV resistance
- Stair applications: Rubber or textured PVC for maximum slip resistance and safety
- Wet areas: UPVC or aluminium with drainage channels to prevent water pooling
Finish selection affects both aesthetics and functionality. Brushed metal finishes conceal minor scratches better than polished surfaces in high-traffic areas. Matt finishes reduce glare in brightly lit spaces whilst providing better slip resistance than glossy alternatives.
Colour matching requires careful consideration. Exact matches create seamless appearances where trims virtually disappear. Contrasting colours make transitions visually prominent, useful for accessibility where you want clear definition between spaces or levels. Many vinyl floor edge trim materials come in ten finishes to coordinate perfectly with popular flooring colours.
Safety features deserve priority in material selection. High-visibility yellow nosings benefit commercial settings where warning of level changes prevents accidents. Photoluminescent strips glow in darkness, essential for emergency egress routes in public buildings. Textured surfaces provide mechanical grip superior to smooth finishes.
Pro Tip: Order samples of shortlisted trims to test against your actual flooring under room lighting conditions. Colours appear dramatically different under various light sources, and physical samples prevent costly ordering mistakes.
Quality stair nosing options incorporate slip-resistant inserts as standard. These removable rubber or carborundum strips allow replacement without changing the entire nosing, extending product life whilst maintaining safety performance throughout decades of use.
How to install vinyl edge trims correctly
Professional installation separates lasting results from premature failures. Even premium trims perform poorly when fitted incorrectly. Following systematic methods ensures your edge trims deliver decades of reliable service whilst maintaining visual appeal.
Measure expansion gaps accurately before cutting any trim. Proper installation involves precise measurements and secure fastening to prevent movement and damage. Standard gaps range from 6mm for small rooms to 12mm for spaces exceeding 10 metres. Insufficient gaps cause flooring to buckle during expansion, whilst excessive gaps look unprofessional and allow debris accumulation.
Installation sequence for optimal results:
- Clean the substrate thoroughly, removing dust, debris, and old adhesive residues that prevent proper bonding.
- Dry-fit trim pieces to verify measurements and identify necessary adjustments before applying adhesive.
- Cut trims using appropriate tools: fine-tooth saws for UPVC, metal cutting blades for aluminium profiles.
- Apply manufacturer-specified adhesive evenly along the substrate, avoiding excess that squeezes out visibly.
- Press trim firmly into position, ensuring consistent contact along the entire length without gaps.
- Secure with screws if specified, drilling pilot holes to prevent profile splitting or cracking.
- Remove excess adhesive immediately using recommended solvents before it cures permanently.
- Allow full curing time before subjecting trims to traffic or cleaning procedures.
Screw fixing provides superior holding power for heavy-traffic areas and stair nosings where forces are substantial. Follow manufacturer instructions carefully on adhesive or screw fixing, ensuring substrates are clean and load-bearing. Space screws at recommended intervals, typically 300mm for residential and 200mm for commercial applications. Countersink screw heads flush with trim surfaces to prevent snagging and maintain smooth profiles.
Adhesive-only installation suits lighter-duty applications where appearance matters most. Contact adhesives work brilliantly for vertical applications like wall base trims. Epoxy adhesives deliver maximum strength for permanent installations. Flexible adhesives accommodate slight movement without bond failure.
Pro Tip: Leave 2mm gaps between trim sections on long runs to accommodate the trim’s own expansion. Fill these joints with colour-matched flexible sealant for invisible connections that won’t crack.
Flush fitting prevents trip hazards that cause injuries and liability issues. Use a straight edge to verify trim tops sit level with flooring surfaces. High spots create dangerous catches for feet and wheeled equipment. Low spots collect dirt and look unprofessional.
Joining corners requires precision cutting at 45-degree mitres for professional appearances. Use mitre boxes or saws for accurate angles. Test-fit mitres before applying adhesive, adjusting until joints close tightly without gaps. Quality vinyl edge trim installation transforms amateur projects into professional results through attention to these details.
Expansion allowance prevents buckling disasters. Never pin trims directly through vinyl flooring, as this restricts necessary movement. Fix trims only to substrates, allowing vinyl to float freely beneath. This principle applies particularly where floors span large areas or experience significant temperature variations.
Explore premium vinyl edge trims at Quality Carpet Trims
Your vinyl flooring deserves finishing touches that match its quality. Inferior trims undermine even the finest installations, whilst professional profiles enhance durability and aesthetics for decades. Quality Carpet Trims specialises in hand-finished solid metal profiles that deliver exceptional results UK homeowners and contractors trust.

Browse an extensive vinyl floor edge trims range featuring ten beautiful finishes to coordinate perfectly with your project. Each profile undergoes hand finishing in the UK, ensuring consistent quality and attention to detail mass-produced alternatives cannot match. From subtle brushed nickel to striking polished brass, finishes complement modern and traditional interiors alike.
Expert guidance helps you navigate profile selection confidently. Detailed product information clarifies which trim types suit specific applications, preventing costly specification mistakes. The comprehensive flooring trim types guide explains functions and installation requirements clearly.
Specialist products address unique challenges. Matwell flooring trims create professional recesses for entrance mats that trap dirt before it reaches your vinyl. Coordinating profiles across your entire project delivers visual continuity that elevates interior design.
What is edge trim for vinyl? common questions answered
Do I really need edge trim for vinyl flooring?
Yes, edge trim is essential for protecting vinyl edges from moisture damage and providing professional finishes. Without trim, exposed edges allow water penetration that causes lifting, subfloor rot, and expensive repairs. Trims also accommodate necessary expansion gaps whilst preventing trip hazards.
Can I install vinyl edge trim myself?
DIY installation is achievable with basic tools and careful measurement. Success requires accurate gap measurement, clean substrate preparation, and following manufacturer fixing instructions precisely. Consider professional installation for stairs and complex layouts where safety and precision are critical.
What’s the difference between T-moulding and reducer strips?
T-moulding joins floors at equal heights with a raised centre covering both expansion gaps. Reducer strips create angled transitions where one floor sits higher than another, preventing trip hazards whilst protecting both edges. Choose based on whether adjacent floors are level or have height differences.
How do I choose between UPVC and metal trims?
UPVC suits most indoor residential applications, offering moisture resistance and affordability. Metal trims provide superior durability for high-traffic commercial areas and outdoor installations where weather resistance matters. Consider traffic levels, location conditions, and aesthetic preferences when deciding.
Do stair nosings really improve safety?
Stair nosings dramatically reduce slip accidents through textured surfaces that provide mechanical grip. They also protect vulnerable step edges from wear that creates dangerous lips. Quality nosings with slip-resistant inserts are essential for family homes and mandatory in commercial buildings under safety regulations.
How often should vinyl edge trims be replaced?
Properly installed quality trims last 15 to 25 years in residential settings. Replace trims when they show visible damage, become loose, or no longer provide adequate edge protection. Regular inspection identifies issues early, preventing flooring damage that costs substantially more than trim replacement.
Recommended
- Vinyl Floor Edge Trim – Premier Trims | Quality Carpet Trims UK
- What is vinyl edge trim? 70% fewer flooring failures
- Flooring Edge Trims: The Key to a Seamless Finish