
Blog
Understanding door bars: enhance flooring transitions with style

Apr
TL;DR:
- Door bars protect flooring edges and create smooth transitions between different floor surfaces.
- Selecting the correct profile and fixing method ensures durability and professional appearance.
- Well-chosen, properly fitted door bars enhance safety, aesthetics, and longevity of flooring installations.
Most homeowners give door bars little thought until a flooring edge begins to fray, a trip hazard appears, or an ugly gap opens up between two different floor surfaces. That moment of frustration is avoidable. Door bars, sometimes called threshold strips or transition strips, do far more than tidy up a doorway. They protect flooring edges, manage expansion movement, smooth out height differences, and contribute meaningfully to how a room looks. This guide covers everything you need to know: what door bars actually do, how to choose the right profile, how to fit them correctly, and how to get the most from them in both style and function.
Table of Contents
- What are door bars and why are they used?
- Understanding the main types of door bars
- Installation best practices for door bars
- Design choices and added benefits of using door bars
- Troubleshooting common problems and special considerations
- Our take: Why careful selection and fitting truly matter
- Find the perfect door bars for your next project
- Frequently asked questions
Key Takeaways
| Point | Details |
|---|---|
| Essential for safe transitions | Door bars protect flooring edges, bridge height differences, and prevent trip hazards between rooms. |
| Choose the right profile | Different floor types and levels require specific door bar designs for the best performance and finish. |
| Proper installation matters | Fitting techniques—like centring, measuring accurately, and using the right fixings—are key to long-lasting results. |
| Added style and durability | High-quality door bars enhance your home’s look, reduce noise and draughts, and stand up to everyday use. |
What are door bars and why are they used?
Before diving into profiles and fitting methods, it helps to understand the mechanics behind flooring transitions. When two different floor surfaces meet at a doorway, you rarely get a clean, safe join without something bridging the gap. That is exactly where door bars come in.
Door bars, also known as threshold strips, are metal or wooden profiles fitted across doorways to create neat joins between different flooring types such as carpet, laminate, vinyl, tile, and wood. They are one of the most practical yet underappreciated elements of any interior flooring project.
Think of a door bar as a structural and aesthetic bridge. On one side you might have plush carpet, on the other a hard laminate floor. Without a bar, the carpet edge frays over time, the laminate chips, and the gap between the two surfaces becomes a genuine trip hazard. A well-fitted door bar eliminates all three problems in one straightforward installation.
Here is a summary of the key roles door bars fulfil:
- Protecting cut edges from fraying (carpet), chipping (laminate), or lifting (vinyl)
- Bridging height differences between floor surfaces using ramped or reducer profiles
- Covering expansion gaps that floating floors such as laminate require to move naturally
- Reducing trip hazards by providing a smooth, gradual transition between levels
- Finishing doorways with a polished, professional look that ties flooring together
The mechanical functions are just as important as the visual ones. Expansion gap coverage for floating floors typically requires bridging 5 to 10mm, and this must be done without restricting the natural movement of the floor beneath. A bar fixed correctly to the subfloor handles this perfectly.
A door bar is not an optional finishing touch. It is a functional component that protects your flooring investment and keeps your home safe for everyone who walks through it.
When you consider that quality flooring can represent a significant financial outlay, protecting those edges with the right bar is simply good practice.
Understanding the main types of door bars
Not all door bars are the same, and choosing the wrong profile is one of the most common DIY mistakes. The right choice depends on the flooring types on either side of the doorway and the height difference between them.
Here is a breakdown of the main profiles and their ideal uses:
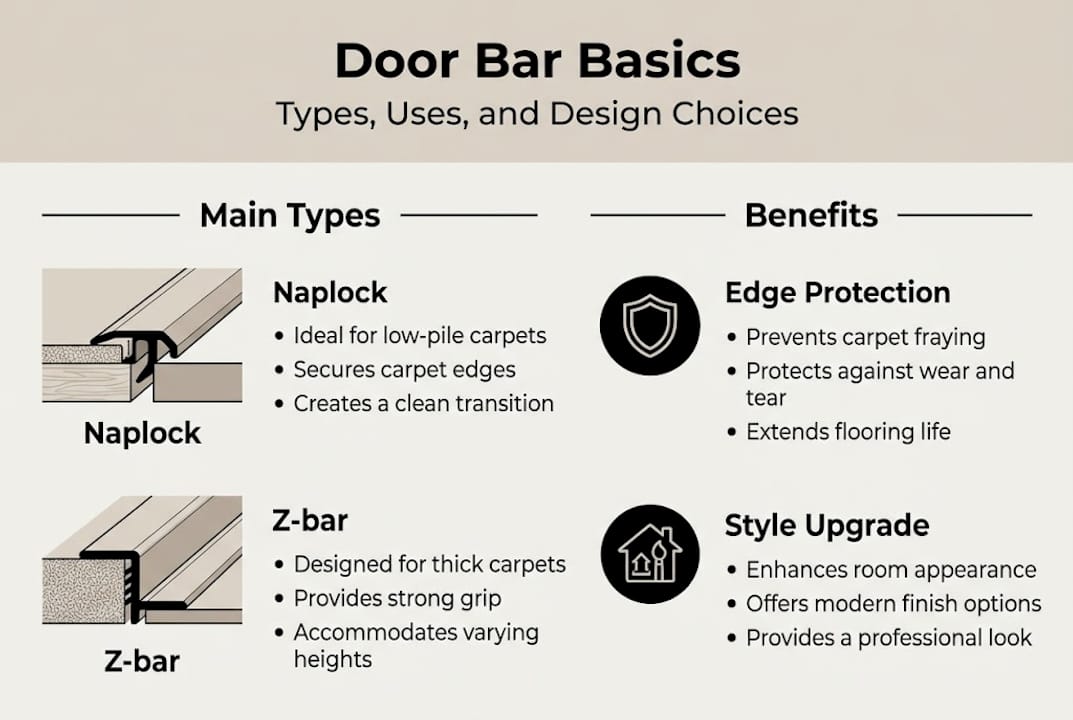
- Naplock bars: Designed for carpet-to-carpet joins. Single or double naplock bars use serrated pins to grip carpet under tension, holding it firmly without adhesive.
- Z-bars: Ideal for carpet-to-hard floor transitions. The Z-shaped profile tucks under the carpet edge on one side and lies flat against the hard floor on the other.
- T-bars: Used where two hard floors of the same height meet, such as laminate to tile. These are typically 12 to 25mm wide.
- Reducers: For transitions where one floor sits 3 to 8mm higher than the other, providing a gentle slope between the two surfaces.
- Ramps: Handle more significant height differences, accommodating drops of up to 20mm. Especially useful for accessibility purposes.
- Extra-wide bars: Cover gaps wider than standard, bridging up to 100mm in some cases.
Material choice matters enormously too. Our solid metal door bars are hand-finished in ten beautiful finishes, giving you a level of quality and durability that aluminium, wood, or PVC simply cannot match. Solid metal resists warping, denting, and corrosion far better than those alternatives.

When it comes to fixing method, you have two main routes. Self-adhesive bars offer a quick, tool-free installation suitable for light-use areas. Screw-fixed bars, by contrast, are far more durable and are recommended for most flooring transitions where longevity and security matter. For most homes, screw-fixed is the wiser choice.
| Profile type | Best use | Typical height difference |
|---|---|---|
| Naplock | Carpet to carpet | None |
| Z-bar | Carpet to hard floor | Slight (0 to 5mm) |
| T-bar | Hard floor to hard floor | None |
| Reducer | Hard floor height difference | 3 to 8mm |
| Ramp | Accessibility or large drop | Up to 20mm |
| Extra-wide bar | Wide doorway gaps | 55 to 100mm |
Explore our full range of metal bar options and dedicated carpet to laminate bars to find the right match for your project.
Installation best practices for door bars
Choosing the right profile is only half the job. Fitting it correctly determines whether the bar lasts years or becomes a problem within months. The good news is that with the right approach, installation is well within reach for any confident DIYer.
Follow these steps for a professional finish:
- Measure the doorway width carefully, then cut your bar to length using a hacksaw or metal cutting disc.
- Position the bar centrally beneath the closed door so it sits neatly under both sides of the door frame.
- Mark fixing positions on the subfloor, spacing screws evenly to avoid warping or movement.
- Fix to the subfloor only, never into a floating floor panel. Fixing into laminate or engineered wood panels restricts expansion and can cause buckling.
- Allow for expansion gaps on either side of floating floors, typically 5 to 10mm.
- Check door clearance before finalising the position. The bar must not obstruct the door’s swing. A clearance of approximately 10mm is the standard guide according to installation best practices.
- For concrete subfloors, use wall plugs and masonry screws rather than standard fixings.
Pro Tip: Always close the door before finalising your centre mark. The bar should sit directly beneath the door’s leading edge, creating an even reveal on both sides. This single step is what separates a DIY look from a professional one.
For a deeper guide on how to install door bars or advice on fitting strips for uneven floors, we cover specific scenarios in detail on the site. If you are working across a doorway with a ceramic tile on one side, our carpet to tile fitting advice walks you through the key considerations.
Design choices and added benefits of using door bars
Once you have the practicalities sorted, it is worth giving serious thought to finish and design. A well-chosen door bar does not just function correctly. It adds a visual coherence to your interior that elevates the entire room.
High-quality door bars enhance interior aesthetics by providing polished, professional finishes that complement your flooring and décor. Choosing a brushed brass bar to match warm-toned oak laminate, for instance, creates a seamless transition that looks considered and deliberate rather than an afterthought.
Here are the key design and practical benefits to keep in mind:
- Matching finishes: Brass, antique gold, chrome, and satin silver options allow you to coordinate with door furniture and skirting boards.
- Wider profiles: Ideal for larger gaps or when accessibility is a consideration, providing a broader, gentler slope.
- Noise reduction: Door bars help with minor noise reduction between rooms, a useful benefit in busy households.
- Draught management: Solid metal bars, when fitted snugly, reduce minor draughts between rooms at floor level.
- Improved durability: In high-traffic doorways such as hallways and kitchens, a quality bar protects flooring edges from daily wear that would otherwise cause visible damage within a year or two.
| Finish | Best pairing | Mood/style |
|---|---|---|
| Brushed brass | Oak laminate, warm tones | Classic, warm |
| Satin silver | Grey tile, cool tones | Modern, minimal |
| Antique gold | Traditional wood floors | Heritage, rich |
| Chrome | Stone or polished tile | Contemporary |
Pro Tip: Coordinate your door bar finish with your door handles or light fittings. It is a small detail that interior designers rely on to create rooms that feel finished and intentional.
You can browse door bar finishes across our full range to find a colour and profile that works with your specific flooring combination.
Troubleshooting common problems and special considerations
Even experienced DIYers run into situations that the standard guidance does not fully cover. Here are the most common challenges and how to handle them.
Wide or uneven gaps: Standard bars cover doorway gaps of around 30 to 55mm. For larger openings, extra-wide bars designed for 55 to 100mm gaps provide a safe, tidy solution. For minor unevenness in the subfloor, shimming beneath the bar levels it out before fixing.
Low carpet against a hard floor: Where the carpet sits significantly lower than the hard floor, place a thin shim under the carpet edge before fitting the bar. This prevents the bar rocking and reduces stress on the fixing points.
Here are a few specialist scenarios that need careful attention:
- Wet rooms and bathrooms: Seal the edges of the bar sparingly with silicone to prevent water ingress, but avoid over-sealing in a way that restricts floor movement.
- Underfloor heating: Never drill screws over heating pipes. Map your pipe layout before marking fixing positions.
- Accessible doorways: Choose low-lip profiles or gentle ramp designs that comply with accessibility requirements and reduce trip risk for wheelchair users or those with mobility difficulties.
- Floating floors: Never fix through a floating panel. Always anchor into the subfloor beneath.
Pro Tip: If you are unsure where your underfloor heating pipes run, a thermal imaging camera hired from a local tool hire shop will show you exactly, saving a costly repair.
For situations involving height variation across the doorway, our strips for uneven floors page covers the best profiles and fitting approaches.
Our take: Why careful selection and fitting truly matter
We have guided thousands of homeowners and tradespeople through flooring transition choices, and the pattern is always the same. Those who take a little extra time to choose the correct profile, the right finish, and the proper fixing method end up with doorways that look and perform brilliantly for years. Those who rush, pick the cheapest option, or guess at the profile often find themselves refitting within 12 months.
The difference between a bar that looks professionally fitted and one that looks like an afterthought is rarely about skill. It is about attention to detail at the selection stage. Solid metal bars, hand-finished and built to last, outperform cheaper alternatives not just visually but in terms of how they hold up under daily foot traffic and temperature change. We believe that cutting corners on flooring transitions is a false economy, and that investing in the right product from the start is always the better decision for your home.
Find the perfect door bars for your next project
Ready to make your own flooring transitions seamless? Understanding which profile, finish, and fixing method suits your doorway is the foundation of a result you will be genuinely proud of.

At Quality Carpet Trims, we supply solid metal door bars hand-finished in ten beautiful finishes, all manufactured here in the UK to the highest standards. Whether you need a classic brass reducer, a sleek satin silver T-bar, or guidance on choosing the right trim for your floor, we are here to help. Browse our full collection and shop brass door bars to find the ideal match for your project. Free samples are available, so you can check the finish against your flooring before committing.
Frequently asked questions
Can I use the same door bar for all types of flooring transitions?
No. Different profiles suit specific transitions and height differences, so selecting the correct type for your flooring combination is essential for both safety and aesthetics.
Are self-adhesive door bars suitable for high-traffic areas?
Self-adhesive bars can work for light-use areas, but screw-fixed bars offer greater permanence and are recommended wherever the doorway sees regular foot traffic.
How do I deal with a large gap between floors at a doorway?
Use an extra-wide bar designed for the job. Wide gaps up to 100mm can be bridged safely and neatly with the correct extra-wide profile.
Do door bars help with noise or draught reduction?
Yes. Door bars reduce minor noise and draughts between rooms at floor level, making them a practical as well as decorative addition to any home.
Recommended
- Door bars explained: seamless flooring transitions made simple
- How to fit carpet door bars: perfect flooring transitions
- Extra Wide Door Threshold Bars: A Must-Have for Seamless Flooring – Quality Carpet Trims
- Carpet to Hardfloor Trims – High-End Door Bars