
Blog
Professional flooring transition methods: 5 trim types

Apr
TL;DR:
- Properly fitted flooring transitions prevent hazards, damage, and improve room aesthetics.
- Selecting the right trim type and material based on height, traffic, and environment is essential.
- Accurate preparation and fixing to the subfloor ensure long-lasting, safe, and professional results.
A poorly fitted flooring transition does more damage than most people realise. It creates a trip hazard, exposes raw flooring edges, and signals to anyone walking through that the finish was rushed. Whether you are a contractor working on a commercial fit-out or a homeowner tackling a renovation, the transition between two floor surfaces is one of those details that either elevates the entire room or lets it down. This guide walks you through professional methods for selecting, preparing, and installing flooring transitions that look sharp, last for years, and meet current safety standards.
Table of Contents
- Understanding flooring transitions and trim types
- Tools, materials and preparation checklist
- Step-by-step professional transition installation
- Special situations, troubleshooting and compliance tips
- Why trim choice is only half the story
- Find the perfect flooring trim for your next project
- Frequently asked questions
Key Takeaways
| Point | Details |
|---|---|
| Choose the right trim | Match T-mouldings, reducers, and nosings to floor materials and height differences. |
| Prioritise preparation | Subfloor flatness and expansion gaps are crucial for lasting results. |
| Follow installation steps | Anchor trims to the subfloor and check all standards for a seamless, safe finish. |
| Adapt for special cases | Wet areas and stairs require specific materials and compliance checks. |
Understanding flooring transitions and trim types
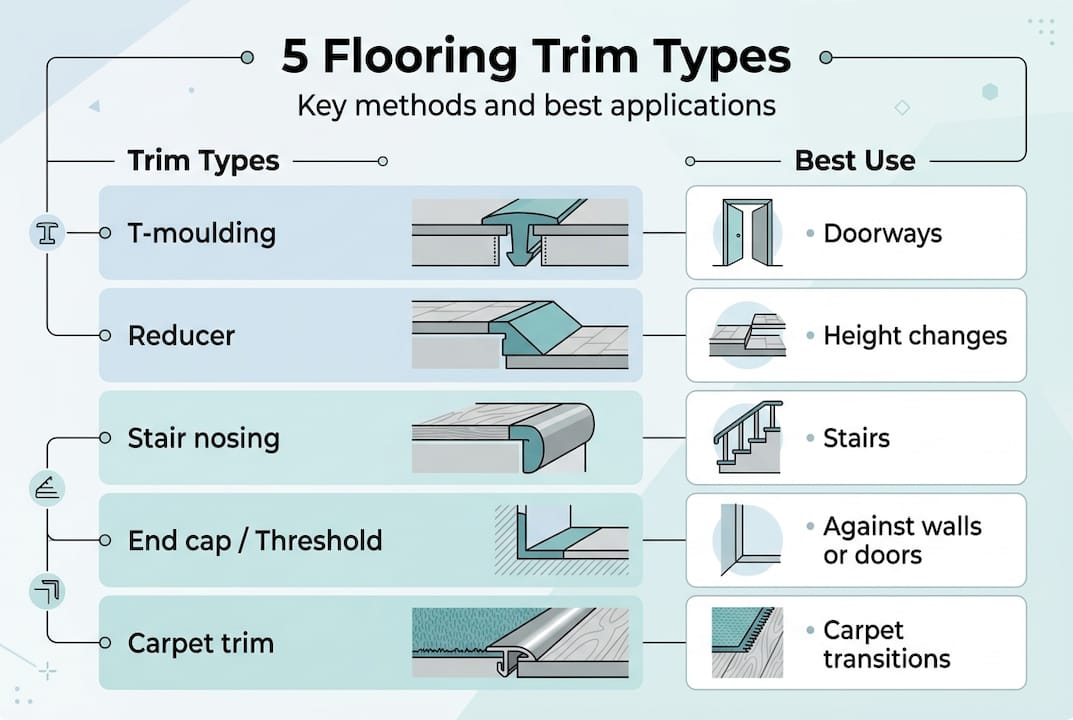
Not all transitions serve the same purpose. Choosing the wrong type is one of the most common mistakes on site, and it shows immediately once the floor is laid. Common professional flooring transition types include T-mouldings for equal-height floors, reducers for height differences up to half an inch, end caps and thresholds for terminating against vertical surfaces, stair nosings for stairs, and carpet bars for carpet-to-hard floor transitions. Each one solves a specific problem.
Here is a quick overview of the key trim types and where they work best:
| Trim type | Best application | Key benefit |
|---|---|---|
| T-moulding | Equal-height floors meeting in a doorway | Clean, symmetrical join |
| Reducer | Height difference up to 1/2 inch | Smooth ramp between surfaces |
| End cap / threshold | Floor meeting a wall or vertical surface | Neat edge termination |
| Stair nosing | Stair treads | Safety and edge protection |
| Carpet bar | Carpet meeting hard flooring | Holds carpet edge securely |
Materials matter too. Wood trims suit traditional interiors but can swell in humid environments. Solid metal trims, hand-finished in a range of finishes, offer durability and a premium appearance that suits both residential and commercial spaces. Vinyl trims are budget-friendly but lack the longevity and aesthetic quality of metal. Professionals match the trim material to the project requirements, not just the colour.

When floors are not perfectly level, the trim choice becomes even more critical. You can explore transition strips for uneven floors to understand which profiles accommodate height variation without creating a visible step or ridge. Getting this right at the planning stage saves a great deal of remedial work later.
The key considerations when selecting a trim type are:
- Floor height difference: Zero difference calls for a T-moulding; any rise needs a reducer or threshold.
- Traffic level: High-traffic commercial areas need robust, fixed trims with secure anchoring.
- Moisture exposure: Kitchens, bathrooms, and utility rooms need moisture-resistant options.
- Aesthetics: The finish should complement both flooring surfaces and the wider room scheme.
For a broader look at how these decisions fit together, the flooring transitions guide covers the full process from selection through to final inspection.
Tools, materials and preparation checklist
Professionals do not improvise on tools. Having the right equipment on hand before you start prevents costly errors and keeps the installation moving efficiently. Here is what you need:
- Measuring tape and pencil for accurate marking
- Spirit level to check subfloor flatness
- Saw (mitre or jigsaw depending on trim material)
- Drill and appropriate fixings for subfloor anchoring
- Safety gear: knee pads, gloves, and eye protection
- Expansion gap spacers to maintain consistent clearance
For materials, select your transition trim based on the criteria in the previous section. If you are working in a wet area, choose a moisture-resistant option. A carpet to tile transition strip in a solid metal finish, for example, holds up far better in a bathroom doorway than a wooden alternative. For hard floor to hard floor joins, hardfloor to hardfloor trims offer a flush, professional result.
Preparation is where most installations succeed or fail. Subfloor flatness must be within 3/16 of an inch over 10 feet. Any deviation beyond this causes the trim to rock, creates uneven gaps, and puts stress on the flooring edges. Use a long spirit level or straightedge to check this before laying anything.
| Preparation step | Why it matters | Acceptable tolerance |
|---|---|---|
| Subfloor flatness check | Prevents rocking and poor fit | Max 3/16 inch over 10 feet |
| Expansion gap marking | Allows floor movement | 1/4 to 1/2 inch |
| Moisture check | Prevents swelling and trim failure | Below 12% for wood subfloors |
| Trim dry-fit | Confirms alignment before fixing | Zero visible gaps at edges |
Pro Tip: Never skip the subfloor flatness check, even when working to a tight deadline. A trim fitted over a high spot will flex underfoot and eventually loosen its fixings. Ten minutes with a straightedge saves hours of remedial work.
Mark your expansion gaps before you cut anything. Floating floors need room to move with temperature and humidity changes. If the trim pins the floor against a wall or door frame, the floor has nowhere to go and will buckle.
Step-by-step professional transition installation
With preparation done, the installation itself follows a clear sequence. Rushing any step here undoes all the careful prep work.
-
Measure and mark the trim position. Measure the doorway or transition zone precisely. Mark the centreline and the trim edges on the subfloor with a pencil. Double-check against both flooring surfaces.
-
Cut the trim to length. Use a mitre saw for clean, square cuts on metal trims. A jigsaw works for curved or angled cuts. Deburr any sharp edges after cutting.
-
Dry-fit the trim. Place the trim in position without fixing it. Check that it sits flush across both surfaces, that there are no visible gaps at the edges, and that the height transition feels smooth underfoot.
-
Mark and drill subfloor fixing points. Anchoring transitions to the subfloor, not to the flooring itself, is essential. This allows the floor to expand and contract beneath the trim without lifting or cracking.
-
Maintain expansion gaps. Use spacers to hold a 1/4 to 1/2 inch gap on each side of the trim before fixing. For transition strips for uneven floors, check that the profile bridges the height difference evenly along its full length.
-
Fix the trim permanently. Drive fixings into the subfloor at the marked points. Do not overtighten, as this can distort the trim profile.
-
Final inspection. Walk across the trim, check for movement, and verify that both flooring edges are fully covered and secure.
“Safe trim edges and correctly fitted stair nosings are not optional extras. They are a fundamental part of any professional installation and directly affect the safety of everyone who uses the space.”
Pro Tip: Always test-fit before committing to permanent fixings. If the trim rocks or shows a gap on one side, address the subfloor issue first. A perfectly fitted trim on a flat subfloor requires no filler, no caulk, and no apology.
For a detailed walkthrough of each stage, the step-by-step flooring transitions guide covers the finer points of achieving a polished result.
Special situations, troubleshooting and compliance tips
Standard installations are straightforward once you know the process. It is the edge cases that separate experienced professionals from those still learning.
Wet areas present a particular challenge. Bathrooms, utility rooms, and commercial kitchens need trims that will not corrode or swell. Solid metal trims with moisture-resistant finishes are the correct choice here. A carpet to laminate threshold in a hand-finished solid metal profile handles the transition cleanly without deteriorating over time.
Stair nosings must project between 3/4 and 1.25 inches beyond the riser face. This is not a stylistic preference; it is a safety requirement. Undersized nosings increase the risk of slipping on the leading edge of the tread.
Floating floor to carpet transitions work best with end caps or carpet bars. The end cap covers the raw edge of the floating floor while the carpet bar grips the carpet pile securely.
Common troubleshooting scenarios:
- Trim is creaking underfoot: The trim is likely anchored to the flooring rather than the subfloor, or the subfloor has a high spot. Remove, check, and re-fix.
- Visible gap between trim and floor surface: The subfloor is not flat, or the trim profile is incorrect for the height difference. Re-check flatness and consider a different profile.
- Trim lifting at one end: Fixing screws have pulled through a soft subfloor. Use larger fixings or a backing plate.
- Floor buckling near the trim: Expansion gaps were not maintained. The floor has no room to move. Remove the trim, re-establish the gap, and refit.
Compliance is non-negotiable in commercial and public spaces. ADA and IBC standards govern stair nosing dimensions and changes in floor level for accessibility. In the UK, Building Regulations Part K covers stair safety and nosing requirements. Always verify the current standards for your project type before specifying trims.
Statistic: Slip, trip, and fall accidents account for over 30% of all non-fatal workplace injuries in the UK, making correct transition installation a genuine safety issue, not just an aesthetic one.
Why trim choice is only half the story
There is a tendency in the flooring industry to focus almost entirely on the product. Choose the right trim, pick the right finish, and the job is done. In practice, we see time and again that a premium trim fitted badly performs worse than a modest trim fitted correctly.
The subfloor is the foundation of everything. A solid metal trim hand-finished to a beautiful standard will rock, creak, and eventually fail if it sits on an uneven or damp subfloor. The trim did not fail. The process failed.
More homeowners and contractors are demanding lasting quality in 2026, and rightly so. But lasting quality comes from proven processes, not from expensive products alone. Careful preparation, correct fixings anchored to the subfloor, and a thorough post-install check are what separate a finish that lasts a decade from one that needs attention within a year. A polished finish is always the result of disciplined process, not luck.
If you take one thing from this guide, let it be this: invest your time in the preparation stage. The installation itself is quick when the groundwork is right.
Find the perfect flooring trim for your next project
Now that you understand the methods, materials, and common pitfalls, the next step is choosing the right product for your specific installation. At Quality Carpet Trims, we supply solid metal door bars and transition strips hand-finished in 10 beautiful finishes, designed to complement any interior scheme.

Whether you need a matwell flooring trim for an entrance area, a carpet edge trim for a clean room perimeter finish, or simply want to brush up on trim terminology before specifying products, we have the resources and the range to support your project from start to finish. Every product is British-made, hand-finished, and backed by expert advice.
Frequently asked questions
What is the difference between a reducer and a T-moulding?
A reducer bridges height differences up to 1/2 inch between two floors, while a T-moulding is used where two floors meet at equal height, typically in a doorway.
How wide should an expansion gap be under a transition strip?
Allow a 1/4 to 1/2 inch gap on each side of the transition strip to give the floor room to expand and contract with temperature changes.
Which transitions are best for wet areas?
Solid metal trims with moisture-resistant finishes are the most durable choice, as wet areas need moisture-resistant materials to prevent corrosion and swelling over time.
Do flooring transitions have to comply with building regulations?
Yes, particularly for stairs and commercial spaces. IBC and ADA standards govern nosing dimensions and level changes, and UK Building Regulations Part K applies to stair safety.
What is the most common mistake when installing floor trims?
Anchoring trims to the flooring rather than the subfloor is the most frequent error, as it restricts floor movement and leads to buckling, creaking, and trim failure.
Recommended
- Flooring Trim: Ensuring Seamless, Safe Transitions
- Installing Flooring Edge Trims for Seamless Floor Transitions
- Industry Terminology: Flooring Trims Explained
- 7 Essential Steps in a Commercial Flooring Trim Guide
- Travertine Decor Workflow: Cut Cracking Risk 50% in 2026 – Marmorique