
Blog
Hardfloor thresholds explained: Perfect flooring transitions

Apr
TL;DR:
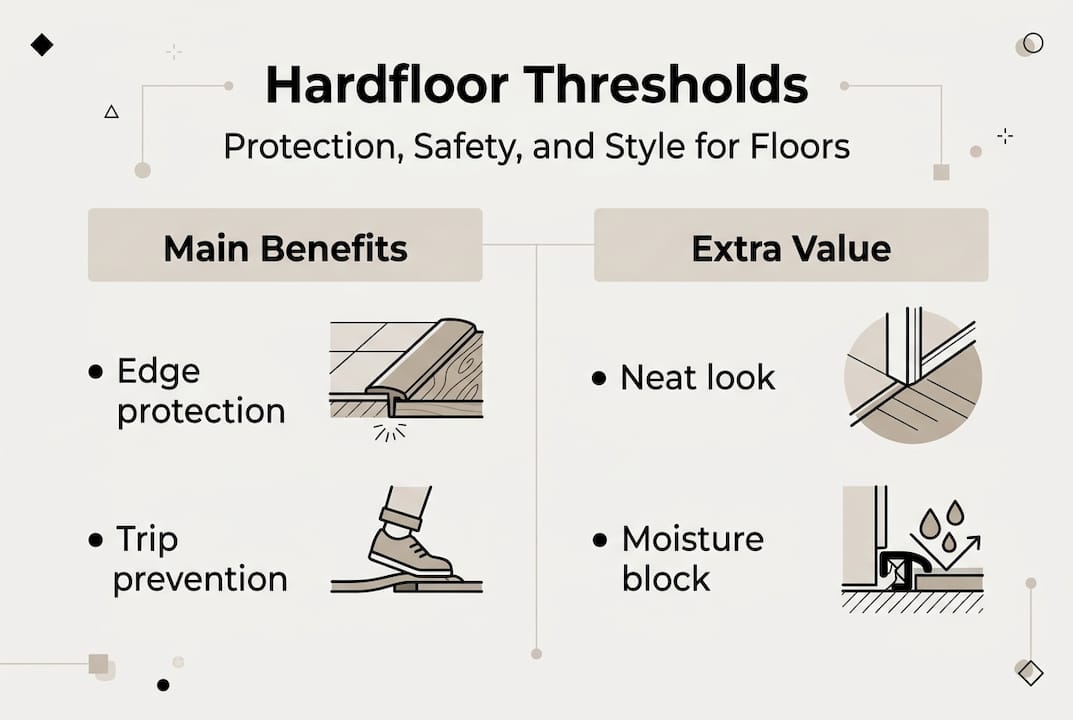
- Hardfloor thresholds protect edges, cover gaps, and provide a seamless transition between floors.
- Material choice depends on environment, traffic, and floor type, with durable options preferred for high-use areas.
- Proper installation and maintenance ensure safety, longevity, and a professional, cohesive finish.
That slight trip at the doorway. The ugly gap where your kitchen tiles meet the hallway wood. These are the small details that quietly undermine an otherwise well-finished room. Hardfloor thresholds are the solution most people overlook until something goes wrong. They cover the join between two hard floor surfaces, protect exposed edges, and give every transition a clean, professional look. Get them wrong and you risk safety hazards, visible flaws, and costly repairs. Get them right and your floors look seamless from room to room. This guide covers everything you need to know, from choosing the correct type to installation essentials and long-term care.
Table of Contents
- What is a hardfloor threshold?
- Types of hardfloor thresholds and their specific uses
- How hardfloor thresholds are installed: Essentials for a seamless finish
- Durability, aesthetics, and maintenance: Getting the most from your thresholds
- A professional perspective: What most guides miss about hardfloor thresholds
- Find the ideal hardfloor threshold for your project
- Frequently asked questions
Key Takeaways
| Point | Details |
|---|---|
| Thresholds prevent hazards | Hardfloor thresholds eliminate tripping risks and close unsightly gaps between floors. |
| Select by room and material | Use durable, waterproof, or expansion-friendly trims according to location and flooring type. |
| Expert installation matters | Installing the correct threshold with precision ensures both safety and aesthetic value. |
| Durability boosts value | The right material choice extends the lifespan of the threshold and the floors they join. |
What is a hardfloor threshold?
A hardfloor threshold is a strip or trim fitted at the junction between two hard flooring surfaces. Think of the point where your laminate living room meets a tiled hallway, or where engineered wood gives way to stone in an open-plan kitchen. That join needs covering, protecting, and finishing. That is exactly what a threshold does.
The role of threshold strips goes well beyond aesthetics. They protect the edges of both floors from chipping and lifting. They cover the expansion gap that floating floors require. They prevent dirt and moisture from working their way into the subfloor. And they eliminate the trip hazard that an exposed edge or uneven join creates.
Many homeowners assume any trim will do the job. This is one of the most common and costly mistakes in flooring projects. Using the wrong profile, material, or width can leave gaps exposed, cause the trim to lift over time, or simply look out of place. The right threshold is chosen based on the specific floors it bridges, the environment it sits in, and the traffic it will face.
Here are the most common locations where hardfloor thresholds are installed:
- Doorways between rooms with different flooring types
- Open-plan transitions between kitchen and living areas
- Hallway-to-room joins where flooring changes material or level
- Bathroom and wet room entrances where waterproofing matters
- Commercial spaces with high footfall across multiple floor zones
As the flooring transition terminology guidance makes clear, high-traffic areas need durable metal or reinforced hardwood, wet areas require waterproof materials, floating versus rigid floors affect trim choice, and imperfect cuts or gaps call for wider covers.
Understanding these principles before you buy saves time, money, and frustration. A threshold is not an afterthought. It is a functional component of your floor.
Types of hardfloor thresholds and their specific uses
Now that you know what a hardfloor threshold is, it is time to explore the different types and where they deliver best results.
Not all thresholds are created equal. The material, profile, and width you choose will directly affect how long it lasts, how it looks, and whether it suits your specific flooring situation.
| Material | Best for | Durability | Waterproof |
|---|---|---|---|
| Solid metal | High-traffic, wet areas, commercial | Excellent | Yes |
| Reinforced hardwood | Domestic, mid-traffic | Good | Partial |
| MDF | Dry, low-traffic rooms only | Poor | No |
| Transition strips | Mixed-height or floating floor joins | Variable | Depends on material |
Solid metal thresholds are the strongest option. Hand-finished in a range of colours and finishes, they suit both modern and traditional interiors while standing up to years of heavy use. They are the go-to choice for busy hallways, commercial entrances, and anywhere moisture is a concern.
Hardwood thresholds offer a warm, natural look and work well in domestic settings with moderate traffic. They are not suitable for wet areas, however, as moisture causes swelling and warping over time.
MDF is the weakest option and should only ever be used in dry, low-traffic rooms. It absorbs moisture readily and will deteriorate quickly in kitchens or bathrooms.
For laminate threshold strips, the key consideration is whether your floor is floating or fixed. As threshold terminology guidance confirms, floating floors require thresholds that allow for natural expansion and contraction, so a fixed-down rigid trim will cause buckling.
Here is a simple process for choosing the right threshold:
- Identify the two flooring types being joined
- Check whether either floor is floating or rigid
- Assess the room environment (wet, dry, high-traffic, low-traffic)
- Measure the gap width and any height difference between floors
- Select the material and profile that matches all of the above
Pro Tip: Never use MDF thresholds in bathrooms or kitchens. Even occasional splashes will cause swelling and the trim will need replacing within months. Opt for solid metal or reinforced hardwood in any area with moisture exposure. You can explore how to achieve a perfect finish with thresholds for further guidance on matching profiles to rooms.
How hardfloor thresholds are installed: Essentials for a seamless finish
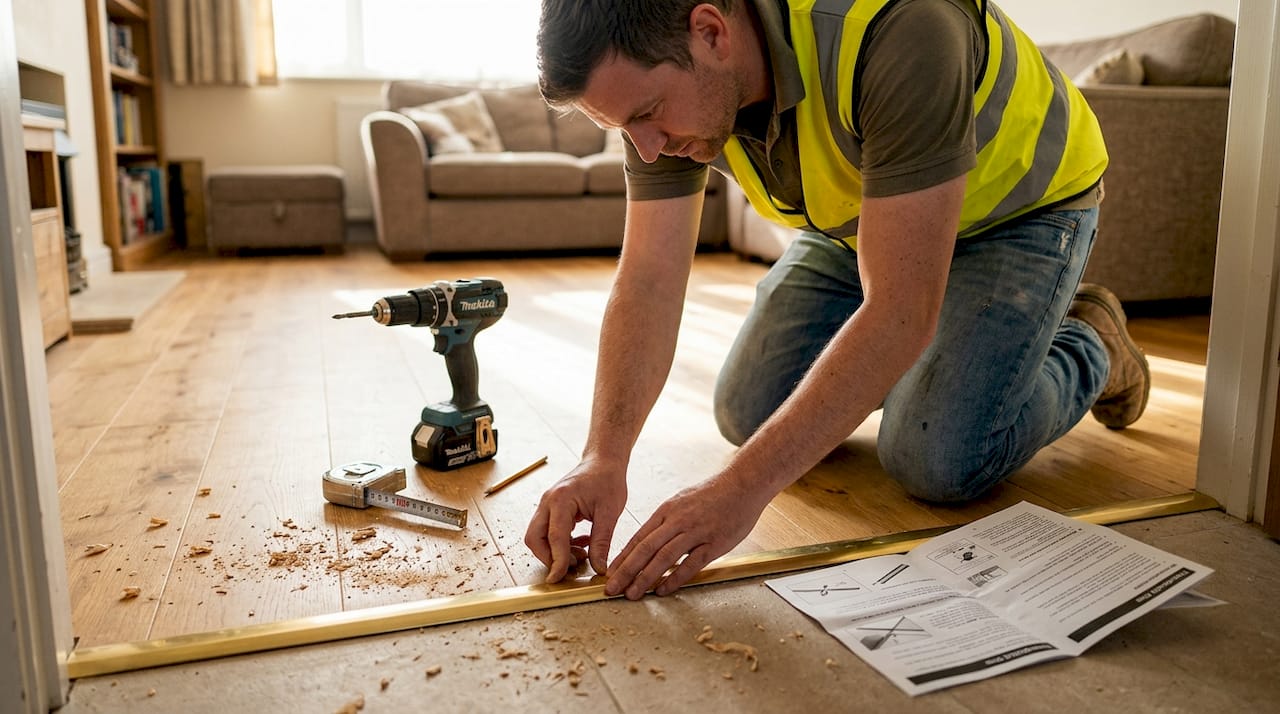
Once you have chosen the right threshold for your floors, knowing how to install it properly ensures safety and seamless looks.
Installation is where many otherwise good projects fall apart. A premium threshold fitted poorly will still look amateur and may fail prematurely. Taking the time to prepare and measure correctly makes all the difference.
Follow these steps for a clean, lasting installation:
- Measure the doorway or transition width accurately, adding a few millimetres for adjustment if needed
- Check the floor levels on both sides. A significant height difference may require a ramp or reducer profile rather than a flat threshold
- Clean the subfloor thoroughly. Dust, adhesive residue, or debris will prevent a secure fix
- Test-fit the threshold before committing. Place it dry to confirm the fit, check alignment, and identify any gaps
- Fix according to floor type. Floating floors need a threshold fixed only to the subfloor or door frame, not to the flooring itself, to allow movement
- Secure and finish. Use the correct fixings for your subfloor material, whether timber, concrete, or screed
Here are the tools you will typically need:
- Tape measure and pencil
- Mitre saw or fine-tooth hacksaw
- Drill and appropriate drill bits
- Screwdriver or fixing tool
- Adhesive (for certain floor types)
- Safety goggles and gloves
According to flooring transition advice, imperfect cuts or gaps are best concealed using wider threshold covers, which saves time and produces a cleaner result without requiring rework.
One of the most frequent errors is choosing a threshold that is too narrow. If the subfloor has rough edges or the cut is slightly uneven, a slim profile will expose the problem rather than hide it. Wider covers give you more room to work with and produce a more forgiving, professional finish. The seamless floors guide offers additional detail on matching edge strips to specific floor types, and the transition strip role resource explains why correct fitting matters structurally as well as visually.
Durability, aesthetics, and maintenance: Getting the most from your thresholds
Beyond installation, the right threshold will offer lasting value and visual appeal.
A threshold that looks great on day one but scuffs, warps, or loosens within a year is not a saving. It is a cost. Choosing for durability from the outset is always the smarter investment, particularly in family homes or commercial environments.
| Material | Lifespan (approx.) | Maintenance level | Ideal setting |
|---|---|---|---|
| Solid metal | 20+ years | Low | All areas |
| Reinforced hardwood | 10 to 15 years | Medium | Dry domestic |
| MDF | 2 to 5 years | High | Dry, low-traffic only |
As UK threshold durability tips confirm, high-traffic areas need durable metal or reinforced hardwood to withstand the punishment of daily use. Soft or composite materials simply compress and wear unevenly under heavy footfall.
Aesthetics matter too. A threshold should complement your existing design scheme, not fight against it. Solid metal thresholds are available in a wide range of hand-finished options, from warm brass and antique bronze through to sleek satin chrome and matt black. Matching your threshold finish to door hardware or light fittings creates a cohesive, considered look that elevates the whole room.
For seamless finishes for flooring, the finish you choose should feel intentional, not incidental.
Pro Tip: In busy family homes or commercial spaces, always select a wider, reinforced threshold rather than the minimum size. The additional coverage protects more of the floor edge and looks more substantial underfoot.
Simple maintenance habits that extend threshold life:
- Wipe down metal thresholds with a damp cloth regularly to prevent grit build-up
- Avoid harsh chemical cleaners on finished surfaces, as these strip protective coatings
- Check fixings annually and re-tighten if any movement is detected
- Inspect for signs of moisture ingress around bathroom or kitchen thresholds
- Replace immediately if lifting occurs, as a raised edge is a trip hazard
A professional perspective: What most guides miss about hardfloor thresholds
Most articles treat thresholds as a footnote. Choose one, fit it, move on. But in practice, the threshold is often the last thing fitted and the first thing noticed when it goes wrong.
We see it regularly. A beautifully laid floor, perfect grout lines, immaculate skirting, and then a cheap, ill-fitting threshold that undoes everything. The detail that was treated as an afterthought becomes the detail everyone notices.
The importance of thresholds is not just visual. In wet areas or high-traffic corridors, a poorly chosen threshold fails structurally, not just aesthetically. As flooring transition terminology guidance makes clear, high-traffic areas need durable metal or reinforced hardwood, and wet areas require genuinely waterproof materials. Cutting corners here leads to early replacement and additional labour costs.
The honest truth is that you get what you pay for, especially in areas that take a daily beating. A solid metal threshold, hand-finished and correctly fitted, will outlast the floor it sits on. That is not an exaggeration. It is simply what quality materials do.
Find the ideal hardfloor threshold for your project
Ready to enhance your floors? Finding the right threshold does not need to be complicated when you know where to look.

At Quality Carpet Trims, we supply solid metal hardfloor transition trims hand-finished in 10 beautiful finishes to suit any interior scheme. Whether you need door threshold bars for a busy hallway or a precise solution for an unusual transition, our team is here to help. Browse the full range, request free samples, or get in touch for tailored advice from the floor trims experts who understand what a truly finished floor looks like. Fast UK delivery and a quality guarantee come as standard.
Frequently asked questions
Do different flooring types require specific thresholds?
Yes, each flooring combination and environment needs a tailored solution. Floating versus rigid floors affect trim choice, and wet areas such as bathrooms require fully waterproof materials for a safe and lasting result.
Can hardfloor thresholds fix uneven or wide gaps between floors?
Yes, extra-wide or reinforced thresholds can neatly cover large or uneven joints. As wider covers confirm, they conceal imperfect cuts and gaps without requiring rework to the floor itself.
What materials are best for thresholds in high-traffic areas?
Solid metal or reinforced hardwood thresholds last longest under heavy footfall. Durable metal or hardwood outperforms standard MDF or soft trims significantly in busy domestic and commercial settings.
How often should hardfloor thresholds be replaced or maintained?
With the right material choice for lifespan, quality metal thresholds can last over 20 years with minimal upkeep. Inspect them annually for movement or wear and address any lifting immediately to prevent trip hazards.
Recommended
- Understand the role of flooring thresholds for a perfect finish
- Home flooring thresholds: your guide to seamless finishes
- Master the role of threshold strips for flooring transitions
- Carpet To Laminate Threshold – Carpet Laminate Trim – Quality Carpet Trims