
Blog
Complete guide to hardfloor edge strips: seamless floors

Apr
Hardfloor edge strips are one of those finishing details that most people overlook until something goes wrong. A loose edge, a visible gap, or a tripping hazard at a doorway are all signs that the transition between floors has been handled poorly. Far from being purely decorative, these strips carry real structural and safety responsibilities. Whether you are a homeowner refreshing a kitchen, or a contractor fitting out a commercial space, understanding edge strips properly will save you time, money, and frustration. This guide covers everything: what they are, which type to choose, how to fit them, and the mistakes worth avoiding.
Table of Contents
- What is a hardfloor edge strip?
- Types and materials: Choosing the right edge strip
- Installation: Getting a flawless finish
- Applications and case studies: Success in real projects
- Common pitfalls and expert troubleshooting
- What most guides miss about hardfloor edge strips
- Where to find quality edge strips and expert support
- Frequently asked questions
Key Takeaways
| Point | Details |
|---|---|
| Edge strips defined | Hardfloor edge strips create seamless, safe transitions between flooring types and finish exposed edges. |
| Material choice matters | Your pick of material and profile affects durability, style, and the overall cost of your project. |
| Flawless finish | Correct installation and maintenance ensure hardfloor edge strips look good and last for years. |
| Common pitfalls | Most failures come from poor fit, wrong material, or installation mistakes but are easily avoided. |
What is a hardfloor edge strip?
A hardfloor edge strip is a narrow profile fitted at the boundary between two flooring surfaces or along an exposed floor edge. Its job is to cover the raw edge of the flooring material, create a clean visual join, and protect both surfaces from wear and damage at their most vulnerable point. Without one, you are left with a raw edge that chips, lifts, or creates a safety risk underfoot.
As noted in this floor transition strips guide, hardfloor edge strips create seamless transitions between flooring types and finish exposed edges. That single function has a knock-on effect on how long your floor lasts, how safe it is to walk across, and how professional the finished result looks.
People often confuse edge strips with threshold bars or door bars, but they are not the same thing. A threshold bar typically bridges two floors of equal or near-equal height in a doorway. An edge strip, by contrast, is used anywhere a floor surface ends and needs a clean, protected finish. Common situations include:
- Open-plan layouts where laminate meets tile
- Step edges and raised platforms
- The perimeter of a room where flooring meets a wall or skirting
- Exposed edges on staircases or mezzanine levels
You can read more about the broader category in our guide to flooring edge trims, which covers the full spectrum of profiles and their uses.
A well-fitted edge strip is the difference between a floor that looks finished and one that looks like a work in progress.
The anatomy of a typical edge strip is simple: a flat base that sits beneath or alongside the flooring, and a visible face profile that covers the join. Some profiles are L-shaped for step edges, others are flat T-bars for level transitions, and some have a tapered reducer profile for floors of differing heights.
Types and materials: Choosing the right edge strip
With the basics covered, the next step is understanding which materials and types suit your needs. The market offers a wide range of options, and the right choice depends on your setting, budget, and the flooring you are working with.
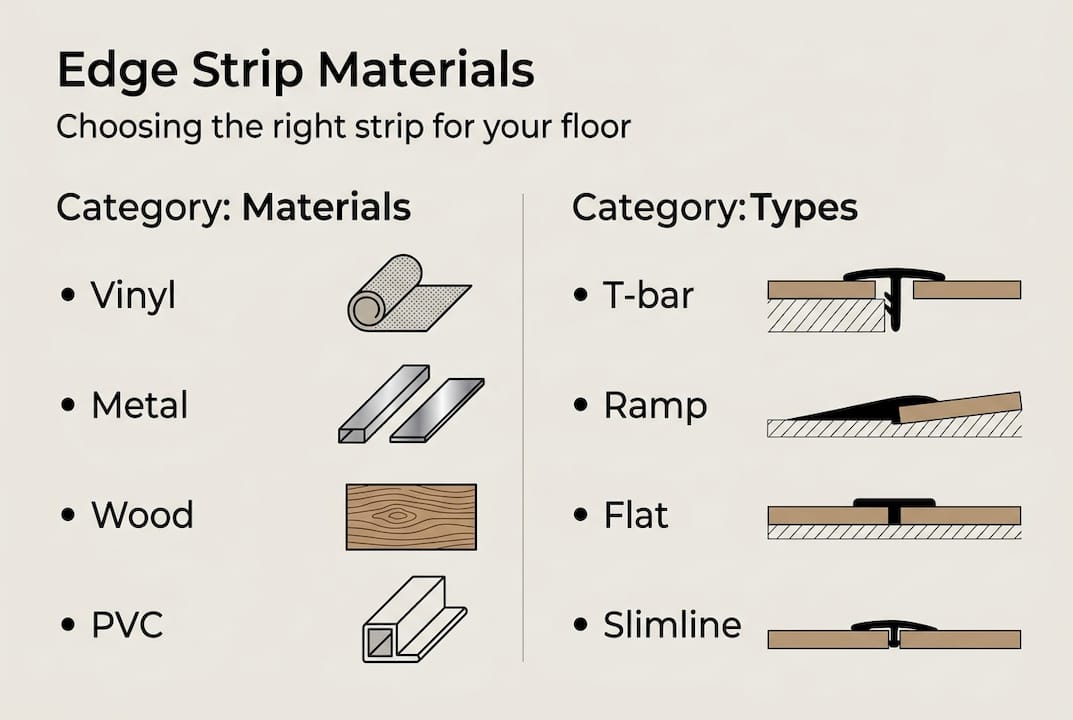
The most common materials are vinyl, PVC, solid metal (such as brass or steel), and wood. Each has its place, but they are not interchangeable. Costs range from £1.60 to over £24 per linear foot depending on material, with vinyl and PVC at the lower end and solid metal or hardwood at the upper end.
| Material | Durability | Appearance | Best use case |
|---|---|---|---|
| Vinyl/PVC | Low to medium | Basic | Budget residential |
| Aluminium | Medium | Modern | Light commercial |
| Solid brass/metal | High | Premium | High-end residential, heavy traffic |
| Wood | Medium | Warm, natural | Traditional interiors |
For residential projects where aesthetics matter and foot traffic is moderate, a solid metal strip with a quality hand finish is hard to beat. It holds its shape, resists denting, and complements a wide range of interior styles. Vinyl options, while cheap, can yellow or crack over time, particularly in areas with sunlight exposure or temperature fluctuation.
Profile shapes also vary. The main types are:
- T-bar: For level transitions between two hard floors
- Reducer: Tapered profile for floors of slightly different heights
- Square edge lipping: For exposed step or platform edges
- Overlap: Covers the edge of one floor over another
If you are working with vinyl flooring, our dedicated resource on vinyl edge strips covers compatible profiles in detail. For a broader look at how trim interacts with vinyl surfaces, the guide on edge trim for vinyl is worth reading before you buy.
Pro Tip: Always match the strip profile to the height difference between your two floors. A T-bar on floors with a 4mm height difference will rock underfoot. Use a reducer or ramp profile instead.
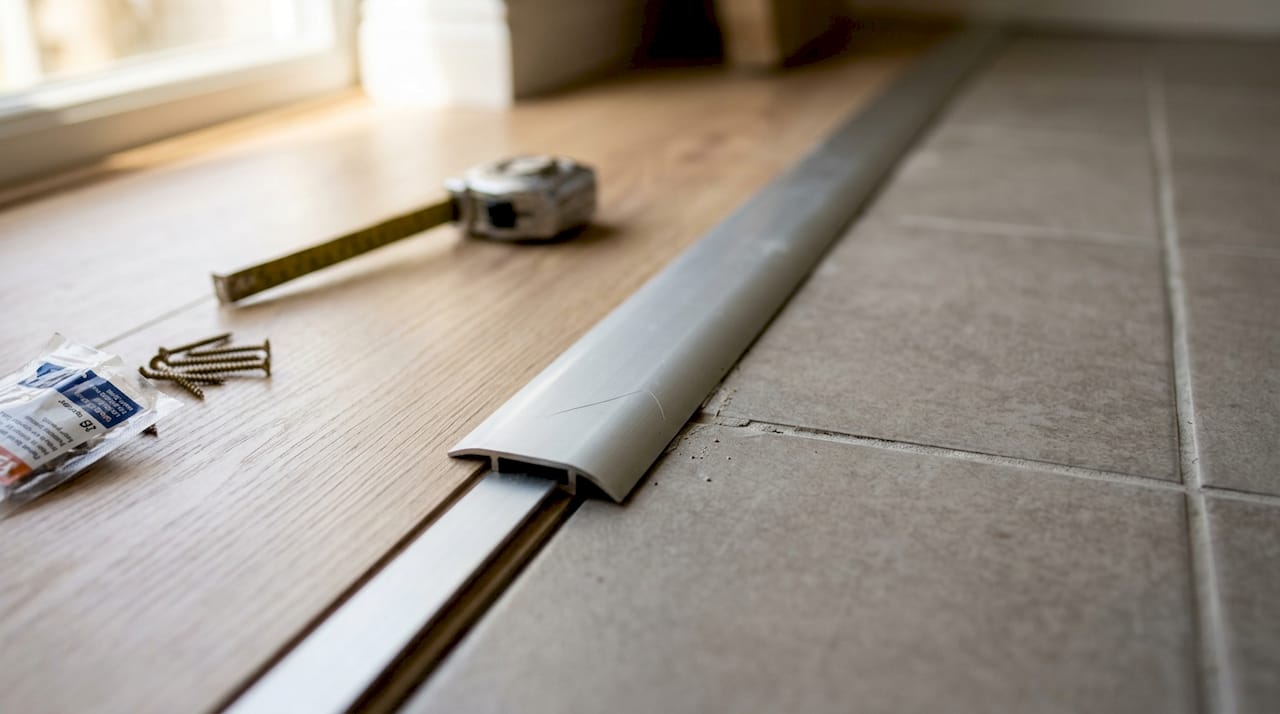
Installation: Getting a flawless finish
Selecting your strip is just the beginning; the real impact comes from correct installation. Even the best quality edge strip will fail early if it is fitted poorly, and the most common cause of failure is rushing the preparation stage.
Here is a straightforward installation sequence that works for most hardfloor edge strip projects:
- Measure carefully. Measure the full length of the transition and add 5mm to allow for trimming to an exact fit.
- Cut cleanly. Use a mitre saw or metal cutting blade for solid metal strips. A clean cut prevents burring that can catch on feet or shoes.
- Prepare the substrate. Ensure the subfloor is level, clean, and free of debris where the strip will sit.
- Choose your fixing method. Adhesive works well for flat, stable surfaces. Screw-down fixing is better for high-traffic areas. Click-in systems suit floating floors where movement is expected.
- Fit and check. Press or screw the strip into place, then walk across it to check for movement or rocking.
- Finish the edges. Where the strip meets a wall or skirting, use a small amount of sealant to prevent moisture ingress.
As confirmed in this floor transition guide, properly installed edge strips help extend flooring life and prevent trip hazards. That is not a minor benefit. A strip that shifts underfoot is a genuine liability, particularly in homes with elderly residents or young children.
For a more detailed walkthrough, our step by step flooring transitions guide covers every stage with visuals and material-specific advice.
Pro Tip: If your two floors sit at noticeably different heights, use a self-adhesive foam underlay strip beneath the lower floor edge before fitting the reducer. This fills the gap and stops the strip from flexing.
Applications and case studies: Success in real projects
Having covered installation, it is clear the right strip makes a real difference across different settings. Let us look at how edge strips perform in practice.
In the home, the most common application is the kitchen-to-lounge transition in open-plan layouts. Here, tile meets laminate or engineered wood, and the height difference can be as much as 6mm. A well-chosen reducer strip bridges this gap invisibly, removes the trip risk, and ties the two floor finishes together visually.
In offices, the entry area takes the most punishment. High foot traffic, wet shoes, and rolling chair castors all put pressure on floor edges. A solid metal strip with a screw-down fixing handles this far better than an adhesive-only solution.
In commercial spaces, the priority shifts to safety. As noted in this floor transition guide, vinyl edge strips are among the most cost-effective solutions for busy commercial settings, though solid metal outperforms vinyl on longevity in truly high-wear environments.
| Project type | Floor join | Strip chosen | Key benefit |
|---|---|---|---|
| Open-plan home | Tile to laminate | Solid metal reducer | Seamless look, safe transition |
| Office entry | Carpet to vinyl | Metal T-bar | Durability, easy to clean |
| Retail unit | Concrete to tile | Heavy-duty metal | Safety compliance |
For commercial-specific guidance, our resource on commercial flooring trims covers UK standards and installation requirements. If your project involves uneven subfloors, the strips for uneven floors range is worth exploring before committing to a profile.
Common pitfalls and expert troubleshooting
Even with great materials and method, overlooking key details can cause failures. Most problems with edge strips are predictable and preventable.
The most common mistakes are:
- Wrong profile for the height difference. A flat T-bar on a 5mm step will never sit flush.
- Skipping subfloor preparation. Dust, adhesive residue, or an uneven substrate causes strips to rock or detach.
- Using adhesive alone in high-traffic areas. Adhesive is fine for light domestic use but will fail under commercial foot traffic without mechanical fixing.
- Buying on price alone. Cheap vinyl or PVC strips look fine on day one but degrade quickly. As highlighted in this floor transition guide, wrong strip selection and poor installation are leading causes of early floor edge failure.
If you notice a strip becoming loose, act quickly. Reapply adhesive or add a screw fixing before the strip lifts entirely and becomes a trip hazard. Gaps between the strip and the floor edge are usually caused by floor movement, which is common with floating floors. In this case, switch to a click-in or floating strip profile that accommodates movement.
For floors that are not perfectly level, our guide on transition strips for uneven floors covers the specific profiles designed to handle height variation without rocking.
Pro Tip: Clean metal edge strips with a damp cloth and a mild detergent monthly. Avoid abrasive cleaners that scratch the finish. A maintained strip lasts decades; a neglected one starts to look tired within a year.
What most guides miss about hardfloor edge strips
Most advice on edge strips focuses on material selection and installation steps. That is useful, but it misses something important: the long-term relationship between your strip, your floor, and your interior as a whole.
Here is an insight that rarely gets mentioned. A quality edge strip, particularly a solid metal one with a hand-applied finish, can actually future-proof your floor. When you eventually change one of the adjoining floor surfaces, a well-chosen strip is often compatible with the new material, saving you the cost and hassle of replacing the trim as well.
There is also an acoustic benefit that nobody talks about. A properly seated edge strip eliminates the hollow tap or click that occurs when a floor edge is unsupported. In open-plan spaces, that subtle noise reduction is genuinely noticeable.
The contrarian view worth sharing: over-engineering transitions wastes money. You do not need the most expensive strip for every project. What you need is the right strip, correctly fitted. A seamless finish using edge trims is about precision, not price. Spend your budget on quality where it is visible and on correct fixing where it counts.
Where to find quality edge strips and expert support
Finding the right edge strip is straightforward when you know what to look for, but having expert support makes the process faster and less prone to costly errors.

At Quality Carpet Trims, we supply solid metal door bars and edge strips hand-finished in 10 beautiful finishes, all manufactured in the UK. Our full range of edge strips covers residential and commercial applications, and our team is on hand to help you select the right profile for your specific floor heights and materials. If you are new to flooring terminology, our guide to flooring trim terminology is a clear starting point. For entrance areas and matting solutions, our matwell flooring trim range is worth a look too. Order online with confidence and get the finish your project deserves.
Frequently asked questions
What does a hardfloor edge strip do?
A hardfloor edge strip bridges gaps and protects the exposed edges between different flooring types, creating a smooth and durable transition. It also reduces trip hazards and gives the floor a professional finish.
How do I choose the best material for my edge strip?
Base your choice on foot traffic, style, and budget. Vinyl is affordable for light use, but solid metal suits high-wear or high-end settings where durability and appearance both matter.
Can I install a hardfloor edge strip myself?
Yes, most edge strips are DIY-friendly with basic tools, though complex height differences or premium finishes may benefit from a professional fitter to avoid costly mistakes.
Are hardfloor edge strips necessary for every project?
You should use an edge strip wherever two different floor surfaces meet or a raw edge is visible. It is a safety and durability requirement, not just a cosmetic choice.
How much do hardfloor edge strips cost in 2026?
Prices range from around £1.60 to over £24 per linear metre depending on material. Solid metal strips sit at the upper end but offer the best long-term value for most residential and commercial projects.
Recommended
- Installing Flooring Edge Trims for Seamless Floor Transitions
- Flawless Laminate Finishes: Edging, Beading, And Transition Strips Made Simple – Quality Carpet Trims
- Flooring Edge Trims: The Key to a Seamless Finish
- Home flooring thresholds: your guide to seamless finishes
- Woning voorbereiden op nieuwe vloer: complete gids