
Blog
What is an edge trim: essential guide for flooring transitions

Mar
Unfinished flooring edges create unsightly gaps, collect debris, and become damaged within months of installation. Many homeowners assume flooring materials can simply meet without additional finishing, only to discover frayed carpet edges, chipped laminate corners, and dangerous trip points where surfaces change height. Edge trims solve these problems by providing protective, decorative borders that bridge different flooring types whilst maintaining a polished appearance. This guide explains what edge trims are, explores material options and profiles, and shows you how to select and install the right trim for seamless, durable flooring transitions throughout your home.
Table of Contents
- What Is An Edge Trim And Why Is It Important?
- Types Of Edge Trim Materials And Their Applications
- Common Edge Trim Profiles And How To Choose The Right One For Your Project
- How To Install Edge Trims For A Seamless Flooring Finish
- Find High-Quality Edge Trims For Your Flooring Projects
- Frequently Asked Questions About Edge Trims
Key takeaways
| Point | Details |
|---|---|
| Protective function | Edge trims shield vulnerable flooring edges from damage whilst preventing trips and creating clean visual boundaries between materials |
| Material variety | Options include solid metal, aluminium, uPVC, wood, and rubber, each offering distinct durability, appearance, and installation characteristics |
| Profile selection | Different shapes like L-profiles, T-moulds, and threshold bars accommodate specific transition types and height differences between floors |
| Installation impact | Proper fitting ensures longevity and aesthetic appeal, requiring careful measurement, secure fixing, and alignment for professional results |
| Location matters | Indoor versus outdoor use, traffic levels, and moisture exposure determine the most suitable trim material and profile for each application |
What is an edge trim and why is it important?
An edge trim is a specialised finishing strip installed along flooring perimeters or at transitions between different floor coverings. These trims create neat, defined edges where flooring meets walls, doorways, stairs, or other flooring types. Without proper flooring edge trims, vulnerable flooring edges become exposed to wear, moisture penetration, and physical damage that shortens the lifespan of your investment.
Edge trims serve three critical functions in residential and commercial spaces. First, they physically protect flooring edges from fraying, chipping, and cracking caused by foot traffic and furniture movement. Second, they eliminate trip hazards by smoothing height differences between adjacent floor surfaces or covering gaps that could catch feet. Third, they enhance visual appeal by creating intentional design boundaries that make flooring installations look purposeful and professionally finished.
The importance of edge trims becomes clear when you consider common problem areas. Carpet edges without trims unravel within months, especially in high-traffic doorways. Laminate and vinyl flooring expand and contract with temperature changes, creating gaps that collect dirt and moisture without proper edge coverage. Stairs present particular safety concerns, as exposed flooring edges can separate from treads or create uneven surfaces that increase fall risk.
Pro Tip: Measure all transition points in your home before purchasing trims to ensure you order sufficient lengths and identify areas requiring different profile types.
Edge trims prove essential in these specific applications:
- Doorway transitions between rooms with different flooring materials
- Stair nosings where carpet or hard flooring meets stair treads
- Perimeter edges where flooring meets skirting boards or walls
- Expansion gaps around laminate and engineered wood installations
- Wet area boundaries separating bathroom tiles from hallway carpet
Quality edge trims transform amateur-looking flooring jobs into polished installations. They signal attention to detail and protect your flooring investment from premature deterioration. Whether you’re completing a DIY project or supervising professional installers, understanding edge trim functions helps you specify the right products for lasting results.
Types of edge trim materials and their applications
Edge trim materials vary dramatically in durability, appearance, cost, and installation requirements. Selecting the appropriate material ensures your trims withstand the specific demands of each location whilst complementing your interior design scheme. Each material category offers distinct advantages for particular applications.
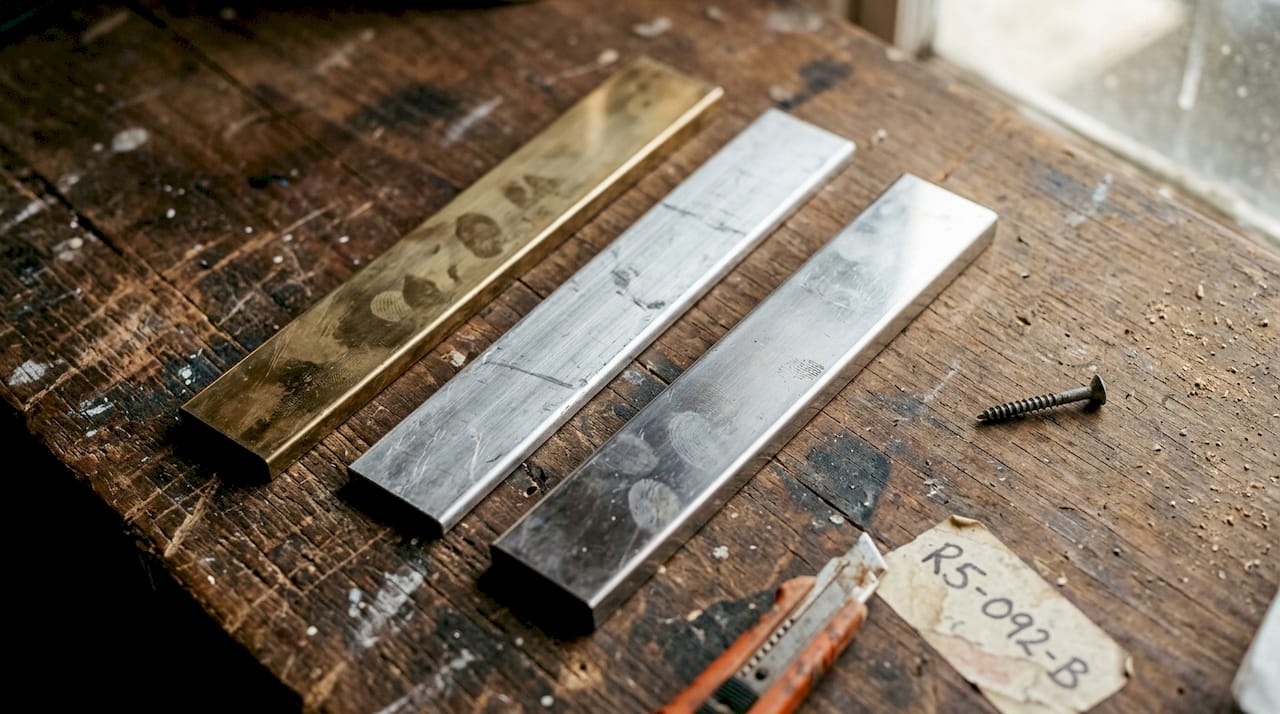
Solid metal trims, including brass, aluminium, and stainless steel, provide exceptional durability for high-traffic commercial environments and outdoor applications. These materials resist moisture, temperature fluctuations, and heavy foot traffic without warping or degrading. Metal trims suit modern, contemporary interiors and offer the longest service life, though they typically cost more than synthetic alternatives. Aluminium remains lightweight and corrosion-resistant, making it popular for exterior door thresholds and wet areas.
uPVC and PVC trims deliver versatile, low-maintenance solutions available in widths from 13mm to 100mm. These synthetic materials resist moisture completely, never requiring painting or sealing. PVC trims install quickly with adhesive or mechanical fixings and accommodate slight irregularities in floor surfaces. They suit bathrooms, kitchens, utility rooms, and commercial spaces requiring frequent cleaning. Colour options include white, black, grey, and wood-effect finishes that coordinate with various flooring styles.
MDF and solid wood trims appeal to traditional interiors and heritage properties where natural materials maintain period authenticity. These trims accept paint, stain, or varnish, allowing perfect colour matching with existing woodwork and skirting boards. Wood trims require more maintenance than synthetic options, needing periodic refinishing to prevent moisture damage. They work best in dry, climate-controlled interiors away from direct water exposure.
Rubber and flexible trims provide safety-focused solutions for areas requiring slip resistance and impact absorption. These materials compress slightly underfoot, reducing trip risk whilst protecting flooring edges. Rubber trims suit commercial kitchens, industrial facilities, care homes, and anywhere vulnerable individuals might fall. Their flexibility accommodates minor floor irregularities without creating gaps.
| Material | Best Applications | Key Advantages | Maintenance Level |
|---|---|---|---|
| Solid metal | High-traffic, outdoor, modern interiors | Maximum durability, moisture-proof, long lifespan | Very low |
| uPVC/PVC | Wet areas, easy-clean spaces, budget projects | Waterproof, quick installation, affordable | Very low |
| MDF/Wood | Traditional homes, painted finishes, period properties | Paintable, natural appearance, matches woodwork | Moderate to high |
| Rubber | Safety-critical areas, industrial, care facilities | Slip-resistant, flexible, impact-absorbing | Low |
Pro Tip: Match trim material to the most demanding condition it will face rather than average use, as the weakest point determines overall performance and replacement frequency.
Consider these factors when selecting trim materials:
- Moisture exposure determines whether waterproof materials are essential
- Traffic levels indicate required durability and wear resistance
- Aesthetic preferences guide material choice for visual harmony
- Budget constraints may favour synthetic over natural materials
- Installation skill level affects which materials you can fit successfully
Understanding industry terminology helps you communicate requirements clearly with suppliers and installers. Familiarising yourself with flooring trim types ensures you specify products that meet both functional and aesthetic needs for each transition point in your project.
Common edge trim profiles and how to choose the right one for your project
Edge trim profiles describe the cross-sectional shape that determines how trims bridge flooring transitions and accommodate height differences. Selecting the correct profile ensures smooth, safe transitions whilst maintaining visual continuity between spaces. Each profile type solves specific transition challenges.
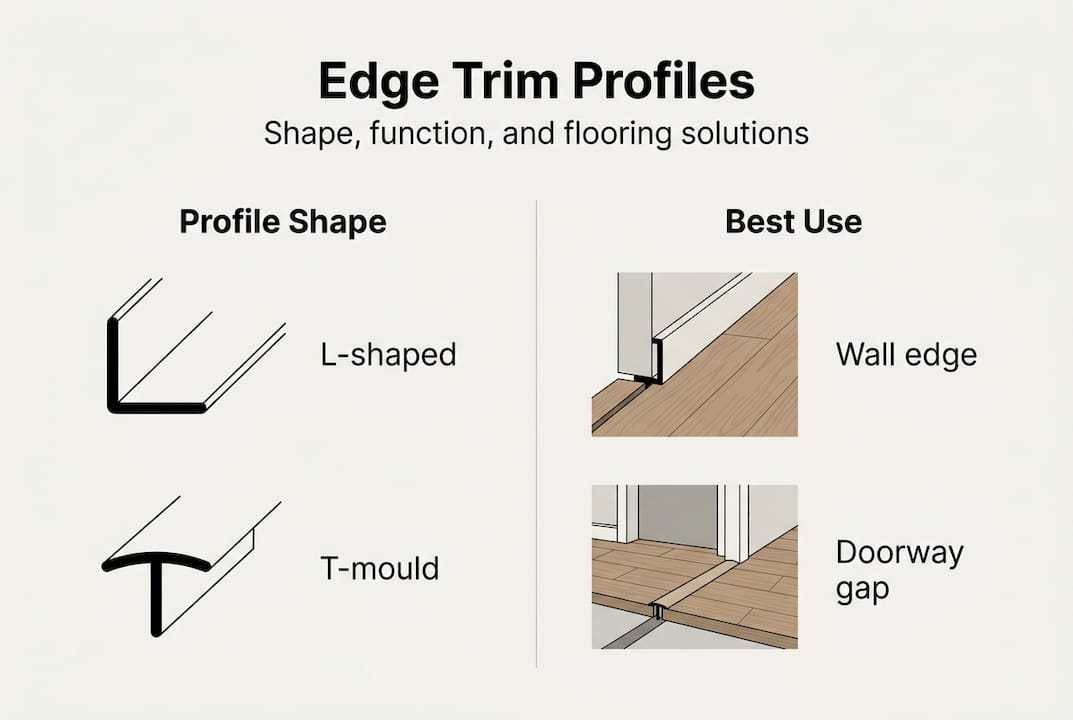
L-shaped profiles create neat finishing edges where flooring meets vertical surfaces like walls, steps, or raised platforms. The vertical leg conceals the flooring edge whilst the horizontal leg sits on the floor surface, creating a clean right angle. These profiles work brilliantly for carpet edges at stairs, laminate perimeters, and vinyl sheet terminations. L-profiles accommodate situations where flooring doesn’t continue beyond the trim location.
T-mould profiles bridge gaps between two floors at the same height, typically in doorways or large open-plan spaces requiring expansion gaps. The central spine sits in the gap whilst flanges extend over both floor surfaces, creating a smooth transition that allows independent movement. T-moulds prove essential for laminate and engineered wood installations that require expansion space but need visually connected rooms.
Overlap strips, also called transition strips, accommodate height differences up to 15mm between adjacent floor surfaces. One edge sits on the higher floor whilst the opposite edge overlaps the lower floor, creating a gentle ramp that eliminates trip hazards. These strips suit transitions from thick carpet to thin vinyl or from raised timber floors to concrete-backed tiles.
Threshold bars specifically address doorway transitions, combining weather resistance with aesthetic appeal. These robust profiles withstand door traffic, protect floor edges from impact damage, and often incorporate moisture barriers for exterior doors. Carpet trim profiles include specialised threshold designs that grip carpet edges securely whilst presenting polished metal surfaces to foot traffic.
Angle trims feature sloped profiles that guide smooth transitions between floors at different heights whilst maintaining a contemporary appearance. The angled face creates a visual flow between levels, making height differences less pronounced. These trims suit modern interiors and commercial spaces where design continuity matters.
Follow this selection process to identify the right profile:
- Measure the height difference between adjacent floor surfaces at each transition point
- Identify whether both floors will experience expansion and contraction or remain stable
- Assess traffic levels to determine required durability and width
- Consider visual impact and whether you want prominent or subtle transitions
- Verify that chosen profiles accommodate your specific flooring materials
- Confirm installation method compatibility with your subfloor type
| Profile Type | Height Difference | Best For | Installation Complexity |
|---|---|---|---|
| L-shaped | N/A (single floor) | Stair nosings, perimeter edges, terminations | Moderate |
| T-mould | 0-2mm (same level) | Doorways, expansion gaps, large rooms | Low |
| Overlap strip | 2-15mm | Mixed flooring heights, carpet to hard floor | Moderate |
| Threshold bar | 0-10mm | Exterior doors, high-traffic doorways | Moderate to high |
| Angle trim | 5-20mm | Contemporary transitions, commercial spaces | High |
Profile selection directly affects installation success and long-term performance. Incorrect profiles create trip hazards, allow moisture penetration, or fail to accommodate floor movement, leading to premature failure. Consulting a comprehensive flooring transition guide before purchasing ensures you specify products that match your project’s technical requirements.
Pro Tip: Purchase one extra trim length for complex installations, as cutting errors or damage during fitting can occur even with careful measurement and preparation.
How to install edge trims for a seamless flooring finish
Proper installation transforms quality edge trims into permanent, attractive flooring features that enhance safety and appearance. Following systematic installation steps ensures professional results whether you’re completing a DIY project or supervising contractors. Each installation phase requires specific attention to detail.
Preparation determines installation success more than any other factor. Clean all floor edges thoroughly, removing dust, adhesive residue, old trim fragments, and debris that could prevent secure bonding. Vacuum edges and wipe with a damp cloth, allowing surfaces to dry completely before proceeding. Check that floor edges are level and smooth, sanding high spots or filling gaps exceeding 2mm. Uneven surfaces prevent trims from sitting flush, creating visible gaps and reducing holding power.
Measuring and cutting require precision to avoid wasteful errors and achieve tight joints. Measure each transition separately rather than assuming identical lengths, as walls and doorways rarely run perfectly parallel. Add 3mm to each measurement for final trimming adjustments. Mark cut lines clearly on trim surfaces using a sharp pencil and straight edge. For metal trims, use a hacksaw with a fine-tooth blade and cutting guide to ensure square cuts. Synthetic trims cut cleanly with a sharp utility knife scored multiple times, then snapped. Always cut trims slightly long initially, test-fitting and trimming incrementally to achieve perfect lengths.
Securing methods vary by trim material and subfloor type. Metal trims typically require mechanical fixings like screws or pins driven through pre-drilled holes into wooden subfloors or wall plugs in concrete. Space fixings every 300-400mm for secure hold without creating visible fixing lines. Adhesive-backed trims bond to clean, dry surfaces when pressed firmly for 30 seconds per section. Contact adhesives provide stronger bonds for heavy-duty applications, requiring adhesive application to both trim and floor surfaces, allowing flash-off time before pressing together. Some profiles combine adhesive backing with mechanical fixings for maximum security in high-traffic locations.
Alignment and finishing separate amateur installations from professional results. Position trims carefully before securing, ensuring they sit perfectly straight and flush with floor surfaces. Use a spirit level for longer runs to detect subtle misalignment. Press trims firmly into position, checking that no gaps appear between trim and flooring. Wipe away excess adhesive immediately with appropriate solvents before it cures. For paintable wood or MDF trims, fill screw holes with matching wood filler, sand smooth when dry, then apply primer and topcoat to match existing woodwork.
Follow these installation steps systematically:
- Remove old trims carefully, avoiding damage to flooring edges or subfloors
- Clean and prepare all surfaces, ensuring they’re dry, level, and free from contaminants
- Measure each transition accurately, marking cut lines clearly on trim material
- Cut trims to length using appropriate tools, checking fit before permanent installation
- Apply adhesive or drill fixing holes according to manufacturer specifications
- Position trims precisely, checking alignment before securing permanently
- Secure trims with appropriate fixings, ensuring even pressure along entire length
- Clean excess adhesive immediately and allow adequate curing time before traffic
- Apply finishing touches like paint, sealant, or protective coatings as required
Pro Tip: Test-fit all trims before applying adhesive or drilling fixing holes, as corrections become difficult once permanent securing begins and mistakes waste expensive materials.
Common installation mistakes include rushing preparation, cutting trims too short, over-tightening screws that crack trims, and allowing foot traffic before adhesives fully cure. Taking time during each phase produces installations that remain secure and attractive for decades. Quality installing guidance provides detailed visual references that clarify complex steps and prevent costly errors.
Find high-quality edge trims for your flooring projects
You’ve learned how edge trims protect flooring investments, enhance safety, and create polished transitions between different floor coverings. Selecting quality trims from specialist suppliers ensures you receive products engineered for lasting performance rather than budget alternatives that fail prematurely.

Quality Carpet Trims supplies British-made solid metal door bars hand-finished in ten beautiful finishes to complement any interior scheme. Unlike inferior aluminium, wooden, stainless steel, or PVC alternatives, these premium trims deliver exceptional durability and timeless aesthetic appeal. The range includes matwell flooring trim solutions for entrance areas requiring robust, attractive finishing.
Explore comprehensive resources on flooring trim terminology to confidently specify requirements, and review detailed guidance on flooring trim types to identify perfect products for your project. Expert advice, free samples, and fast delivery support your flooring finishing success from specification through installation.
Frequently asked questions about edge trims
What length do edge trims typically come in?
Most edge trims are supplied in standard lengths of 900mm, 1800mm, or 2400mm to suit common doorway widths and room dimensions. Longer lengths up to 3000mm accommodate wider openings without joints. You can cut trims to exact requirements during installation.
Can edge trims be used outdoors?
Solid metal trims withstand outdoor conditions excellently, resisting moisture, temperature fluctuations, and UV exposure without degrading. Choose corrosion-resistant materials like aluminium or brass for exterior applications. Avoid wood and MDF trims outdoors as moisture causes swelling and deterioration.
How do I match edge trims to different flooring types?
Select trim profiles based on flooring thickness and transition type rather than material alone. L-profiles suit carpet edges, T-moulds work for laminate expansion gaps, and threshold bars bridge height differences between any flooring combination. Colour and finish should complement the dominant flooring material.
Is it possible to paint or customise wooden edge trims?
Wooden and MDF edge trims accept paint, stain, and varnish readily, allowing perfect colour matching with existing woodwork and décor. Sand trims lightly before applying primer, then finish with topcoat to match skirting boards or door frames. Allow adequate drying time before installation.
What maintenance do different trim materials require?
Metal and PVC trims need only occasional cleaning with damp cloths and mild detergent. Wooden trims require periodic inspection for moisture damage and refinishing every few years in high-traffic areas. Rubber trims benefit from occasional cleaning with appropriate solvents to remove embedded dirt and maintain slip resistance.
Recommended
- Installing Flooring Edge Trims for Seamless Floor Transitions
- Flooring Edge Trims: The Key to a Seamless Finish
- What is edge trim for vinyl? Professional flooring guide
- Flooring Trim: Ensuring Seamless, Safe Transitions