
Blog
Achieve seamless floor transitions: step-by-step UK guide

Apr
TL;DR:
- Proper floor transitions enhance safety, durability, and visual appeal of interiors.
- Selecting and installing the correct trim depends on flooring types, height differences, and substrate condition.
- Precise measuring, suitable tools, and methodical steps ensure professional, long-lasting results.
Uneven, unsightly floor edges are one of the quickest ways to undermine an otherwise well-designed room. Whether it’s a carpet meeting a tiled hallway or a laminate floor butting up against hardwood in an open-plan space, a poorly chosen or badly fitted trim draws the eye for all the wrong reasons. It can also create a genuine trip hazard. This guide walks you through everything you need to know: from understanding why transitions matter, to selecting the right trim, preparing your space, fitting it correctly, and troubleshooting any issues that arise. Follow these steps and you’ll achieve results that look truly professional.
Table of Contents
- Understanding floor transitions and their importance
- Planning for seamless transitions: materials, tools and preparation
- Step-by-step installation process for flawless results
- Troubleshooting and perfecting your floor transitions
- A designer’s perspective on seamless floor transitions
- Find the right flooring trims for your project
- Frequently asked questions
Key Takeaways
| Point | Details |
|---|---|
| Preparation is key | Careful measuring and trim selection solve most transition problems before they start. |
| Choose trims wisely | The right trim style ensures seamless movement, aesthetic unity, and safety in any space. |
| Follow proper installation steps | Step-by-step fitting and checks lead to durable and flawless transitions. |
| Review and maintain | Regular checks and maintenance keep transitions looking smart and performing safely. |
Understanding floor transitions and their importance
A floor transition is the point where two different flooring surfaces meet. At that junction, a trim or threshold bar is used to bridge the gap neatly and securely. Without one, you’re left with exposed edges, uneven surfaces, and an opening for dirt, moisture, and wear to creep in.
There are several types of transition points you’ll commonly encounter in UK homes and commercial spaces:
- Room to room: Where flooring changes between a hallway and a living room, or a kitchen and a dining area
- Carpet to hard floor: One of the most frequent pairings, requiring a trim that holds the carpet edge firmly
- Open-plan spaces: Large areas where different zones feature different materials for both practical and aesthetic reasons
- Exterior thresholds: Where interior flooring meets a doorstep or conservatory entrance
The aesthetic impact of a well-chosen trim is significant. It creates a unified appearance across your home and signals a level of care and craftsmanship. A finish that flows from room to room without jagged edges or raised lips simply feels more resolved.
Functionally, flooring trims protect edges and prevent tripping hazards, which is especially important in homes with elderly residents or young children, and in commercial settings where safety compliance is a legal requirement.
“A floor transition that’s been chosen thoughtlessly is the detail that gives away an amateur installation. Get it right, and the whole room lifts.”
Poor transitions accelerate wear on flooring edges, allow moisture ingress, and create visual clutter that disrupts an otherwise considered interior. Understanding the full range of flooring trims terminology before you shop will save you from costly mistakes and returns. Knowing the difference between a T-bar, a reducer, an edge trim, and a threshold bar means you’ll always order the correct product the first time.
The implications of getting this wrong go beyond aesthetics. Raised or loose trims cause falls. Incorrect profiles allow carpet edges to fray or laminate to lift over time. Investing a little time upfront in understanding what you need pays dividends every time someone walks across that floor.
Planning for seamless transitions: materials, tools and preparation
Once you’ve grasped why transitions matter, it’s time to get practical with what you need and how to prepare.
Start by surveying every transition point in your project. Note the two flooring types meeting at each point and measure the height difference between them. This difference is the single most important factor in selecting the right trim profile. As the correct trim choice depends on flooring type and height difference, guessing this will almost always lead to an ill-fitting result.
| Flooring pairing | Recommended trim type | Key consideration |
|---|---|---|
| Carpet to tile | Threshold bar with carpet gripper | Height difference and pile depth |
| Laminate to laminate | T-bar or flush reducer | Expansion gap management |
| Vinyl to hardwood | Reducer strip | Slope gradient for comfort |
| Carpet to laminate | Door bar with adjustable lip | Pile height variation |
| Tile to tile (same level) | Flat seam cover | Grouting and joint width |
For measuring, always take three measurements along the width of the transition and use the longest. Trims can be cut down, but they cannot be extended. Measure twice, order once.
Essential tools checklist:
- Steel tape measure and pencil
- Mitre saw or junior hacksaw with fine-tooth blade
- Power drill with appropriate bits
- Rubber mallet
- Adhesive (contact or grab adhesive depending on trim type)
- Protective gloves and eye protection
Subfloor preparation is often underestimated. The surface beneath your trim must be clean, flat, and dry. Any dust, adhesive residue, or debris will prevent a solid bond or cause the trim to sit unevenly. For uneven floor transition strips, extra care is needed to level or pack out the substrate before fixing.
Pro Tip: If the gap between your two floors is wider than standard due to an old door frame, subfloor step, or previous tile removal, consider an extra-wide threshold bar. These cover gaps of up to 60mm and save you from complex remediation work on the subfloor. Familiarise yourself with the correct flooring trim terminology so you can describe your situation accurately when ordering.
Step-by-step installation process for flawless results
With your materials and tools in hand, it’s time to put your plan into action.
Following methodical installation steps improves trim performance and long-term appearance, reducing the likelihood of callbacks or corrections. Here’s how to approach the installation:
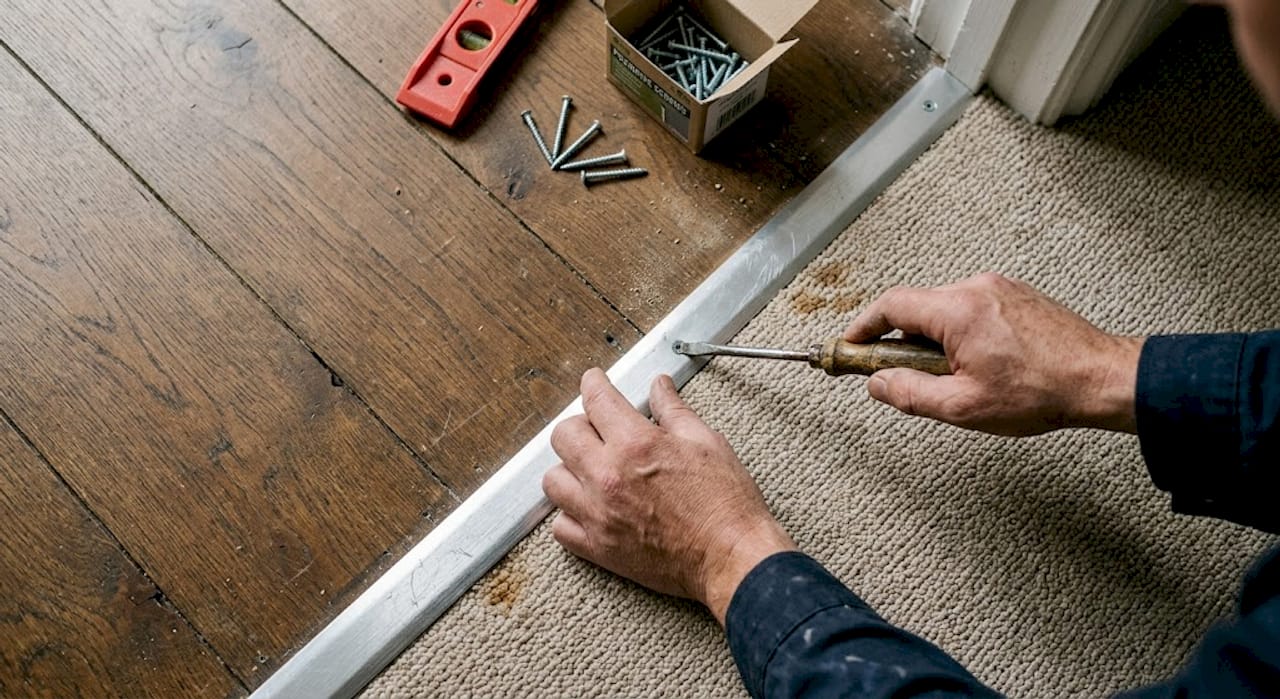
- Dry-fit first. Place your trim in position without fixing it. Check the fit, confirm alignment, and mark any cut lines with a pencil.
- Cut to length. Use a mitre saw or fine-tooth hacksaw. Cut slowly and cleanly. Wear eye protection throughout.
- Prepare the fixing channel or surface. For screw-down trims, drill pilot holes at the marked positions. For adhesive trims, apply grab adhesive in a continuous bead along the substrate.
- Fix the trim securely. Screw-down trims should be tightened evenly to avoid bowing. Press adhesive trims firmly and hold for the manufacturer’s recommended time.
- Check for level alignment. Run a spirit level along the trim. Any rocking or raised edges should be addressed before adhesive sets or screws are fully tightened.
- Fit the top cap or decorative cover (if applicable). Snap or press into place with a rubber mallet, protecting the surface with a cloth.
| Fixing method | Pros | Cons |
|---|---|---|
| Mechanical (screw-down) | Strong, permanent, repositionable | Requires drilling, visible fixings possible |
| Adhesive (grab or contact) | No drilling, clean finish | Less forgiving, harder to remove |
| Combination | Maximum hold | More time-consuming to install |
Safety note: When drilling into concrete or tile, always check for concealed pipes and cables using a detection device. When using adhesive, ensure adequate ventilation.
Pro Tip: In open-plan layouts, achieving invisible joins is about alignment with existing grout lines or board edges. Plan the position of your trim before you lay the floor on either side, not after. Refer to the detailed transitions guide for guidance on complex multi-material installations.
Troubleshooting and perfecting your floor transitions
After installation, achieving perfection often comes down to the final checks and fixes.
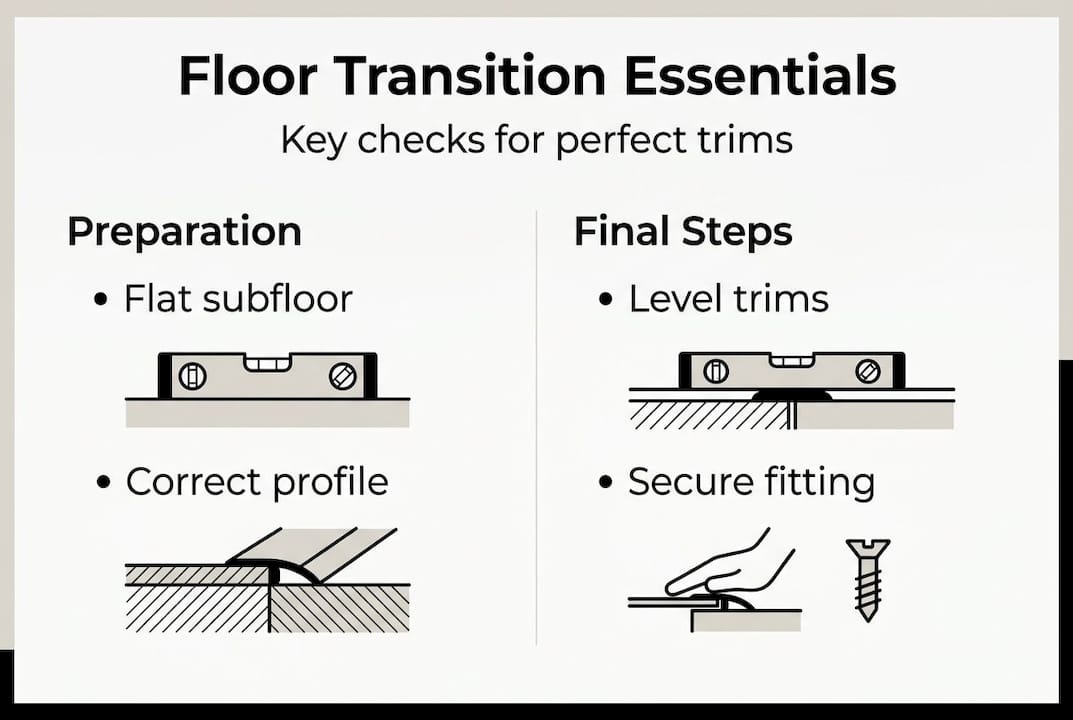
Begin with a visual and physical inspection. Walk across the transition point. It should feel smooth underfoot with no rocking, clicking, or sharp edges. Look along the trim from a low angle to catch any bowing or misalignment that isn’t obvious from above.
Common issues and how to address them:
- Loose trim: Re-drill and use longer screws, or apply additional grab adhesive underneath and clamp until set
- Visible gap at one end: Usually caused by an out-of-square doorframe; use a flexible sealant in a matching colour to close the gap neatly
- Squeaking underfoot: Often caused by the trim moving slightly; add a thin bead of adhesive beneath the trim and weigh down overnight
- Height mismatch after fitting: Floor level transitions that are corrected promptly prevent trip hazards and extend the life of the trim
- Trim too wide for the doorway: Score and snap or re-cut; never force a trim that doesn’t fit cleanly
For long-term care, wipe solid metal trims regularly with a damp cloth. Avoid harsh chemical cleaners that could strip the hand-applied finish. Our trims are solid metal and hand-finished, which means they’re built to last, but a little routine attention keeps them looking their best.
Important: Never install a trim that obstructs the swing or seal of a fire door. This is a building regulations requirement in the UK and a serious safety consideration in any commercial project.
For awkward height differences, consider a ramped reducer profile. These create a gentle gradient between two surfaces, which is both safer and more visually refined than a steep lip.
A designer’s perspective on seamless floor transitions
Here’s something most fitting guides won’t tell you: the trim is never the afterthought. It’s the punctuation mark of a well-designed floor scheme. Get it right and nobody notices. Get it wrong and it’s the only thing people see.
The biggest mistake we see, even from experienced contractors, is prioritising aesthetic finish over safety profile. Choosing a slim, low-profile trim because it looks elegant, when the height difference actually demands a ramped reducer, is a decision that creates liability and discomfort. The reverse is equally problematic: installing a heavy industrial threshold in a domestic bedroom because it feels “more secure” creates an ugly, oversized detail that cheapens the surrounding finishes.
The real insight is that a well-chosen trim, in the right finish, actually adds value. A solid metal threshold in a brushed finish costs a fraction of the flooring it connects, yet it can make a £3,000 floor installation look genuinely bespoke. Buyers and designers notice these details at viewings. They signal quality craftsmanship at every step.
We also believe strongly that professional transition methods should be accessible to every homeowner, not just trade customers. The knowledge gap between DIY and professional results is rarely about skill. It’s almost always about knowing which product to use.
Find the right flooring trims for your project
Choosing the right trim from a specialist supplier makes a genuine difference to your finished result. At Quality Carpet Trims, we supply solid metal door bars and thresholds, hand-finished in 10 beautiful finishes, so you’ll always find something that complements your interior.

Whether you’re looking for matwell trims for an entrance area or need to brush up on flooring trim terminology before you order, we’ve made it easy to get the right product first time. Free samples, fast UK delivery, and expert advice are all available when you browse all trims and find the profile that suits your flooring pairing perfectly.
Frequently asked questions
What are the most common floor transition trims in UK homes?
Typical trims include door threshold bars, carpet to hard floor trims, matwells, and edge trims, with the best choice depending on which flooring types are meeting and the height difference between them.
How do I ensure my floor transitions are safe and compliant?
Correct transition design ensures safety and legal compliance, so always minimise level differences, fit trims securely, and ensure transitions never obstruct fire doors or emergency exits.
Can I retrofit trims to existing floors without removing them?
Yes, adhesive trims suit retrofitting in many situations, provided the substrate is clean, dry, and free from dust or old adhesive residue before application.
Which trims suit underfloor heating installations?
Floating and expansion trims work well over underfloor heating systems, allowing for slight movement caused by thermal expansion and contraction during heating cycles.
Recommended
- Perfect bathroom floor transitions: step-by-step UK guide
- Floor level transition guide for UK homeowners 2026
- What is a flooring transition: guide for UK homeowners 2026
- How to Choose Flooring Transitions: Cut Trip Hazards 30%
- Guide complet pour installer un habillage d’escalier durable